Ram Heavy Duty Forum

Register a free account today to become a member! Once signed in, you'll be able to participate on this site by adding your own topics and posts, as well as connect with other members through your own private inbox!

What did you do TO your RAM today?

Johnnynapalm

Member
Joined
Jan 19, 2021
Messages
49
Reaction score
61
Care to share more details on the setup to protect the Retrax canister? I’ve been trying to figure out the best way to do that myself.
Sure! This was Clownpockets idea - to measure the inside of the bed, where you would want the extruded aluminum to be. I cut a piece of cardboard to make sure the fit was tight. I ordered 2 angle brackets from McMasterCarr to hold it in place. I drilled a hole and installed a rivnut for the angle brackets but on the inside so it looks like the extruded aluminum is floating there. It was a tight project but well worth it.

With the rack, I’m working on a basket over the canister using linear slides and extruded aluminum. Not quite done yet but when it’s close, I’ll post pictures of this too.
 

DougB

Well-Known Member
Joined
Jun 5, 2020
Messages
883
Reaction score
1,539
Location
Round Rock, TX
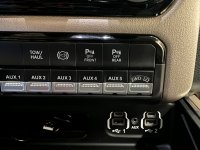
Installed BD Diesel’s 2WD low kit. Didn’t really have a need for it but wife/kids needed a gift idea for me a while back so :cool:

Finally had a reason to use the AUX switches. Setup AUX6 to control it. The tutorial thread on here helped me get that setup.

Did a hack job on the label that comes with the kit. It’s ok but think I have some white on black label tape at the office so I can make a better one.

A3C75BBD-4E5D-4A40-A473-E6489383CD9C.jpeg
 

GatorNation

Active Member
Joined
Feb 16, 2020
Messages
30
Reaction score
137
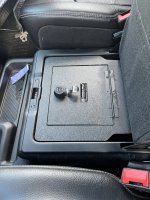
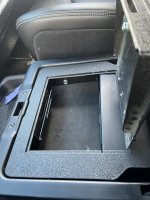
Modified the Console Vault under bench “safe” to fit my 2019 PW with cd player. Apparently the last year for cd in that location? So I removed the hidden hinge to accommodate the player and added a piano hinge from Amazon. Still need to clean it up a bit but I’m pleased.

IMG_3235.jpeg
 

Attachments

  • IMG_3236.jpeg
    IMG_3236.jpeg
    684.7 KB · Views: 65

Grey

Well-Known Member
Joined
Sep 26, 2023
Messages
190
Reaction score
299
Used the new AEV Procal snap, adjusted the TPMS pressure down to 45 for general daily driving. Tires are at 50, see how that does for a few days. Might push the back wheels up 5 pounds. Run around a few miles and check
 

Rockcrawlindude

a rock crawlin’ dude
Joined
Jan 1, 2021
Messages
6,336
Reaction score
16,433
Location
Georgia USA
Used the new AEV Procal snap, adjusted the TPMS pressure down to 45 for general daily driving. Tires are at 50, see how that does for a few days. Might push the back wheels up 5 pounds. Run around a few miles and check
I keep my 2500 at 45psi all around, It’s a good setup for me and allows for a load in the rear without adjustment. Scale weight on my rig is 8220 (4540f/3680r) and my tires are 129load 80psi max @ 4080lb.

I have my tpms set to 45psi and the light comes on closer to 35psi I’m not sure the threshold but I think it’s something like 25% less than whatever it’s set to.
 

Mikerob14

Member
Joined
Jul 30, 2022
Messages
83
Reaction score
61
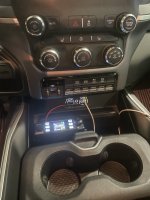
Well, didn’t do all this today, but just hadn’t gotten around to talking about it. Got the windows tinted about two weeks ago with Xpel XR ceramic Tint. With the help of @44Dan44, I was able to run AUX 5 and 6 power to the rear of the truck. In doing so, I created a really great setup for in cab power for a dash cam.
Decided on going with the Blackvue DR900X-2CH as I really like the look and functionality of the camera. Plus having the rear was a necessity as south Florida is a nightmare to drive in, much less in a 1 ton tank…
Routed the cables for the rear camera over the headliner, that process was a little involved but nothing too crazy. Us Mega Cab folks will run out of cable trying to route things to the rear so need to get creative. Ran Batt, IGN and Ground down the driver’s side A pillar and hooked into the new wiring I had set up.
I also hooked up a fellow members anti theft, very pleased with how that turned out. In addition, I added the KYKR screen protector to the 12” tablet up front. I went with the matte, and while I don’t have much to base it on from before as far as glare goes, it doesn’t have any glare now, and I like how it looks on the screen. I would recommend that if your on the fence.
Now we return to the tint. While I like the product, as I looked pretty extensively before hand, I’m not pleased with the shop right now. I went to detail the inside of the truck today and when I was cleaning the windows, I realized that two of the six window tints were scratched from the install, and all except one window had fuzzies, dirt or other nonsense under the tiny. So now I get to go by the shop tomorrow and tell them they get to redo every single window, as I paid around $750 for this and to be honest the guy that did my Durango for $400 did a much better job. Pretty productive last few weeks and still have a few more projects forthcoming.
 

Grey

Well-Known Member
Joined
Sep 26, 2023
Messages
190
Reaction score
299
Well, didn’t do all this today, but just hadn’t gotten around to talking about it. Got the windows tinted about two weeks ago with Xpel XR ceramic Tint. With the help of @44Dan44, I was able to run AUX 5 and 6 power to the rear of the truck. In doing so, I created a really great setup for in cab power for a dash cam.
Decided on going with the Blackvue DR900X-2CH as I really like the look and functionality of the camera. Plus having the rear was a necessity as south Florida is a nightmare to drive in, much less in a 1 ton tank…
Routed the cables for the rear camera over the headliner, that process was a little involved but nothing too crazy. Us Mega Cab folks will run out of cable trying to route things to the rear so need to get creative. Ran Batt, IGN and Ground down the driver’s side A pillar and hooked into the new wiring I had set up.
I also hooked up a fellow members anti theft, very pleased with how that turned out. In addition, I added the KYKR screen protector to the 12” tablet up front. I went with the matte, and while I don’t have much to base it on from before as far as glare goes, it doesn’t have any glare now, and I like how it looks on the screen. I would recommend that if your on the fence.
Now we return to the tint. While I like the product, as I looked pretty extensively before hand, I’m not pleased with the shop right now. I went to detail the inside of the truck today and when I was cleaning the windows, I realized that two of the six window tints were scratched from the install, and all except one window had fuzzies, dirt or other nonsense under the tiny. So now I get to go by the shop tomorrow and tell them they get to redo every single window, as I paid around $750 for this and to be honest the guy that did my Durango for $400 did a much better job. Pretty productive last few weeks and still have a few more projects forthcoming.
That is a hand full of stuff guy.
 

deanfx

Active Member
Joined
Jul 2, 2023
Messages
166
Reaction score
142
Well, didn’t do all this today, but just hadn’t gotten around to talking about it. Got the windows tinted about two weeks ago with Xpel XR ceramic Tint. With the help of @44Dan44, I was able to run AUX 5 and 6 power to the rear of the truck. In doing so, I created a really great setup for in cab power for a dash cam.
Decided on going with the Blackvue DR900X-2CH as I really like the look and functionality of the camera. Plus having the rear was a necessity as south Florida is a nightmare to drive in, much less in a 1 ton tank…
Routed the cables for the rear camera over the headliner, that process was a little involved but nothing too crazy. Us Mega Cab folks will run out of cable trying to route things to the rear so need to get creative. Ran Batt, IGN and Ground down the driver’s side A pillar and hooked into the new wiring I had set up.
I also hooked up a fellow members anti theft, very pleased with how that turned out. In addition, I added the KYKR screen protector to the 12” tablet up front. I went with the matte, and while I don’t have much to base it on from before as far as glare goes, it doesn’t have any glare now, and I like how it looks on the screen. I would recommend that if your on the fence.
Now we return to the tint. While I like the product, as I looked pretty extensively before hand, I’m not pleased with the shop right now. I went to detail the inside of the truck today and when I was cleaning the windows, I realized that two of the six window tints were scratched from the install, and all except one window had fuzzies, dirt or other nonsense under the tiny. So now I get to go by the shop tomorrow and tell them they get to redo every single window, as I paid around $750 for this and to be honest the guy that did my Durango for $400 did a much better job. Pretty productive last few weeks and still have a few more projects forthcoming.
When I had my previous trucks windshield ceramic tint installed the shop scratched my dash and I had a hair in the tint. It was terrible. I had a different shop do the tint on my new truck and it turned out better. Gah I hate trusting these places with my vehicles.
 

JRM222500

Member
Joined
Nov 14, 2023
Messages
15
Reaction score
28
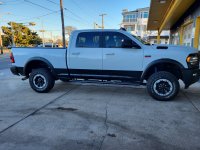
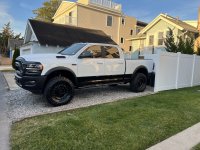
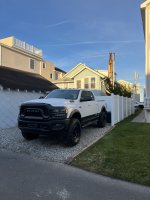
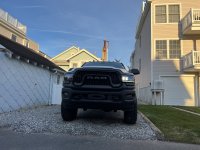
Here’s the finished product after everyone’s helpful suggestions. Thuren front: .5” leveling kit w fox shocks, sway bar links, track bar. Rear: Thuren 1” coils, fox shocks, track bar. Shock boots. Method MR315 17x37 +25. Nitto Ridge Grappler 37 x 12.5. Minor trimming. No rubbing fully flexed. Rides better than stock!

Attachments​

  • Resized_20231214_154238.jpeg
    Resized_20231214_154238.jpeg
    820.3 KB · Views: 11
  • IMG_2547.jpeg
    IMG_2547.jpeg
    815.2 KB · Views: 10
  • IMG_2549.jpeg
    IMG_2549.jpeg
    543.9 KB · Views: 9
  • IMG_2551.jpeg
    IMG_2551.jpeg
    577 KB · Views: 10
  • IMG_2554.jpeg
    IMG_2554.jpeg
    617.6 KB · Views: 11
  • IMG_2552.jpeg
    IMG_2552.jpeg
    793.4 KB · Views: 11
 

Groove1797

New Member
Joined
Jul 21, 2023
Messages
6
Reaction score
2
Here’s the finished product after everyone’s helpful suggestions. Thuren front: .5” leveling kit w fox shocks, sway bar links, track bar. Rear: Thuren 1” coils, fox shocks, track bar. Shock boots. Method MR315 17x37 +25. Nitto Ridge Grappler 37 x 12.5. Minor trimming. No rubbing fully flexed. Rides better than stock!

Attachments​

  • Resized_20231214_154238.jpeg
    Resized_20231214_154238.jpeg
    820.3 KB · Views: 11
  • IMG_2547.jpeg
    IMG_2547.jpeg
    815.2 KB · Views: 10
  • IMG_2549.jpeg
    IMG_2549.jpeg
    543.9 KB · Views: 9
  • IMG_2551.jpeg
    IMG_2551.jpeg
    577 KB · Views: 10
  • IMG_2554.jpeg
    IMG_2554.jpeg
    617.6 KB · Views: 11
  • IMG_2552.jpeg
    IMG_2552.jpeg
    793.4 KB · Views: 11
That looks great!

How has the gas mileage changed and did you weigh the new and old setup by chance?

Thanks
 

Users who are viewing this thread

Top