Ram Heavy Duty Forum

Register a free account today to become a member! Once signed in, you'll be able to participate on this site by adding your own topics and posts, as well as connect with other members through your own private inbox!

mopar Power Deployable Running Boards

johanh13

Active Member
Joined
Aug 10, 2019
Messages
189
Reaction score
113
Looks good. One thing I failed to mention and didn’t think about- Can Bus wires should be twisted pairs to even out any interference they may pick up. It shouldn’t be an issue here (more of a “best practice”), but if you aren’t too far along, take the two Can IHS wires and twist them together.

Yeah, I only put the cloth tape on the first 12" so far... how many twists, about one turn per 1-2" ?
 

ahhhr

Active Member
Joined
Sep 13, 2019
Messages
152
Reaction score
121
Nice job guys and a great thread.
But im sure as hell glad i got mine factory installed. I probably would have walked away from this project.
 

diezeldave

New Member
Joined
Jun 3, 2020
Messages
17
Reaction score
12
Dealership is installing these on my truck right now. Guess they had to special order some bracket since it has air suspension but it should be done tomorrow.
 

johanh13

Active Member
Joined
Aug 10, 2019
Messages
189
Reaction score
113
Dealership is installing these on my truck right now. Guess they had to special order some bracket since it has air suspension but it should be done tomorrow.
Would be very curious what parts they used and how much did they charge you ?
 

diezeldave

New Member
Joined
Jun 3, 2020
Messages
17
Reaction score
12
Would be very curious what parts they used and how much did they charge you ?

So take the accounting wizardry with a grain of salt since the price was worked in to the purchase price of the truck. They broke it down as $1400 for parts and $900 for labor which they waived as part of the truck purchase deal. $900 for labor seems a bit steep but it did sound like quite a bit of work to run the harness, install the steps, do the programming, etc. I'll try to get a parts list when I go pick up the truck. All I do know is there must be some difference between the normal suspension and the air suspension because they originally ordered some kind of wrong bracket that was causing the steps to rub paint somewhere. Moral of the story, 10000% order your trucks with the steps from factory. Way cheaper and easier.
 

powerwagon50

New Member
Joined
Jun 9, 2020
Messages
5
Reaction score
3
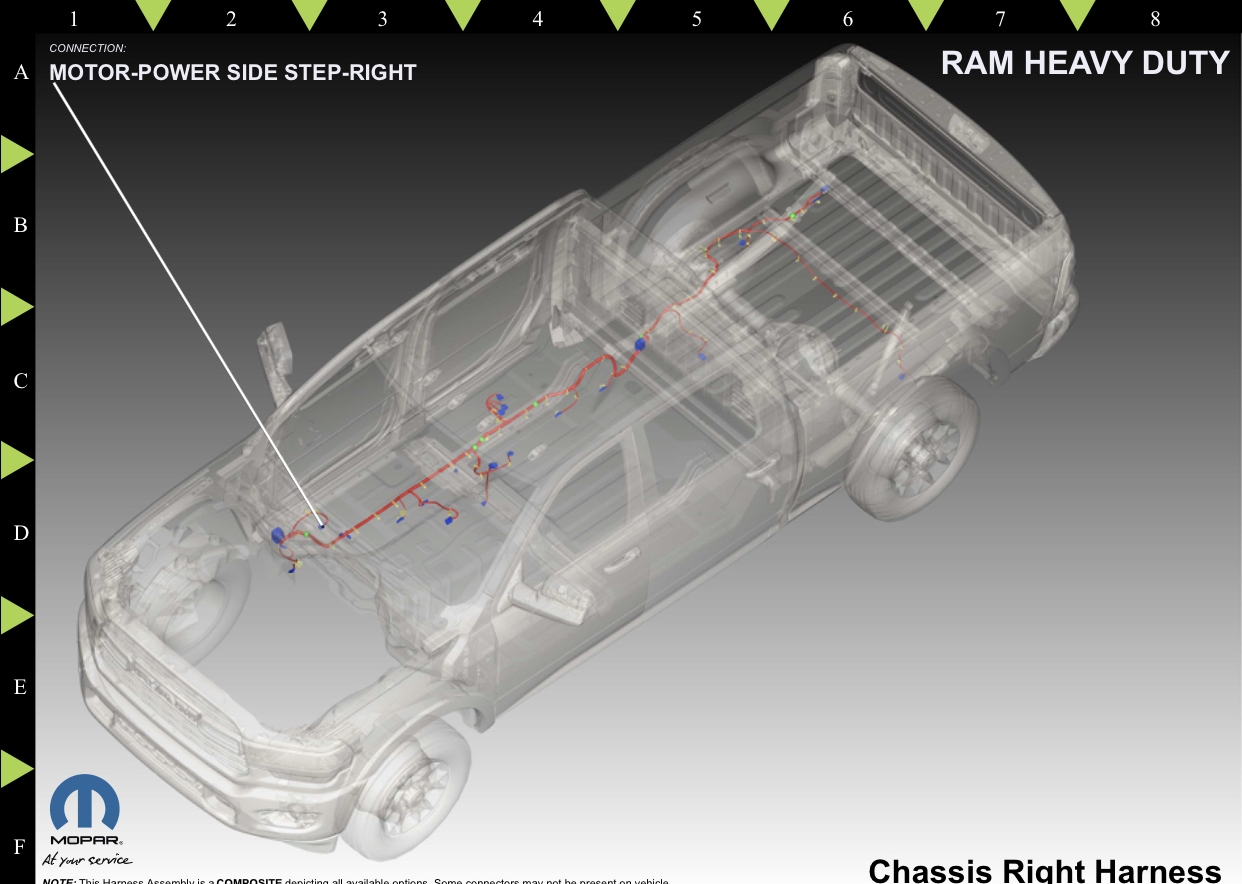
The reason for custom building the harness is ease of install. Here’s the route of the two chassis harnesses you ordered, so everything you see in red needs to be removed and replaced with the new ones-
ePiElyd.jpg
heRlsHu.jpg

It looks easy on paper, but once you get under there, you’re gonna be reaching up around all kinds of obstructions and trying to pull wire loom zip tie trees out of body holes, then fishing the new harnesses in.
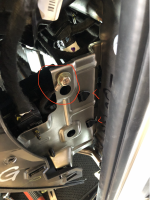
The module is at the passenger side of the glovebox area (I believe there’s a detailed pic earlier in the thread).
MqkH5zP.jpg

If the connector for it isn’t there, then you also need a different instrument panel harness, which requires dash removal to replace it. @johanh13 is building a stand alone custom harness that doesn’t require removal of any other factory harnesses, and it is using the exact same connectors and terminals as the factory uses, and will be connected to the hard parts just like factory. I believe he paid ~$70 for all materials to build the harness, whereas the two chassis harnesses alone are about $380, and that hasn’t even touched on whether or not you need to swap the instrument panel harness.
That makes sense. Thank you Jimmy for your input! Appreciate the effort and help. You speak of the the custom harness being built by johan using the same connectors and terminals. Where exactly is he attaching his custom harness? Im assuming he's going stand alone through the connector to the instrument panel and from there to the power steps correct? Will the switches appear on the uconnect screen in the vehicle?
 

Jimmy07

Re-coding from an easy-chair
Joined
Apr 5, 2020
Messages
2,785
Reaction score
3,654
That makes sense. Thank you Jimmy for your input! Appreciate the effort and help. You speak of the the custom harness being built by johan using the same connectors and terminals. Where exactly is he attaching his custom harness? Im assuming he's going stand alone through the connector to the instrument panel and from there to the power steps correct? Will the switches appear on the uconnect screen in the vehicle?
The harness originates at the power steps module. It’s easier if you think of each option on the truck as it’s own separate entity. In this case, the entire power steps option consists of the boards/motors, the module, and wiring. All modules for any given option only need three things from the truck to be able function- power, ground, and to be put online via canbus. The rest of the control wiring goes from the module to the hard parts. On a factory equipped truck, all this wiring is taped in with the rest of the wiring via inline connectors in the most efficient manner possible to save on wiring bundle sizes. If you look at the schematic for the power steps, and you bypass all those in-line connectors that contain other wiring, all you’re left with is a wire coming straight from the fuse box, a wire going straight to metal, two wires going to the canbus block, and five wires going to each step motor. The connector view sheets reveal the part numbers of the manufacturer’s connectors that FCA uses. Then you build the harness in a way that is easy to add without running through any of the truck’s connectors or wiring.
No feature that you add to the truck after the fact will “just work” without being enabled in the BCM. The dealer would do this by adding the sales code for the feature through dealer connect while connected to the truck. BUT...not all sales codes are available to add to all truck VINs, and it’s only what FCA decides to allow. Historically, if the option isn’t available on a certain trim level when buying the truck, then the sales code for that option won’t be available to add after the fact. If there is a kit for the feature, then the sales code will be available to all VINs. In the case of the member above that’s having the dealer add them as part of the truck sale, I would hope they connected the truck to dealer connect first to see if the sales code was available to add before starting the parts install.
Instead of even wasting time or money with the dealer (because you have to pay them whether it’s available or not) we just use AlfaOBD software to enable the settings in the BCM. It’ll be two settings that need to be enabled- one that brings the module online with the canbus, and one that puts the settings in the radio. This method configures the BCM just like it would be if factory equipped.
 

johanh13

Active Member
Joined
Aug 10, 2019
Messages
189
Reaction score
113
Getting bored waiting for my boards.... argh
Popped open the module, attached photo...
 

Attachments

  • pssm.png
    pssm.png
    3.7 MB · Views: 120

diezeldave

New Member
Joined
Jun 3, 2020
Messages
17
Reaction score
12
Went and picked the truck up today. Apparently, they just installed the AMP steps. The passenger side is binding since the air suspension tank is in the way apparently. They are just waiting for the right bracket from AMP then they will swap the brackets out. On the one hand, I am a little disappointed they didn't install the OEM step that integrates with the truck and gives options on the screen but on the other hand, I am happy they didn't have to tear apart the entire dash to run the harness. Every time I have had a service department take apart a dash, it has never been the same after. Lots of squeaking, rattling, damaged trim pieces, etc.
 

johanh13

Active Member
Joined
Aug 10, 2019
Messages
189
Reaction score
113
Ok, so my boards are installed and functional! I did catch a wiring error when I put the motor connectors on, so I had to swap two wires at the PSSM. I also still do not have the correct pin for the connection at the fuse box, so I hotwired it to confirm correct function. Much to my surprise, the boards worked right away without any programming! Obviously, to get the button on my screen, I will need to program the feature (will attempt that yet too!). Attached are a few photos... Many thanks to Jimmy07 for all his help, could not have done it without him! Let me know if you all have any questionsright motor connetor blue wire should be brown.png

c1 at PSSM had to swap blue and brown.png
driver side motor.pngpassenger side motor.png
through the firewall.png
grounded.png

homemade wire harness.png
 

johanh13

Active Member
Joined
Aug 10, 2019
Messages
189
Reaction score
113
Hey John,

Have you been about to get the oem power steps to work? Im currently working on adding the power steps to my 2019 power wagon. Ran into similar road blocks and issues. Bought the above listed parts and the chassis wiring that was ordered by the dealer doesn't have the connector for my rear differential locks.... other than the parts above are there any other requirements? Ive been reading through this thread and I see some custom harness work? This would definitely be beyond my scope of work. Let me know if you were able to get the oem steps to work?

Thanks,
Edd
Yes, my boards are now installed and functional (please see my other with post photos). Let me know if you have any questions!
 

Omar RVA

Active Member
Joined
Feb 26, 2020
Messages
144
Reaction score
206
Location
OR
Ok, so my boards are installed and functional! I did catch a wiring error when I put the motor connectors on, so I had to swap two wires at the PSSM. I also still do not have the correct pin for the connection at the fuse box, so I hotwired it to confirm correct function. Much to my surprise, the boards worked right away without any programming! Obviously, to get the button on my screen, I will need to program the feature (will attempt that yet too!). Attached are a few photos... Many thanks to Jimmy07 for all his help, could not have done it without him! Let me know if you all have any questionsView attachment 5261

View attachment 5262
View attachment 5263View attachment 5264
View attachment 5265
View attachment 5266

View attachment 5267

Power boards weren't an option on the Power Wagon and I wish they were. That said I would have never attempted this given the workload involved so a big congrats to you for getting this done. Great work! Others in the future will benefit from it.

OA
 

johanh13

Active Member
Joined
Aug 10, 2019
Messages
189
Reaction score
113
Ok, so I got the correct pin for the fuse box connection yesterday and put it in. Now just waiting for the bluetooth adapter so I can do the programming for the screen menu.... everything works great even as is!
 

Attachments

  • the right pin.png
    the right pin.png
    3.5 MB · Views: 152
  • left board deployed.png
    left board deployed.png
    4.1 MB · Views: 152
  • right board deployed.png
    right board deployed.png
    3.7 MB · Views: 142

Jimmy07

Re-coding from an easy-chair
Joined
Apr 5, 2020
Messages
2,785
Reaction score
3,654
Ok, so I got the correct pin for the fuse box connection yesterday and put it in. Now just waiting for the bluetooth adapter so I can do the programming for the screen menu.... everything works great even as is!
Now you’ve piqued my interest even more on these. I’ve been on the fence about getting the AMP steps for my 2017, but I had the thought in the back of my mind to try the 2019+ factory power steps. The only thing stopping me was the fact that my BCM isn’t capable of enabling the radio setting for them. Knowing now that they at least work like they are supposed to automatically using the BCM door ajar outputs, I’m going this route, as it is way cheaper than the AMP steps. I’ll deal with getting the radio setting to show up later with a BCM swap I have planned for other 2019+ features I’m adding to my 2017 anyway.
 

johanh13

Active Member
Joined
Aug 10, 2019
Messages
189
Reaction score
113
Now you’ve piqued my interest even more on these. I’ve been on the fence about getting the AMP steps for my 2017, but I had the thought in the back of my mind to try the 2019+ factory power steps. The only thing stopping me was the fact that my BCM isn’t capable of enabling the radio setting for them. Knowing now that they at least work like they are supposed to automatically using the BCM door ajar outputs, I’m going this route, as it is way cheaper than the AMP steps. I’ll deal with getting the radio setting to show up later with a BCM swap I have planned for other 2019+ features I’m adding to my 2017 anyway.
Yes, this project was very enjoyable and relatively easy (once I had all the info & parts). Keep us posted on your projects, I love learning how things work
 

powerwagon50

New Member
Joined
Jun 9, 2020
Messages
5
Reaction score
3
Yes, my boards are now installed and functional (please see my other with post photos). Let me know if you have any questions!
Hi Johan,

Thanks for the update! Congrats on the successful install. Was the module location in the same spot jimmy mentioned in his post? I believe its located behind he glove compartment if I'm not mistaken? Do you have a picture of the module installed? Thank you
 

johanh13

Active Member
Joined
Aug 10, 2019
Messages
189
Reaction score
113
Hi Johan,

Thanks for the update! Congrats on the successful install. Was the module location in the same spot jimmy mentioned in his post? I believe its located behind he glove compartment if I'm not mistaken? Do you have a picture of the module installed? Thank you

Yes, the module is on the passenger side of the dashboard. I do not have a very good photo, but attached what I have. The red arrows show the mounting bracket hooks, the other side has a screw (hidden from view). I circled the ground lug I used to connect the black wire. The module is behind the arrows and ground lug. I drilled a 10mm hole in the raw steel and inserted a rivnut for the ground connection...
 

Attachments

  • module loc.png
    module loc.png
    3.8 MB · Views: 116

Users who are viewing this thread

Top