
Thankful for this thread! It helped me finally get my dash cam installed. Instead of a mirror tap, I used this adapter and it worked great!!
Ram Heavy Duty Forum
You are using an out of date browser. It may not display this or other websites correctly.
You should upgrade or use an alternative browser.
You should upgrade or use an alternative browser.
Dash camera
- Thread starter carlrx7
- Start date
Thanks, relbus. The SimpleUSBPort adapter is currently unavailable on amazon. I sent a note to Dongar to make certain it will fit my 2019 Ram 2500. If so I will use your method to connect to power. This thread has been great to show how to install a dash cam, thanks for starting this discussion carlrx7
SFAngus
Well-Known Member
I'm adding that jumper from the AUX#6 pin to the G425 pass-through wire..
Mostly correct.
The crayon is my addition. I'm showing adding a jumper from AUX#6 to bring it back into the cab on the pass through wire G425. You could do the same with any AUX connection. You could also rewire the D connector to bring an AUX to the rear of the truck.
I think I've deciphered most of this, after reading all of these different threads... However, I'm still not clear on whether you can activate the power at the rear of the truck AND also activate the in-cab switched/battery fed wires simultaneously. Is that possible?
Thanks in advance!
Has anyone used an OBDII connection for powering a dash cam? Acedashcam, 290 N Benson Ave. #6, Upland, CA 91786, USA is a shop that makes a connector in house and seems to have a good reputation. I think I will use this and if it does not work well will just do a direct to battery connection. It certainly is a simple way to connect a dash cam to power. I have a 12" Uconnect system which I would hate to mess up, however.
If i might add my couple of comments...i just got my 2021 3500, has the PTO and Aux switches. didnt want to lose an AUX switch for an 'always on' radar detector and dash cam...so i reviewed the 2019 Upfitter Schematic. the first 4 times i tried to read it, my head hurt. electrical diagrams aint in my wheelhouse. anyway, but through the help of so many good posts, i went to look at the Upfitter kit that comes with the truck in the big zip lock bag. in there are the bladed connectors that plug into the grey and dark grey ports in the engine bay for the aux switches, etc. but there is also a light grey connector with 6 pins on it. its loose. its a male connector. there are wires terminated on the pins. one wire goes from one pin on the connector to another. you can see that as pins 3 and 4 are connected by what looked to be a 12 inch Red/White (rd/wht) wire. and then pins 1 and 6 are connected by a pink orange. what this is, i believe is "power (whether ignition or straight feed from battery) coming into lets say pin 6, going along the 12 inch wire and being fed into pin 1 which leads to the rear of the truck wires. straight battery power comes in on pin 3, goes along that 12 inch piece of red/white and out to the rear of the truck.
that loose connector snaps into its female counterpart of exactly the same light grey color which is buried up there under the dash, took me a few minutes to figure out how to snap it in with one hand and i swore at the ram engineers a few times. but it went it. really no big deal just not comfortable as i have big hands.
now i had wires near the brake pedal hanging down, the 2 (red/white and pink/orange) heading back up as they are the jumpers. i cut the pink/orange right in the middle as the pink orange is the pin 6->pin1 pass thru of SWITCHED juice which is what i want. the juice comes in on 6 and out on 1, so i stripped back 6 just a bit. put a multimeter on the stripped exposed copper, car was off. no voltage. turned on the car, 12 volts.
so basically , if you want 12v in the cab without tapping another thing or splicing wires, just connect that connector to the female side underneath the dash. decide if you want straight battery or ignition-fed 12v...cut the appropriate jumper in the middle and then connect your radar kit/dashcam kit to it.
then you can run it along the A-pillar under the rubber seam.
if you havent looked at your bag of AUX/PTO cables, do so and this will all make more sense.
i guess now i dont have power going to the rear of the truck though right now i dont have a need. if i did, i guess i could splice it back together along with my radar detector power wire.
and if you dont have the pto aux bag of goodies, im sure there are other good ways. someone suggested putting a small fuse box in side the cabin, which i thought about which would make hooking up other things a lot easier. you could run that pink/orange to a small fuse block, and have a common ground, then anything else would easily be run right to that area. it would be nice if they would put the AUX upfitter connectors with easy snap in terminals inside the cabin as some put as much inside as outside and who the heck wants to hackup trim panels.
View attachment 14760
Thanks for sharing and welcome to HDRams.
That said, had you bothered to read the entire thread, you would see these details have been covered quite extensively. I'm not digging on you so please don't take offense, just pointing out that the additional clutter doesn't add anything new to the thread.
Additionally, the 2021 is significantly different in that there are 4 new "pass-through" circuits in addition to the IGN+ and BAT+ wires you called out, so you should be looking at the upfitter wiring for the 2021 trucks.
D2433A has a total of 6 wired circuits and D2621A has an additional pass-thru circuit. Also covered in the Aux pass-thru wiring thread here:
AUX pass-thru wiring.
mine is a '19, yes Did you just buy the parts from the dealer, or is there someplace putting together a kit?
 hdrams.com
spg993tt
New Member
- Joined
- Apr 11, 2021
- Messages
- 28
- Reaction score
- 19
brutal, thx a ton. great info up here. thx for pointing me in the right direction. somehow i kept looking at the schematic for our 2019 and didnt realize it was updated for 2021. love that they added the 3 more passthrus.
would you go from one of the Aux's to the 4 passthrus (some type of solder,crimp, heat shrink solder) to connect. or. would you run it from Aux 4, lets say to port 4 on the 2nd/lighter grey AUX PDC connector right next to the connector 1 in the engine area.? using port 4 to port 4 with a small bridge wire with pin connectors on each end would give a nice water tight, but removable connection. you see a downside to going that route, using a connector wire to from one connector to the port4 on connector 2 (which passes thru to port5 under the dash on that light grey connector).
lastly, in looking at the AUX PDC Connector 2, the lighter of the two, i think it sits just below the darker grey 4 pin connector up top, i cant figure out how to remove the removable section. the top connector#1 lighter color was no problem. a push clip and pull and the outer piece comes right off.
the lower one i cant figure out. seems like there is a red sliding lock. i pushed that rearward as far as it would go and the outer piece wont comes off.
and its super tight in there, hard to access with one hand which is all i can fit back there.
sorry to ask, any quick tips to get that outer section off thta connector2.
tx again for all your support, tons of great info up here.
Thanks for sharing and welcome to HDRams.
That said, had you bothered to read the entire thread, you would see these details have been covered quite extensively. I'm not digging on you so please don't take offense, just pointing out that the additional clutter doesn't add anything new to the thread.
Additionally, the 2021 is significantly different in that there are 4 new "pass-through" circuits in addition to the IGN+ and BAT+ wires you called out, so you should be looking at the upfitter wiring for the 2021 trucks.
D2433A has a total of 6 wired circuits and D2621A has an additional pass-thru circuit. Also covered in the Aux pass-thru wiring thread here:
AUX pass-thru wiring.
mine is a '19, yes Did you just buy the parts from the dealer, or is there someplace putting together a kit?
spg993tt
New Member
- Joined
- Apr 11, 2021
- Messages
- 28
- Reaction score
- 19
got that lower connector off. just had to slide that red lock rearward and then there is a tiny push latch problem is, atleast on my truck its angle away /downwards almost and its super hard to see, let alone get a hand in there. didnt want to use a screw driver for fear of dropping it in there, and i couldnt get two hands, but just hand gymnastics and i got it out. thx in advance again. ill say this, some great stuff going on there these days with the electronics on the truck but i think some of these connectors, their placement could be different. for example, the upper connector is simpler, easier to remove, why not put that underneat the the white one which is harder to release, has an extra step (the red sliding lock) and is further complicated by being in the worse of the two positions. the light grey and white connectors under the dash are really buried in tight spaces where you're lucky if you can one hand it at best. neat stuff.
brutal, thx a ton. great info up here. thx for pointing me in the right direction. somehow i kept looking at the schematic for our 2019 and didnt realize it was updated for 2021. love that they added the 3 more passthrus.
would you go from one of the Aux's to the 4 passthrus (some type of solder,crimp, heat shrink solder) to connect. or. would you run it from Aux 4, lets say to port 4 on the 2nd/lighter grey AUX PDC connector right next to the connector 1 in the engine area.? using port 4 to port 4 with a small bridge wire with pin connectors on each end would give a nice water tight, but removable connection. you see a downside to going that route, using a connector wire to from one connector to the port4 on connector 2 (which passes thru to port5 under the dash on that light grey connector).
lastly, in looking at the AUX PDC Connector 2, the lighter of the two, i think it sits just below the darker grey 4 pin connector up top, i cant figure out how to remove the removable section. the top connector#1 lighter color was no problem. a push clip and pull and the outer piece comes right off.
the lower one i cant figure out. seems like there is a red sliding lock. i pushed that rearward as far as it would go and the outer piece wont comes off.
and its super tight in there, hard to access with one hand which is all i can fit back there.
sorry to ask, any quick tips to get that outer section off thta connector2.
tx again for all your support, tons of great info up here.
If you're going to loop an AUX connector pin to one of the pas through blunt cut wire's, I would put each of them in another similar weatherpak type (or identical) 4-way connector to the AUX connector(s) already there. Then you can just run a jumper wire or connect to something else and it's easily reconfigured.
spg993tt
New Member
- Joined
- Apr 11, 2021
- Messages
- 28
- Reaction score
- 19
u have a part # for that connector? the seals look like weatherpak but a quick look on their site, i cant seem to find one that looks like those 2 that are in there already, though i guess it doesnt matter if exact, would be nice to get a few extra connecting pins when if you change anything. the connectors in that engine bay area are the flat spade looking connectors. any specs out there on the connectors and the pins, the housing?If you're going to loop an AUX connector pin to one of the pas through blunt cut wire's, I would put each of them in another similar weatherpak type (or identical) 4-way connector to the AUX connector(s) already there. Then you can just run a jumper wire or connect to something else and it's easily reconfigured.
u have a part # for that connector? the seals look like weatherpak but a quick look on their site, i cant seem to find one that looks like those 2 that are in there already, though i guess it doesnt matter if exact, would be nice to get a few extra connecting pins when if you change anything. the connectors in that engine bay area are the flat spade looking connectors. any specs out there on the connectors and the pins, the housing?
I don't have the factory connector part# handy, perhaps @Jimmy07 can post it up.
RAM uses several vendors, mostly TE and Yazaki.
u have a part # for that connector? the seals look like weatherpak but a quick look on their site, i cant seem to find one that looks like those 2 that are in there already, though i guess it doesnt matter if exact, would be nice to get a few extra connecting pins when if you change anything. the connectors in that engine bay area are the flat spade looking connectors. any specs out there on the connectors and the pins, the housing?
The two 4-way aux output connectors on the aux PDC are Yazaki 7282-5595-10 for the dark grey connector, and Yazaki 7282-5595-40 for the light gray. The male terminals for both of them are Yazaki 7114-4140-02. The wire seals are 7158-3081-50, and the unused port seals are 7158-3080-60I don't have the factory connector part# handy, perhaps @Jimmy07 can post it up.
RAM uses several vendors, mostly TE and Yazaki.
The two 4-way aux output connectors on the aux PDC are Yazaki 7282-5595-10 for the dark grey connector, and Yazaki 7282-5595-40 for the light gray. The male terminals for both of them are Yazaki 7114-4140-02. The wire seals are 7158-3081-50, and the unused port seals are 7158-3080-60
Thanks Jimmy!
Those are the accessory side?
Checking the data sheet, it looks like 7283-5929-10 for the female (truck side) connector, and 7116-4140-02 for the female terminals?
Correct, those are the accessory side that accept the male spades. 7283-5929-40 mates with 7282-5595-40, and 7283-3108-10 mates with 7282-5595-10. They are the same body, but keyed a little different. 7116-4140-02 are the female terminals.Thanks Jimmy!
Those are the accessory side?
Checking the data sheet, it looks like 7283-5929-10 for the female (truck side) connector, and 7116-4140-02 for the female terminals?
Just pushed mt wires thru the rubber boot with a stiff wire taped to it to fish thru . Worked fine .
Thanks for sharing.
We're trying to help a 2021 owner; these trucks have 4 extra pass through circuits (blunt cut wires) already present and he would like to put a factory connector on them.
spg993tt
New Member
- Joined
- Apr 11, 2021
- Messages
- 28
- Reaction score
- 19
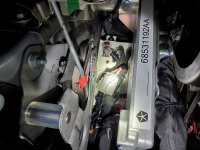
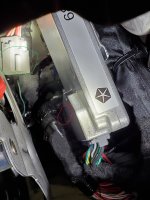
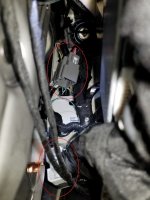
Well, had to scrub the mission at like T-minus 8 or so. went out there with the tools, the harness pieces, my game plan was to utilize the new-for-21 black connector with the 6 wires, 3 are pass thru, 1 is ground, 2 are data. i would have jumped the appropriate connection in the U area in the engine bay over to an AUX so id have aux'd 12v passing thru to the cabin via one of those 3 passthrus. here's the problem....that connector once i got under there is insanely buried. the light grey one , yesterday i moaned was hard to get at...but relatively speaking the connector into which the black one goes is buried. its behind those fat umbilical's of harness wiring. there is an "ECU" looking thing with the code 68*** you can see it in the photos. those photos are from the ground looking up and that connector is above/behind those thing, unmovable cable stalks, and the "ECU 68**". i disconnected the battery and used a plastic prod to push in there and see if i could push it over so it might drop down and be accessible. where its at right now, you can barely see it, let alone i cant even touch it with my fingers to get close enough to snap in the harness connection piece that would slide into it. there are two fat connections just to the passenger side of that ecu 68* and i disconnected one. didnt give any real slack or more access. i couldnt reach the one thats above it. its that 2nd fat connection above the one i was able to remove that is pushing against the connector we're trying to reach.
looks like that "ECU68 is bolted to a steel bar and if i remove that bolt, maybe that will free up some space. it was right then i opted to halt the mission. figured id turn to the gurus up here and see what the suggested next course would be. how the heck do i get back in there without whacking stuff up.
see 3 images. u can see the grey light grey connector, relatively speaking that thing is wide open. you can barely make out the white one we're trying to reach. its buried back there. thoughts? ideas? i know i could go with the light grey nice and easy breezy but id rather try to solve this problem plus are others suffering that as well? when i mentioned yesterday how RAM should spend a bit more time making some of this more user-friendly, this is what i was talking about.
I don't have the factory connector part# handy, perhaps @Jimmy07 can post it up.
RAM uses several vendors, mostly TE and Yazaki.
Attachments

Well, had to scrub the mission at like T-minus 8 or so. went out there with the tools, the harness pieces, my game plan was to utilize the new-for-21 black connector with the 6 wires, 3 are pass thru, 1 is ground, 2 are data. i would have jumped the appropriate connection in the U area in the engine bay over to an AUX so id have aux'd 12v passing thru to the cabin via one of those 3 passthrus. here's the problem....that connector once i got under there is insanely buried. the light grey one , yesterday i moaned was hard to get at...but relatively speaking the connector into which the black one goes is buried. its behind those fat umbilical's of harness wiring. there is an "ECU" looking thing with the code 68*** you can see it in the photos. those photos are from the ground looking up and that connector is above/behind those thing, unmovable cable stalks, and the "ECU 68**". i disconnected the battery and used a plastic prod to push in there and see if i could push it over so it might drop down and be accessible. where its at right now, you can barely see it, let alone i cant even touch it with my fingers to get close enough to snap in the harness connection piece that would slide into it. there are two fat connections just to the passenger side of that ecu 68* and i disconnected one. didnt give any real slack or more access. i couldnt reach the one thats above it. its that 2nd fat connection above the one i was able to remove that is pushing against the connector we're trying to reach.
looks like that "ECU68 is bolted to a steel bar and if i remove that bolt, maybe that will free up some space. it was right then i opted to halt the mission. figured id turn to the gurus up here and see what the suggested next course would be. how the heck do i get back in there without whacking stuff up.
see 3 images. u can see the grey light grey connector, relatively speaking that thing is wide open. you can barely make out the white one we're trying to reach. its buried back there. thoughts? ideas? i know i could go with the light grey nice and easy breezy but id rather try to solve this problem plus are others suffering that as well? when i mentioned yesterday how RAM should spend a bit more time making some of this more user-friendly, this is what i was talking about.
Perhaps that PTO/D2433A is just taped up?
Look at the images in this post, mine was fairly well exposed. Those were shot through the dash hole with the headlight switch panel removed. Just pull on it to remove the whole switch/surround piece.
Dash camera
Anyone done a dash camera install yet? Looking for the switched power to tap into. I'm thinking i'll find some in the mirror or under that massive cover on the windshield. Any tips taking that thing off so I don't snap any plastic clips?
hdrams.com
spg993tt
New Member
- Joined
- Apr 11, 2021
- Messages
- 28
- Reaction score
- 19
yeah, the tech or robot that assembled your truck cabin in that area brought his B+ to A+ game and the robot or human that did mine was pissed off at something. because she/he/it buried my connector behind that fat umbilical cord of wires.
you can see how in yours, its hanging lower, below infact the light grey connector. thats what i wish i had in my dreams!!<G> see our two images. they buried me behind that umbillical and that eco thing.
also in my image, there is a bolt in blue. i think that holds that ECO thin up to the metal stud atop it. waas thnking of taking otu that bolt, seeing if that frees up some slack and have at it. overall, way more unbolting of electronics than id prefer.
anyone know if removing that bolt drops that ecu looking thing. i dont see any other bolts or connection points, but its hard to see in there.
i tried for 20 minutes with the battery disconnected using a flathead screwdriver with electrical tape covering the metal to push it over prod it loose, see if i could get it to budge. no budge. its wedges in behind that big connector. there are two with red sliding latches and then a locking arm you opent he arm, slide out the connection, must have 20 cables in each. lower one easy to get out. upper one i couldnt get to.
that ecu is in the way.
Perhaps that PTO/D2433A is just taped up?
Look at the images in this post, mine was fairly well exposed. Those were shot through the dash hole with the headlight switch panel removed. Just pull on it to remove the whole switch/surround piece.
Dash camera
Anyone done a dash camera install yet? Looking for the switched power to tap into. I'm thinking i'll find some in the mirror or under that massive cover on the windshield. Any tips taking that thing off so I don't snap any plastic clips?
Attachments
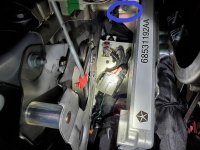
That’s the amplifier that is in the way. Remove it if you have to, and rearrange the two pass thru connectors.yeah, the tech or robot that assembled your truck cabin in that area brought his B+ to A+ game and the robot or human that did mine was pissed off at something. because she/he/it buried my connector behind that fat umbilical cord of wires.
you can see how in yours, its hanging lower, below infact the light grey connector. thats what i wish i had in my dreams!!<G> see our two images. they buried me behind that umbillical and that eco thing.
also in my image, there is a bolt in blue. i think that holds that ECO thin up to the metal stud atop it. waas thnking of taking otu that bolt, seeing if that frees up some slack and have at it. overall, way more unbolting of electronics than id prefer.
anyone know if removing that bolt drops that ecu looking thing. i dont see any other bolts or connection points, but its hard to see in there.
i tried for 20 minutes with the battery disconnected using a flathead screwdriver with electrical tape covering the metal to push it over prod it loose, see if i could get it to budge. no budge. its wedges in behind that big connector. there are two with red sliding latches and then a locking arm you opent he arm, slide out the connection, must have 20 cables in each. lower one easy to get out. upper one i couldnt get to.
that ecu is in the way.
yeah, the tech or robot that assembled your truck cabin in that area brought his B+ to A+ game and the robot or human that did mine was pissed off at something. because she/he/it buried my connector behind that fat umbilical cord of wires.
you can see how in yours, its hanging lower, below infact the light grey connector. thats what i wish i had in my dreams!!<G> see our two images. they buried me behind that umbillical and that eco thing.
also in my image, there is a bolt in blue. i think that holds that ECO thin up to the metal stud atop it. waas thnking of taking otu that bolt, seeing if that frees up some slack and have at it. overall, way more unbolting of electronics than id prefer.
anyone know if removing that bolt drops that ecu looking thing. i dont see any other bolts or connection points, but its hard to see in there.
i tried for 20 minutes with the battery disconnected using a flathead screwdriver with electrical tape covering the metal to push it over prod it loose, see if i could get it to budge. no budge. its wedges in behind that big connector. there are two with red sliding latches and then a locking arm you opent he arm, slide out the connection, must have 20 cables in each. lower one easy to get out. upper one i couldnt get to.
that ecu is in the way.
Per part number, that's the Audi amp. Jimmy has commented before what a PITA that is there to move, but that's what it is.
Users who are viewing this thread
Total: 1 (members: 0, guests: 1)