Carl,
This forum thread has goos information
Dash Cams Thread
Here's my basic instructions on getting to the mirror wiring & what leads to use
Wiring Cover Removal:
First, remove the smaller of the two plastic assembly at the base of the mirror, this can be done using a small screwdriver and slightly sliding the piece up. Next, remove the larger plastic piece by spreading inside clips apart. Or leave it on, it will come off when the mirror is removed
Remove Mirror:
Twist the mirror & mount assembly (and bottom cover if not removed above) 1/6 turn counter-clockwise to the left.
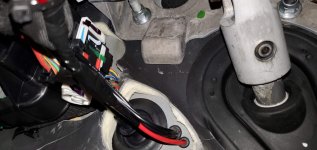
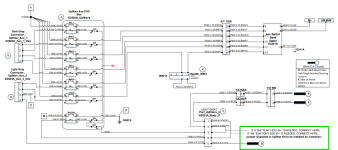
Mirror Harness Wiring:
"Key ON" is the pink with yellow stripe wire (+12V when the truck is ON).
The black wire is ground.
"Key off" power is either the dark blue/light green wire or the light green/dark blue wire. Double-check as it's not the same on all trucks.
Replacing Mirror:
First, place the top cover before replacing the mirror.
There's a hex bolt head attached to the windshield. On the arm, there is a nub, that you align up with a cut out above the hex head. Rotate the assembly about 1/6th clockwise to the right to line up the notch. Then push up against the hex head and then rotate the assembly counter-clockwise about 1/6th to the left.
I hope this helps you