Ram Heavy Duty Forum

Register a free account today to become a member! Once signed in, you'll be able to participate on this site by adding your own topics and posts, as well as connect with other members through your own private inbox!

NAViKS Surround Camera Installation and Use

RBarrett

Active Member
Joined
May 23, 2019
Messages
124
Reaction score
146
Now that we are going to have about 20 members getting the NAViKS Force OEM 360 Camera System for Christmas I thought a new thread was in order. With Brutal_HOs help I hope to move the installation posts from the other NAViKS thread here and add a couple tips for those of you with new units arriving soon. Since I have now done this install more than half a dozen times I can assure you it's not too bad. If you receive just the harness in the box, as I did, hopefully this thread will help get you all to the point of using your trucks new features.

Original NAVIKS discussion thread. https://hdrams.com/forum/index.php?threads/always-on-camera-solution-naviks.2464/

Link to NAVIKS Force OEM 360 Camera System unit covered.

** WARNING **
You must have the AUX Trailer Camera feature installed or enabled to use the AUX RCA inputs.

This is a technical sticky, please restrict questions to specific install or use issues. Many questions may already have been answered in the original NAViKS thread so please search there before asking.

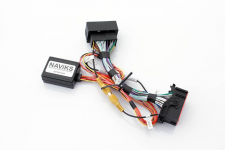
Website image:

1608756115035.png

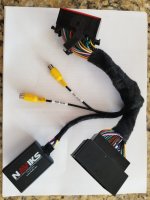
Actual shipped harness (Aux labeling added by user):
20210130_132500.jpg
 
Last edited by a moderator:

RBarrett

Active Member
Joined
May 23, 2019
Messages
124
Reaction score
146
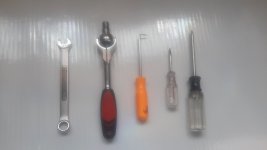
The Tools You Will Need:
Like most jobs there are lots of ways to do it and various tools that can be used. I started doing this job with all sorts of stuff but after doing it so many times I just left these small tools in my console and it's all I've needed the last several times. I will include the NAViKS install/use sheet that they tell me you will receive with your unit at the end of this thread. I'll also point out where we differ on approach or tools used. I have listed the tools I now use below. I use these specific tools because the are small and they allow installation without removing the touch screen display completely the way NAViKS has you do it.

  • Tools Needed:
    • 10MM wench
    • T-15 Torx driver
    • 7mm socket on 1/4 inch drive ratchet (nutdriver will also work)
    • 90* pick or spring hook tool
    • Tiny screwdriver
    • Protection for the screen ( bath towel )
    • Stick on Velcro for NAViKS box


20201222_110826.jpg
 
Last edited:

RBarrett

Active Member
Joined
May 23, 2019
Messages
124
Reaction score
146
What's In Your NAVIKS Box:
Well here is how the unit will come.. Double boxed peanuts and all. Looks just like what you see on NAViKS website. The one shown here doesn't have the dual RCAs that should be on the newest ones in our group buy. They recommended some type of Velcro for the small box with their logo to stick to something so you don't get a rattle. It has a pretty long pigtail so you should be able to find a good place to attach it. I started the install after finding some Velcro as my unit needed to come in and out for testing so I did it from the get go.

index.php


Prototype shown (see first post)
index.php
 
Last edited by a moderator:

RBarrett

Active Member
Joined
May 23, 2019
Messages
124
Reaction score
146
The Installation:
Having the advantage of lots of practice here is how I now approach the installation of the NAViKS unit. This is NOT the way Naviks instructs you to install this harness. They have you remove the entire display screen so that it can be put aside to get to the radio module that is behind it. This requires removing numerous additional connectors from the back of the screen. What I show here leaves all of those in place. You may want to use the Naviks procedure.
  • Use this at your own risk
  • First you will need to disconnect both of your battery negative terminals. 10MM wench
  • NAViKS says to wait 90 seconds for airbag and seat belt tensioner reasons.
  • Next comes the removal of the screen and dash trim surrounding it.
    • Remove the rubber mat in the recessed area by the 12V plug at the top of the dash. 90* Pick tool can easily grab it.
    • Remove the two screws, T15 Torx, up top (see NAViKS picture below) and yank on the top to start it out. Pull hard.
    • NAViKS shows using a trim tool on the bottom first. They did that on my truck but wound up struggling with it a bit. I think just pulling at the top is much easier. Be aware of the gear shift lever as it will be pretty close to the screen when you remove it. You might want to put a towel over the lever for this step.
    • I released it from all the clips and let the bottom rest on a towel draped over the console. There are a number of cables attached to the screen - most of them down low by the switch panels. If you leave these connected they will keep the display standing upright so you can work behind it.
    • I have the upfitter switch option on my truck so may have an extra cable (MOD: I think all trucks have the same cable if anyone cares to confirm).
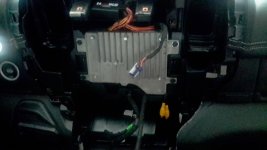
      I was able to do the entire installation only releasing the uppermost cable that is for the 12v outlet in the upper tray where the two screws were. This is the cable loose by the radio chassis in the picture.
    • The 12V outlet cable only takes a real small flat blade screwdriver to release it.

index.php


  • The next step was to remove the 4 screws that hold the radio chassis to the dash. 7mm socket on small ratchet.
  • Once the screws are out of the chassis it can be pulled outward towards the back of the still connected screen and trim panel.
  • NAViKS has you remove all the other connectors and cabling to the screen. I have never done that and figure the less messed with the better.
  • There are lots more cables attached to the back of that radio module.
    • The one that needs to be intercepted with the NAViKS module is at the very bottom. This is a large 52-pin connector with latching arm to pull it in and lock everything down. The NAViKS install sheet below has a better picture with the screen out of the way.

index.php


I found that there was enough room and sufficient cable length to make working with the faceplate and screen still connected reasonably easy. The nature of the big connectors latching device makes for very easy removal by using a small 90 degree pick tool. I was able to slip it in between the other connectors and release it without messing with anything else. You just push up behind it and it will release the lock and a continued push then moves the lever and releases the whole thing. Then you can get the connector out and away from everything before inserting the NAViKS cable. This operation can be a little hard to do mainly because it's hard to see with everything else still connected. If you take a really good look at how the connector releases and practice with your pick tool placement on the latch it will be easy. Do this on the the NAViKS harness connector before you try installing it.

index.php


index.php


  • Insert the NAViKS cable into the back of the radio chassis and close the latch.
  • Put the original harness connector into the other end of NAVIKS cable and close that latch.
Since it looked like things were going to be tight back there I moved the small box that holds the actual NAViKS chip/software etc. away on its long pig tail.

With everything all connected it looks like this:

index.php


Then it is a matter of getting all the original wires plus the new NAViKS harness stuffed in behind the radio chassis such that the 4 screws can be reinstalled. This only took two tries since there is more room than there looks. After doing this so many times I think I settled on pushing everything down into the lower right hand area behind the radio chassis. There is enough room there and it seemed to minimize any unnatural bends in all the cabling you will be dealing with. This is where you may find something else might work better for you. The small box with NAViKS label has a separate connector on it. If something happens that requires module replacement that box has the only electronics. Therefore I recommend mounting it outside of everything so it can be accessed easily. The small black plastic area above the radio module has worked well for me. I would attach the screen and faceplate with only a couple of the clips at the top since you should probably test it before locking it all down. That's about it before moving on to testing it out. As it turns out, and because it's a plug and play device, it was one of the simplest auto dashboard projects I have ever done. So this is what it looked like just before closing it up.

[MOD NOTE: Production units have a much shorter pigtail for the NAViKS box and will not be mountable in the recommended location]


index.php
 
Last edited by a moderator:

RBarrett

Active Member
Joined
May 23, 2019
Messages
124
Reaction score
146
The newest NAViKS harness for all of us should arrive with two RCA jacks in the harness on a couple shortish pigtails. If you elect to use the lower right corner for the harness, before putting the radio module back, and your RCA pigtails are as long as my prototype harness, than one way to get them out front is like this. In my case right now I was not going to use these inputs so I covered them with a foam so they won't rattle. It will also keep the outer portion of the jack from contacting anything and thus introducing potential noise into the signal path.

20201113_124457.jpg
 
Last edited by a moderator:

RBarrett

Active Member
Joined
May 23, 2019
Messages
124
Reaction score
146
Battery Reconnection - Getting Your Cameras Back
Before you can test the fruits of your labor you will need to do two things. One reconnect the negative terminals of your batteries. Two go find something else to do. If you try to test anything right away you will just make yourself anxious and be disappointed. It is not going to work. Please do not call Naviks yet. According to Naviks there is a third party camera control system under the passenger seat floorboard. Your disconnection of the battery has disrupted communication between all the dash stuff and that unit. You will have no cameras available and that's just what it will tell you on the screen. After something like 35 minutes pass once you reconnect the batteries, this communication will finish getting reestablished. Only after that happens can you get your cameras back. Next up is how to make it work.
 
Last edited:

RBarrett

Active Member
Joined
May 23, 2019
Messages
124
Reaction score
146
Auxiliary Camera Inputs:
If you have done all the other work to get camera wiring to the radio module location and have attached a camera, or cameras to the RCAs, that can be tested now. If you have a 2019 with only one Aux input you will need to determine which RCA is usable through trial and error. My understanding from Naviks was all harnesses would include two RCA inputs but only one will be functional and can be used on the 2019s. Those of us with two Aux inputs can utilize both. The way these inputs are wired is in parallel with the factory bumper/bedside camera input wiring that is part of the 13 pin connectors at those locations. You can either use the RCA input or the factory bed/bumper input for your Aux camera input(s). Those with two Aux inputs can mix these if needed with one channel using the RCA input and the other using the factory wiring for input. I would not recommend attaching a camera to both wiring paths at the same time. The best outcome of that would be double images displayed and the worst being frying stuff you don't want to have to replace.
 
Last edited:

RBarrett

Active Member
Joined
May 23, 2019
Messages
124
Reaction score
146
Camera System Testing and Use:
Once your camera system has become operational again you can begin to test it. If you have a camera that uses an RCA output you can use it to check those inputs now. I only had an old low tech camera but tested that these inputs worked so I could report back to Naviks. If you are already set up with a more permanent wiring and camera setup, either through the RCAs or factory wiring, all the better. Get it all hooked up and test it now so when you close your dash up it's for good. Start up your vehicle or at least get it in the RUN state. Hold in on the right center button on the back side of the steering until you see the camera and control screen come up. Release that button when it does. This takes 5-6 seconds. From here you can test your Aux input(s) now. Shift through your touch screen surround buttons to get to the Aux inputs. If you don't have anything connected you just get the blue screen. Otherwise you should see your camera images. With the vehicle at rest that's all you probably want to do before snapping all the rest of the big screen in place and buttoning it all up so you can drive it. There is not much more to say about actually operating this function once you tested it. Right back steering wheel button 5-6 second push to either start it up or shut it down. Switch to whatever camera view you want when it's operational by using the touch screen.
 
Last edited:

RBarrett

Active Member
Joined
May 23, 2019
Messages
124
Reaction score
146
Side View Cameras With Blinker:
This aspect of the system is best thought of as a totally separate function from the cameras in motion just discussed. It can be used when the system is displaying one of the camera views while moving but does not have to be. It can also be used when the center screen is devoted to any other combination of things. The system can be turned on and off three different ways. This is a result of problems I encountered with this function and the fact that Naviks had to work on a fix that I could not test right away. The way I prefer to turn this function on and off is to press the Mute button below the volume knob for 3 seconds and then push it again. These are momentary pushes and the radio will mute for that 3 second amount of time. At first the timing of that operation seemed touchy (was that 3 seconds or 4; too long or to short) but now I never get it wrong. The need to get that timing right is also part of why Naviks built in two other ways to do it. Holding the volume down control button on the backside of the wheel for 10 seconds will also trigger the function. The volume of whatever you were listening to will also be gone after that and you will need to turn it back up each time. For this reason I don't like this one. The third way is to push and hold the Screen Off button for 5 seconds. You will need to turn that back on if you want to see anything. So I don't like this way either. I may prefer the Mute button because it was the only way when I got used to running this stuff early on and it also takes less time. Suit yourself . In any event once you have this function activated it will come on whenever you activate the blinker no matter what the display is devoted to. Whenever the blinker goes back off the screen will return to whatever it was doing before. To turn the function back off repeat how you got it on. Not much more to say.


Navigation Keyboard In Motion:
This function of the system is pretty straight forward. If you hold in on the left center button behind the steering wheel after a few seconds the navigation keyboard will come up. Now that I think about this I have never done this without already having the navigation screen up in the display. Assuming that is when you press the button when you are moving it will come up, unlike without the Naviks unit, where you get the unavailable message. While that screen is up the center touch screen nav display will freeze since the system thinks it's stopped. 0 MPH. Interestingly some portion of the system seems to still be functioning since voice commands and turn directions still come through to the cluster display. After you enter whatever you are doing you will just hit that same button again. The map will then update to where you are now and route to a new destination if that's what you entered. If you forget to push that button the second time after entering stuff you will eventually notice that screen not updating your position. Just hit the button again in that case and it will update to where you are now.
 
Last edited:

RBarrett

Active Member
Joined
May 23, 2019
Messages
124
Reaction score
146
Operation Observations:
When I first reconnect the batteries after the various module install/removals that i've done I have noticed some inconsistent camera behavior when switching the camera views. Blank screens come mostly to mind but maybe other stuff. After cycling through the various views and also after cycling the ignition these all seem to disappear. It seems like that third party camera module and /or the Naviks box need to sort out how to talk to each other. Another camera behavior I have noticed is if the camera in motion is turned off with using the screens "X" the shut down and restart behavior is not always consistent with its behavior if you use the steering button to turn it off. You avoid this if you just get used to using the wheel button to enter and exit this function. The last thing is we will all wish the blinker function was faster. As I said in the other thread it takes a while for the system to walk through all the steps that are involved. It is a little quicker if you already have the camera function up on the screen. This function is very handy when towing; you just need to get the blinker on early to get the view when you need it most.
 
Last edited:

RBarrett

Active Member
Joined
May 23, 2019
Messages
124
Reaction score
146
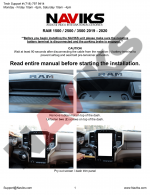
Naviks Installation and Use Sheets:

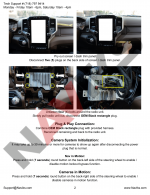
Naviks Install 1.png Naviks install 2.png
 
Last edited by a moderator:

RBarrett

Active Member
Joined
May 23, 2019
Messages
124
Reaction score
146
I think all the relevant information is now in one place. Hopefully this thread will help everyone get your Naviks units up and running. As you start using the features of this unit I would appreciate your thoughts, impressions and particularly if you identify any problems. I have a pretty open line of communication with Naviks now and they are providing me with a test module that lets me get back to OE status easily. If you have any question let me know.

Brutal-HO (whos been helping all the way) may decide we should move this part of the thread.
 

mlink

Active Member
Joined
Nov 9, 2019
Messages
172
Reaction score
149
Location
Hartford County, CT
In the event that we discover/report an additional issue or comment, what, if any, will be the procedure to update/flash the NAVIKS to fix or gain the improvements? I remember we discussed this earlier, but not sure of the outcome.
 

RBarrett

Active Member
Joined
May 23, 2019
Messages
124
Reaction score
146
In regards to finding some issue or problem with the Naviks unit, it is ultimately up to Naviks of course. If they have some fatal flaw in this product that has not been discovered yet I think they would stand by their warranty to work it out with owners and get it sorted out. If they enhance the product sometime in the future that would be different I would think. Companies approach that sort of thing in many ways I'm sure you know. In any event the actual active device that holds the software is confinded to the small black box and that part would be unplugged and changed once new software was available.
 
Last edited:

mlink

Active Member
Joined
Nov 9, 2019
Messages
172
Reaction score
149
Location
Hartford County, CT
I installed the NAVIKS on my new truck Sunday (thanks so much for the instructions @RBarrett) , then Monday I towed from CT to NC and back over 3 days - which gave me a chance to try it out.

Everything worked as described and was reliable.

As expected, the signal-activated side camera views were very slow & cludgy - as warned by @RBarrett.
My experience was mostly on the interstates but this feature needs work - as every time you use your signal, the NAVIKS spends at least two seconds loading/displaying/closing every camera view until it hits the correct camera and then displays it. But by the time it does, you've probably executed that lane change or passed that vehicle. Because things happen fact at 65mph, most times the action is over and the camera never catches up or only displays for a brief flash before the turn signal switches it off. Contrast this to what I consider to be the "standard" for signal-activated mirror camera display - the camera system on the '18+ GMCs which is instantaneous. I hope NAVIKS can do some further development on the display logic they are using here.
The other suggestion I would make is a small indicator or camera flash to let you know whether the NAVIKS function you are setting has turned on or off. The first time or two I held the left steering wheel button in, the signal function did not turn on. Without an indicator, you don't know whether NAVIKS has "woken up" or not - so should you press/hold again? Or wait... or is the unit on and pressing again will turn it off etc. It might be good to flash a quick camera view or something to indicate it's turned on after the button hold. Also, I don't see any value in providing multiple ways (Mute button, etc) to activate it. If there is a problem, you find yourself trying out each method one after another because you have no indicator (which might actually be turning NAVIKS on/off/on again).

Although that's what I bought NAVIKS for, I haven't run the wiring through my 5th Wheel to try out the trailer cam, but I was able to activate any other camera and roll with it on down the highway so I'm confident that camera persistence is working.

I was able to make changes in the NAV while rolling, but didn't test it extensively. Speaking of the NAV, I know there are several RAM NAV haters here on HD, so I had low expectations. But I have to say that since my point of reference is several GMC Denali NAVs (mediocre), the NAV in my Limited was the best I have ever used in any car or truck so far. As for the missing towing low-bridge or one-way street situations (that all factory NAVs seem to omit), I think these are becoming fewer and fewer as I've never encountered one in any of my towing, Also, my pre-trip planning paranoia is increasing - so this NAV is fine for me. So I really loved using it all the way down and back. It even navigated that sh_t show going from Chesapeake Bay Bridge Tunnel through Hampton Roads/Norfolk and through southern VA back out to I-95 in Emporia, VA. The other major test would be the compact areas of small streets in Washington, DC (where NAVs go to die) - but don't think I'm bring a dually downtown there anytime soon.

Since I have a '20, I'm not planning to use either NAVIKS RCA port.

I wanted to be one of the first to give you real-world feedback on NAVIKS. Overall it worked well, did what we all asked for, and will probably get more refined in the future.

Anyone else try theirs out yet?
 
Last edited:

TXsportDiver

Active Member
Joined
May 1, 2020
Messages
109
Reaction score
173
Thanks, @RBarrett. Awesome write-ups.

I now have my Naviks unit. But, I made a vehicle change since ordering it. So, I've not yet installed it.

I changed from a 2019 2500 Mega Cab Limited to a 2020 3500 Mega Cab DRW Limited (Happy New Year Employee plus pricing to me!).

Neither of the trucks are spec'd with the factory camera trailer wiring. So, I assume I'll need to use one of the Naviks' inputs to add a camera from my RV.

But, then I read the following from @mlink...
Since I have a '20, I'm not planning to use either NAVIKS RCA port.
So, I'm now wondering if I have other options besides the RCA input(s). If so, what is it. Buy the over priced trailer wiring kit...and use the over priced Mopar camera(s)?
 

RBarrett

Active Member
Joined
May 23, 2019
Messages
124
Reaction score
146
That's pretty much it for your wiring options that I know of. Add the factory harness and deal with the factory multi-pin input connector or run your own wires from the RCAs. Others were trying to find the connector so they could use a non Mopar camera with the factory wiring. I don't know the current status of this If you overcome that hurdle or you use the RCAs you have many camera options. Some are even looking at a wireless to input to the RCAs. If it were me I would run some well shielded coax from the RCAs to where you need to go for a start. Try which ever camera you want and see how it is. This will cost the least too.
 

TXsportDiver

Active Member
Joined
May 1, 2020
Messages
109
Reaction score
173
I'm glad to know I was thinking in the right direction (Naviks with RCA camera, wired or wireless)...was just trying to confirm the truck didn't come with other options. Thanks for your clarification.
 

Brutal_HO

The Mad Irishman
Staff member
Joined
Feb 1, 2020
Messages
12,160
Reaction score
21,756
Location
Douglas County, CO
Thanks, @RBarrett. Awesome write-ups.

I now have my Naviks unit. But, I made a vehicle change since ordering it. So, I've not yet installed it.

I changed from a 2019 2500 Mega Cab Limited to a 2020 3500 Mega Cab DRW Limited (Happy New Year Employee plus pricing to me!).

Neither of the trucks are spec'd with the factory camera trailer wiring. So, I assume I'll need to use one of the Naviks' inputs to add a camera from my RV.

But, then I read the following from @mlink...

So, I'm now wondering if I have other options besides the RCA input(s). If so, what is it. Buy the over priced trailer wiring kit...and use the over priced Mopar camera(s)?

I think you will still need to enable the Aux trailer camera option in the BCM. I don't know that anyone has yet to use the NAViKS that didn't already have this (or installed the Mopar kit).
 

Users who are viewing this thread

Top