Ram Heavy Duty Forum

Register a free account today to become a member! Once signed in, you'll be able to participate on this site by adding your own topics and posts, as well as connect with other members through your own private inbox!

Switch Pros

el_barto

Well-Known Member
Joined
May 25, 2020
Messages
1,244
Reaction score
1,807
As has been established, Power Wagon can’t be had with the Aux switches, unfortunately.
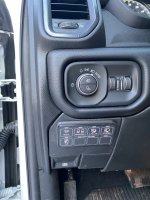
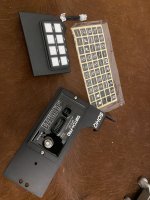
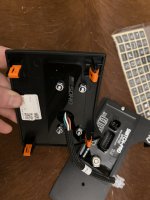
Rather than try to figure out how to retrofit the aux switches, I decided to take the “lazy” option, and got SwitchPros 9100 Module. I also got the SDHQ power module bracket which mounts between the PDC and the headlight. The SDHQ keypad mount kit was easy too, simply replaces the trim panel below the headlight switch. Could I have drilled the holes myself in my own panel, sure. But it made installation that much less of a headache.

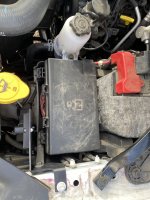
I tapped the Clearance Lights fuse for the lights Trigger wire (dims keypad backlight), and tapped the fuse for “inverter wakeup module, rear usb, and wireless charger” for the ignition-on signal. I need to shorten those wires up a bit later, it’s a bit sloppy in the fuse panel still.

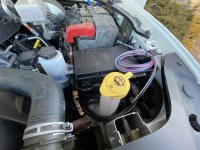
I needed a longer 4awg wire for the power supply, and one with a 5/16” hole for the HAPP stud... I ordered one from Amazon. The HAPP stud needs an M8x1.25
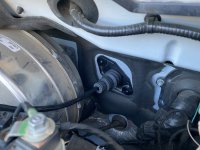
I used a Daystar firewall grommet thru the clutch block off plate to pass wires.

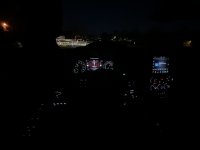
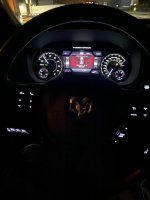
I used the RGB wheel in the app and was able to dial the color(it’s white with a bit of blue tone) and brightness in pretty spot on.

Next I need to start to connect accessories to it...first will be ARB compressor(it will go under rear seat) & the rock Lights. I don’t have reverse or a-pillar lights yet, but now I have an excuse to get them.
 

Attachments

  • E2D48E27-953E-4958-A2CB-4D8AF8FC4890.jpeg
    E2D48E27-953E-4958-A2CB-4D8AF8FC4890.jpeg
    631.6 KB · Views: 545
  • A3CA34C7-75AF-473D-9D7B-24FEE359785D.jpeg
    A3CA34C7-75AF-473D-9D7B-24FEE359785D.jpeg
    619.6 KB · Views: 532
  • 5EE00612-E7EE-40D6-990B-05CECD7CB2F7.jpeg
    5EE00612-E7EE-40D6-990B-05CECD7CB2F7.jpeg
    470.1 KB · Views: 487
  • 2B277D5C-4409-4917-9E68-9437E15C2FB9.jpeg
    2B277D5C-4409-4917-9E68-9437E15C2FB9.jpeg
    423 KB · Views: 482
  • 015135D5-F63C-4138-8C97-A777ADD880D7.jpeg
    015135D5-F63C-4138-8C97-A777ADD880D7.jpeg
    497.1 KB · Views: 482
  • 9CE20395-8C0E-4DC6-A15D-E8BE7C4D38FB.jpeg
    9CE20395-8C0E-4DC6-A15D-E8BE7C4D38FB.jpeg
    136.2 KB · Views: 481
  • 35D79148-687A-4314-AE2B-D089222D618D.jpeg
    35D79148-687A-4314-AE2B-D089222D618D.jpeg
    332 KB · Views: 469
  • 2E0D31B1-A6E2-4B87-9754-C9CA3743A459.jpeg
    2E0D31B1-A6E2-4B87-9754-C9CA3743A459.jpeg
    545.2 KB · Views: 462
  • 6007BFDB-2523-4A53-89E4-66E324FC1E67.jpeg
    6007BFDB-2523-4A53-89E4-66E324FC1E67.jpeg
    372 KB · Views: 516

el_barto

Well-Known Member
Joined
May 25, 2020
Messages
1,244
Reaction score
1,807
Looks nice, still blows my mind PWs dont come standard with some aux sw's
I agree 100%, but I read in another thread that the under-dash connector that is used for the oem aux switches is occupied by the axle lockers...hence why no oem switches for PW.
 

el_barto

Well-Known Member
Joined
May 25, 2020
Messages
1,244
Reaction score
1,807
Slick install below the factory light switches. I might have to copy you on that one.
I just used the SDHQ panel mount, its a factory replacement panel they provide pre-drilled and with the necessary backing Plate. Could I have drilled my own panel? Sure, but they made it easy at a reasonable price. Minor trimming of some plastic behind the panel is required(they outline this in the instructions)
 

Rockcrawlindude

a rock crawlin’ dude
Joined
Jan 1, 2021
Messages
6,345
Reaction score
16,484
Location
Georgia USA
Does this system come with instructions of how to wire it up?

I see on their website that 4 of the buttons are 35A and 4 are 18A does this mean relays are not necessary for each circuit?

Referring to this link


Thanks
 

el_barto

Well-Known Member
Joined
May 25, 2020
Messages
1,244
Reaction score
1,807
Does this system come with instructions of how to wire it up?

I see on their website that 4 of the buttons are 35A and 4 are 18A does this mean relays are not necessary for each circuit?

Referring to this link


Thanks

yes it comes with instructions, but not specific to the Ram.
It’s very straightforward though. Big red goes to battery +, black goes to battery -, light blue needs ignition on signal, white (optional) to dim backlighting at night. Pink is another optional trigger signal wire (eg, reverse, high beams, etc). Everything else is just power outputs to accessories.

No relays / fuses, it is all solid state, you set your "overcurrent" value for each circuit using the app, the the power module handles it internally. However, I did have to wire my compressor with a direct connection to the battery and a relay to the SwitchPros, since it requires 40amps fuse.

Heres the installation instructions:


Rockcrawlindude

a rock crawlin’ dude
Joined
Jan 1, 2021
Messages
6,345
Reaction score
16,484
Location
Georgia USA
yes it comes with instructions, but not specific to the Ram.
It’s very straightforward though. Big red goes to battery +, black goes to battery -, light blue needs ignition on signal, white (optional) to dim backlighting at night. Pink is another optional trigger signal wire (eg, reverse, high beams, etc). Everything else is just power outputs to accessories.

No relays / fuses, it is all solid state, you set your "overcurrent" value for each circuit using the app, the the power module handles it internally. However, I did have to wire my compressor with a direct connection to the battery and a relay to the SwitchPros, since it requires 40amps fuse.

Heres the installation instructions:

That’s amazing thanks man.
Exactly what I wanted to know. I already have done some wiring with relays but could clean it up and do this. Thanks again.
 
Last edited:

dave41079

Well-Known Member
Joined
Sep 16, 2020
Messages
230
Reaction score
363
Location
Nashville, TN
That’s amazing thanks man.
Exactly what I wanted to know. I already have done some wiring with relays but could clean it up and do this. Thanks again.
I had this on my 5th gen 4Runner, and it's really awesome. You can set different parameters for lights to strobe, dim, press one button to turn on multiple outputs, set them as ignition or constant, set the switches as latched or momentary, etc. It's a great piece and worth the price.
 

Rockcrawlindude

a rock crawlin’ dude
Joined
Jan 1, 2021
Messages
6,345
Reaction score
16,484
Location
Georgia USA
I’m really looking into it.

Problem with me would be filling all 8 spots.

I couldn’t deal with blank switches; I’m way too weird for that.
 

dave41079

Well-Known Member
Joined
Sep 16, 2020
Messages
230
Reaction score
363
Location
Nashville, TN
I’m really looking into it.

Problem with me would be filling all 8 spots.

I couldn’t deal with blank switches; I’m way too weird for that.
Same. I found myself coming up with additions for mine. I had light bar, ditch lights, left side lights, right side lights, rear lights, amber front/rear (great for staying visible on dusty trails), winch power, and compressor. I could have linked lights together, or omitted things altogether and been fine...but I also don't like blank spots. It's possible you could set two of the switches for in cab winching. Set them as momentary and have one for in and one for out.
 

Rockcrawlindude

a rock crawlin’ dude
Joined
Jan 1, 2021
Messages
6,345
Reaction score
16,484
Location
Georgia USA
Same. I found myself coming up with additions for mine. I had light bar, ditch lights, left side lights, right side lights, rear lights, amber front/rear (great for staying visible on dusty trails), winch power, and compressor. I could have linked lights together, or omitted things altogether and been fine...but I also don't like blank spots. It's possible you could set two of the switches for in cab winching. Set them as momentary and have one for in and one for out.
All useful items, sir. I’ll keep thinking about this for a while, I’m sure.
 

el_barto

Well-Known Member
Joined
May 25, 2020
Messages
1,244
Reaction score
1,807
I’ve only got the rock lights fully functional so far. Compressor is like 95%...wires all run, just need to get bracket made & hook it up.
Rear bumper lights and ditch lights are in the future plans, but not sure when. I agree I want them all filled up but on the other hand its nice to have the space to add mods in the future with ease.
 

mickey6

New Member
Joined
Jan 27, 2021
Messages
2
Reaction score
1
what's behind the panel to the right of the parking brake release? I'm looking for a nice spot to add a switch to turn on the fuel pump to an aux fuel tank. I saw a plug behind mine but I don't know what it's for. 2019 3500 laramie 4wd
 

DINKELROCK

Member
Joined
Mar 10, 2021
Messages
21
Reaction score
32
That is a clean look for sure. I had the Painless Trail Rocker on my last build and this looks like the way to go for the PW. Thanks for the info!
 

Russty__

Member
Joined
Jan 29, 2021
Messages
52
Reaction score
24
Installing mine tomorrow, I was worried that I would need to setup a aux fuse block for power to the sources but you’re saying I don’t need to do that? I have 2 Baja designs Lp9s with high beam low beam function as well as 2 lp4s and my GMRS radio that need to go on it. Also the lights have a DRL I’d like to wire into the switch pros.
 

el_barto

Well-Known Member
Joined
May 25, 2020
Messages
1,244
Reaction score
1,807
Installing mine tomorrow, I was worried that I would need to setup a aux fuse block for power to the sources but you’re saying I don’t need to do that? I have 2 Baja designs Lp9s with high beam low beam function as well as 2 lp4s and my GMRS radio that need to go on it. Also the lights have a DRL I’d like to wire into the switch pros.
You do not need fuses as the Module is solid state and has built in configuable overcurrent limits.
My air compressor required direct power and a relay as it requires a 40amp fuse (more than the modules 35amp limit), but I was still able to use the module as the switch control.
 

Users who are viewing this thread

Top