peewee86
Member
- Joined
- Apr 12, 2020
- Messages
- 23
- Reaction score
- 49
I frequent a lot of different user forums but normally I rarely join in unless I have something to add. Other than member introductions this is my first post.
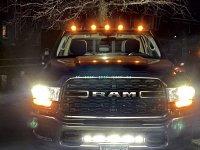
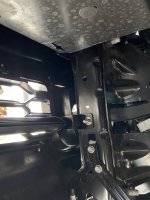
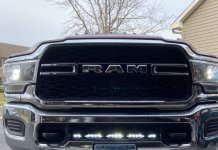
This last weekend with the COVID-19 keeping me stuck around the house I got busy with installing a light bar on the front of my 2019 2500. I will walk through the steps I took so others can have another project to keep them busy during the stay at home time. I looked at possible mounting locations and behind the lower grill seemed like the cleanest option. It is out of sight except when the light is turned on. The grill itself is about 26 inches wide and once I got under and looked at the metal framing on either side I found a mounting point measurement of 28 5/8” wide. There are already holes predrilled so this is a no drill installation. I purchased a 25” light bar off eBay. I paid $51 to my door for a pair of them. I plan to keep the second one around as a spare. Although I have yet to have one fail, many of the cheap light bars don’t have the best reputation for reliability. It’s listed as a 240W 6D light but I’m not sure that it is any brighter than other 100W inexpensive light bars that I have purchased in the past. I’m not making a specific recommendation for a product but you’d like something in that 25 to 26 inches overall length range. Mine measured 26 3/8” end to end.
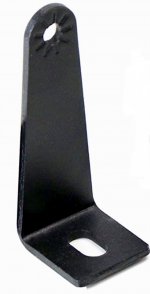
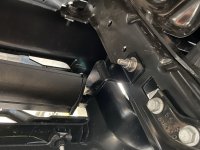
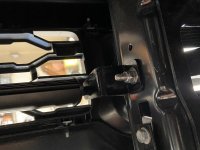
I had some 3 inch mounting brackets laying around the garage that were left over from a different light bar. (See photo) If your light bar doesn’t come with something like this they’re available for about $8 on Amazon. They were originally an L shape but I put them into a vise and with a hammer made a second 90° bend in each bracket to make a “Z”. Your goal is to get an overall length of 28 5/8” when attached to your light bar to match the radiator framing. It’s not rocket science. The brackets will flex a little bit so as long as you are close it’s probably OK. My brackets were stainless steel and I used stainless 1 inch 1/4-20 bolts with nylock nuts. I used the lower set of holes in the frame but if you have the sensors in your grill you will most likely need to use the upper set. If the brackets that you use are not stainless steel they may need to be repainted after bending them to prevent them from rusting. The original paint will probably flake off at the bend.
My truck had the upfitter switches so the wiring was quite easy. No need for a relay or fuse. Ram has taken care of that already with the upfitter package. I had a generic weatherpack waterproof connector lying around the garage left over from a previous project. I used it to connect the light bar pigtail to my wire run. You will need about 4 1/2 feet of 12 gauge black and red multi strand wire. I recommend protective wire loom which should only cost about $3. I didn’t get any photos of the wiring but I’d be happy to post them up to this thread when I get a chance. I used a ring terminal on the ground wire and attached to a grounding lug right next to the battery. The hot wire runs back to the firewall on the driver side and is soldered on to one of the 12 gauge pigtails that comes with the upfitter package. Then it is just a matter of snapping the pigtail end into the terminal block.
Check out the pictures and feel free to ask me any questions.
I wanted to reiterate how much of a piece a cake this was to put together. You can do this! -PeeWee.

This last weekend with the COVID-19 keeping me stuck around the house I got busy with installing a light bar on the front of my 2019 2500. I will walk through the steps I took so others can have another project to keep them busy during the stay at home time. I looked at possible mounting locations and behind the lower grill seemed like the cleanest option. It is out of sight except when the light is turned on. The grill itself is about 26 inches wide and once I got under and looked at the metal framing on either side I found a mounting point measurement of 28 5/8” wide. There are already holes predrilled so this is a no drill installation. I purchased a 25” light bar off eBay. I paid $51 to my door for a pair of them. I plan to keep the second one around as a spare. Although I have yet to have one fail, many of the cheap light bars don’t have the best reputation for reliability. It’s listed as a 240W 6D light but I’m not sure that it is any brighter than other 100W inexpensive light bars that I have purchased in the past. I’m not making a specific recommendation for a product but you’d like something in that 25 to 26 inches overall length range. Mine measured 26 3/8” end to end.
I had some 3 inch mounting brackets laying around the garage that were left over from a different light bar. (See photo) If your light bar doesn’t come with something like this they’re available for about $8 on Amazon. They were originally an L shape but I put them into a vise and with a hammer made a second 90° bend in each bracket to make a “Z”. Your goal is to get an overall length of 28 5/8” when attached to your light bar to match the radiator framing. It’s not rocket science. The brackets will flex a little bit so as long as you are close it’s probably OK. My brackets were stainless steel and I used stainless 1 inch 1/4-20 bolts with nylock nuts. I used the lower set of holes in the frame but if you have the sensors in your grill you will most likely need to use the upper set. If the brackets that you use are not stainless steel they may need to be repainted after bending them to prevent them from rusting. The original paint will probably flake off at the bend.


My truck had the upfitter switches so the wiring was quite easy. No need for a relay or fuse. Ram has taken care of that already with the upfitter package. I had a generic weatherpack waterproof connector lying around the garage left over from a previous project. I used it to connect the light bar pigtail to my wire run. You will need about 4 1/2 feet of 12 gauge black and red multi strand wire. I recommend protective wire loom which should only cost about $3. I didn’t get any photos of the wiring but I’d be happy to post them up to this thread when I get a chance. I used a ring terminal on the ground wire and attached to a grounding lug right next to the battery. The hot wire runs back to the firewall on the driver side and is soldered on to one of the 12 gauge pigtails that comes with the upfitter package. Then it is just a matter of snapping the pigtail end into the terminal block.
Check out the pictures and feel free to ask me any questions.
I wanted to reiterate how much of a piece a cake this was to put together. You can do this! -PeeWee.
Last edited:
