Ram Heavy Duty Forum

Register a free account today to become a member! Once signed in, you'll be able to participate on this site by adding your own topics and posts, as well as connect with other members through your own private inbox!

4500 Camper/Jeep Hauler Build

Bigboom338

Member
Joined
Aug 23, 2023
Messages
43
Reaction score
71
Location
South Dakota
We have Rad Rover 6+'s. I am not sure if I can get them between the cab and camper, tight if I do. I too am going to have to figure out my spare tire placement. I saw where a guy had made a lift arm and a boat winch setup for under the bed between the cab and duals.
 

gprguy

Well-Known Member
Joined
Apr 14, 2022
Messages
549
Reaction score
1,316
Location
Kitsap Peninsula, WA
Yeah, that will be tight for sure. Maybe if they sit side by side and you can kind of nest them, one pointing driver's and one pointing passenger's. The handlebars will probably be the worst of it. If it helps any, get a set of folding pedals off of Amazon. We added those to our bikes and it shaves an inch or so off each side.

BTW, if it's of any use I am looking at these guys for a sliding tray to hold the bikes in the cabinet:


Still trying to decide which model to go with, either one big tray that slides in both directions or two small trays one for each bike back to back.

I think under the frame is out for me now that I've added the second fuel tank.. I have a couple ideas around the spare but I need to finalize the bike cabinet first.
 

gprguy

Well-Known Member
Joined
Apr 14, 2022
Messages
549
Reaction score
1,316
Location
Kitsap Peninsula, WA
To say it's been a rough week would be a massive understatement.

Last week our friend and traveling companion Spud succumbed to heart disease. He was almost 12. He had only been a part of our lives for the last 3 and a bit years but it feels like so much longer. He loved hitting the road and camping and it's impossible to put into words how much we will miss him.

IMG_5396.jpeg

RIP buddy.
 

Brutal_HO

The Mad Irishman
Staff member
Joined
Feb 1, 2020
Messages
12,224
Reaction score
21,864
Location
Douglas County, CO
I wish I had a bender capable of something like that, 4" stainless mandrel bent must take some serious force. The bends are all from Stainless Bros, extremely high quality stuff - I'm very happy with them.

I haven't decided what to do long term, I am more of a turn down kind of guy but the one that's on there is the cheapest available on Amazon. I doubt the truck's even gone into regen once yet. :D

Sorry about your pup.

One of my customers in Denver makes the tooling for doing those big (and little) pipe bends. No, his name isn't Bender, but the co name is apropos "Tools For Bending." LOL Their claim to fame was all the tooling for the SR-71.

The owner is a cool dude and did a favor for me bending some 4" thick wall tubing for a friend's pickup project.
 

gprguy

Well-Known Member
Joined
Apr 14, 2022
Messages
549
Reaction score
1,316
Location
Kitsap Peninsula, WA
Thanks for the kind words. It's been a weird week getting used to the new normal around here, but getting a little work done on the truck has been a welcome distraction.

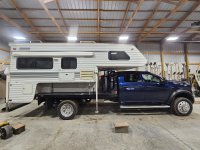
I've ordered the sliding tray for the backpack cabinet, once that shows up in late October I can start building the skeleton for that. In the meantime I am working on various odds and ends.

CHMSL Relocation

The backpack cabinet will completely block the rear window even when the camper isn't on the truck, so I want to move the CHMSL (and more importantly, it's cameras) from the back of the cab to the back of the backpack box. First step, build an extension cable:

IMG_5462.jpeg

This consists of two fakra Z male-female cables (one for the DRVM camera, one for the cargo camera) and then 4 wires for the brake light/cargo light connection. That brake/cargo light connection uses the following connectors available at Digi-Key and elsewhere:

Male: 174922-1
Male pins: 173631-1
Female: 174929-1
Female pins: 173645-1

Those pins are good for 16-20 gauge wire. I used 16, in hindsight I would have been fine with 18 or 20.

Here's the cable finished up and test fit to the back of the CHMSL:

IMG_5463.jpeg

After taking apart the interior trim and dropping the headliner down a little bit in the driver's rear corner (removing the driver's rear seat is also a must), the extension gets run behind the headliner and out the back of the cab. Everything plugged together nicely and the slack was tucked up above the headliner.

IMG_5465.jpeg

I also tested out the CHMSL and cameras at this point and they all still work normally.

We'll need something to go in place of the CHMSL, and Ram makes a plug that goes in for trucks that don't come with the CHMSL. Part number 68412030AC.

IMG_5466.jpeg

And installed.

IMG_5467.jpeg

Nice and clean. Next we need some way to get out of the back of the cab and into the future cabinet. I picked up these door jamb connector things off of Amazon. It should make a nice flexible connection to the future cabinet. Test fit after drilling a 3/4" hole:

IMG_5468.jpeg

The cable gets run down the inside of the C pillar and then out the back of the cab:

IMG_5469.jpeg

And that's about it for now, at least until the cabinet exists to run this all into:

IMG_5470.jpeg

All the trim and interior is back in place, and I just need to bundle up this cable and seal up the ends until the cabinet takes shape.

PS: What the Fakra?

Part of this project was learning about Fakra cables, and I thought I'd toss up a quick summary of what I learned. Turns out they have different colored connectors (each with a corresponding letter) that have specific keyways on the ends. No doubt to make it easy for workers on the assembly line to hook up these cables and not cross connect them. Each color/letter does have a specified use, but Ram seems to just be using them for whatever. On the back of the CHMSL the DRVM camera is a white connector (Fakra B) and the cargo camera is a black connector (Fakra A). Finding Fakra A or B extension cables is somewhat possible but not that easy. Luckily they also have a universal connector, the "water blue" or Fakra Z connector. This will connect to any of the other colors/letters. Since I had two identical Z extensions in my bundle I just labeled one with some red tape so I don't mix them up.

I also found this helpful chart on the web:

fakras.jpg

Hope that helps someone down the road.
 

gprguy

Well-Known Member
Joined
Apr 14, 2022
Messages
549
Reaction score
1,316
Location
Kitsap Peninsula, WA
No real updates on the truck, but I am picking up some aluminum to start on the backpack box once the sliding shelf ships next week. The dual fuel tank setup is working perfectly now. One small project I did was set up the purge valve for the air system to run automatically on a timer - it purges when the truck starts and then every hour afterwards that the truck is running. I used a programmable timer from https://timers.shop and it worked great. Freed up an aux switch for something better.

We did get the Jeeps out and on a trail, finally, for the first time since we moved to Washington nearly 10 years ago. Pretty mild stuff but they still work.. Hopefully we'll get back to Moab next year when the truck is done enough.

IMG_5499.jpeg
 

gprguy

Well-Known Member
Joined
Apr 14, 2022
Messages
549
Reaction score
1,316
Location
Kitsap Peninsula, WA
They are LJ Rubicons - both 6 speeds as well. We've owned them since new. Mine has just over 20k miles on it, hers is getting closer to 30k. Our forever Jeeps..

Hers has the stock axles for now at least. I'm going to have to upgrade those sooner or later. Mine has a lot more done to it - the axles are Spidertrax 9's I built, a mix of ford 9", Dana 60 and F-450 bits with fabricated housings and knuckles.

IMG_5502.jpeg
 

Bigboom338

Member
Joined
Aug 23, 2023
Messages
43
Reaction score
71
Location
South Dakota
Got my bed put on. Last weekend I put my camper on just to get some measurements and also see how things are going to look. Lots of work to do, but nothing compared to your build.
 

Attachments

  • 20231014_105701.jpg
    20231014_105701.jpg
    588.1 KB · Views: 63
  • 20231014_110132.jpg
    20231014_110132.jpg
    592.7 KB · Views: 64
  • 20231010_115427.jpg
    20231010_115427.jpg
    1.2 MB · Views: 61
  • Screenshot_20231010_175108_Photos.jpg
    Screenshot_20231010_175108_Photos.jpg
    355.1 KB · Views: 61

gprguy

Well-Known Member
Joined
Apr 14, 2022
Messages
549
Reaction score
1,316
Location
Kitsap Peninsula, WA
That looks great! Very similar to how I expect mine to sit, I backed my truck under my camper to get an idea of clearances last week. Do you have a plan for your spare tire? That's one thing that I am still undecided on.

I'm still waiting on things - bought a bunch of aluminum for the backpack box and started building the brackets to bolt it to the frame. My slide from slide-master.com shipped today, once that shows up I can get to actually making progress again.
 

Bigboom338

Member
Joined
Aug 23, 2023
Messages
43
Reaction score
71
Location
South Dakota
If I don't haul the bikes up there, the tire will be attached to the headache rack. If I do haul them up there this was suggested. Of course COG is an issue, but another option for me is putting my 48" hitch extension on and carrying the tire flat on the top of the bar after welding or bolting on a T brace.
I am considering building a frame to sit the camper on to raise it 6 or so inches. By doing that I would clear the black tank and enable me to slide the camper forward. So many decisions.
 

Attachments

  • 22185.jpeg
    22185.jpeg
    213.6 KB · Views: 31

jsalbre

Well-Known Member
Joined
Oct 29, 2019
Messages
2,608
Reaction score
3,317
Location
ID
If I don't haul the bikes up there, the tire will be attached to the headache rack. If I do haul them up there this was suggested. Of course COG is an issue, but another option for me is putting my 48" hitch extension on and carrying the tire flat on the top of the bar after welding or bolting on a T brace.
I am considering building a frame to sit the camper on to raise it 6 or so inches. By doing that I would clear the black tank and enable me to slide the camper forward. So many decisions.
If you raise the camper up you may be able to put the spare vertically under the side of the camper.
 

Users who are viewing this thread

Top