
So is mine. I wonder why 2 different parts numbers. Possibly different trim levels have different part numbers? Not logical but who knows.This is for the 12 pin connector.Surround view.
Ram Heavy Duty Forum
You are using an out of date browser. It may not display this or other websites correctly.
You should upgrade or use an alternative browser.
You should upgrade or use an alternative browser.
2022 Ram Tow/Trailer Camera Options
- Thread starter iflyskyhigh
- Start date
-
- Tags
- jimmy07
You all will have better results discussing camera options in the dedicated 2022 Ram Tow/Trailer Camera Options thread that was split out here last year...
 hdrams.com
2022 Ram Tow/Trailer Camera Options
So I had some questions regarding the different tow / trailer camera options in my 2022 2500 Limited build. [MOD: Questions answered in post 19 and 20] I was clogging up the other “order” thread so I’m moving my questions over here to the towing section I believe @Jimmy07 answered most of my...
hdrams.com
ACEd
Well-Known Member
- Joined
- Sep 13, 2021
- Messages
- 906
- Reaction score
- 1,418
I thought that was the thread we were on - is there another thread I should be following too?You all will have better results discussing camera options in the dedicated 2022 Ram Tow/Trailer Camera Options thread that was split out here last year...
2022 Ram Tow/Trailer Camera Options
So I had some questions regarding the different tow / trailer camera options in my 2022 2500 Limited build. [MOD: Questions answered in post 19 and 20] I was clogging up the other “order” thread so I’m moving my questions over here to the towing section I believe @Jimmy07 answered most of my...
Thanks Brutal, I've been trying to follow on the correct thread, but this old mind can get crossways every once in a while. It is just sad that "once in a while" seems to come on the hour, every hour.You all will have better results discussing camera options in the dedicated 2022 Ram Tow/Trailer Camera Options thread that was split out here last year...
2022 Ram Tow/Trailer Camera Options
So I had some questions regarding the different tow / trailer camera options in my 2022 2500 Limited build. [MOD: Questions answered in post 19 and 20] I was clogging up the other “order” thread so I’m moving my questions over here to the towing section I believe @Jimmy07 answered most of my...

brv10
has the scoop
- Joined
- Jun 13, 2021
- Messages
- 3,329
- Reaction score
- 7,340
Like this one?XN1- Trailer Surround view system- $995.
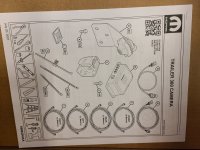
This is a standalone option, but you must have a package that includes regular truck surround view, and you must have a Uconnect 5 radio. The kit that comes delivered with the truck will have 4 digital cameras, a central vision processing module (CVPM), coax cables to connect the cameras to the CVPM, and the main sections of harness that carry the CVPM’s power, ground, canbus IHS hi/lo, and video output signal (3 wires) to the truck via the 12-pin connector. It is described as “to be installed by the dealer”, and I don’t see any instructions for the kit, so curious to see some that gets this post up the instructions that should be included. I’m sure it involves mounting the cameras on the 4 sides within a certain height range of each other, and calibrating the cameras to the CVPM using fixed points they are looking at.
XFQ- Mopar trailer camera wiring with no camera- $515 ($695 on some build tool sites).
This is the Aux 1&2 trailer camera wiring prep for the truck only, which preps the truck with the 12/7-pin trailer connectors. The kit that has the wiring for the trailer, that plugs into the 12-way truck connector, and one analog camera, is sold separately. A second camera is available separately from that kit. These are just observation cameras that can be mounted anywhere, and you can toggle between the two via the Aux 1&2 camera soft keys on the radio screen.
All the build sites will let you select both XFQ and XN1, but if you have both, it is only possible to use one Aux camera. This is because one of the two aux cameras uses the same video input on the radio as the CVPM for the trailer surround view uses.
Attachments

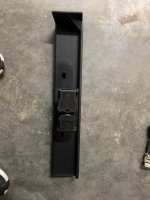
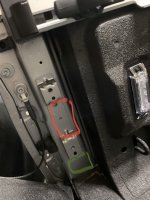
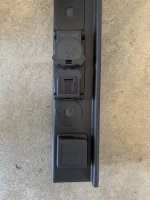
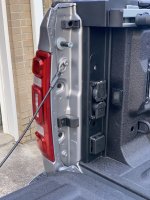
So got the B&W Turnover installed and then started looking at bed wiring with Ramboxes. I can't find a flat spot large enough for the mounting plate to sit flush, so other options...The plastic cover panel at the rear of the bed which has the two mounting points for the bed extender. I don't plan on using a bed extender, the plastic piece if damaged will be much easier (cheaper) to replace if damaged or mangled. The plastic is of the same thickness of the plastic mounting plate for the 12/7 pin connector, so preliminary plan is to place it between the two mounting points. I will cut out the plastic to the same dimensions as the bumper mount which should allow the 12/7 pin connector to click into place. Behind the plastic piece there is some metal which will need to be cut away to facilitate the wires to pass through. If this is successful I will plan to do the same thing if the tow mode camera connector, it does appear there should be enough slack in that wiring harness to move to this location. The wiring harness, 68525632AA, has a connector for the 7 pin which I am unable to locate, so I am going to use a curt 7 pin extender #56070 to move the 7 pin to the bed and retain the function of the bumper 7 pin. The wiring harness, 68525632AA, will only be used for the 12 pin camera connector portion. None of this has been done yet but that is the direction I am headed once all pieces are acquired. Pictures attached show the 12/7 pin connector placed in the approximate location on the plastic piece mentioned. The red outline would be the placement of the 12/7 pin and the green outline the placement of the tow mode camera connector.
Attachments
Ickabod
Well-Known Member
- Joined
- Jun 11, 2020
- Messages
- 248
- Reaction score
- 288
This is what my box says....a totally different part number....Like this one?

Are you sure it’s a truck side connector, or is it the docking station plate for the 12-way plug for when it’s not in use?Only difference I can see is my kit has the truckside connector which my truck came with from the factory.
I see both part number kits floating around on eBay. Curious if one kit has the 12-way plug populated with 7 pins, and the other kit’s 12-way plug populated with 10 pins…This is what my box says....a totally different part number....
View attachment 32014
brv10
has the scoop
- Joined
- Jun 13, 2021
- Messages
- 3,329
- Reaction score
- 7,340
You are correct, docking station once I looked at the kitAre you sure it’s a truck side connector, or is it the docking station plate for the 12-way plug for when it’s not in use?
brv10
has the scoop
- Joined
- Jun 13, 2021
- Messages
- 3,329
- Reaction score
- 7,340
The one I have here is 7 pins, 82216421ABI see both part number kits floating around on eBay. Curious if one kit has the 12-way plug populated with 7 pins, and the other kit’s 12-way plug populated with 10 pins…
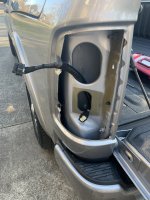
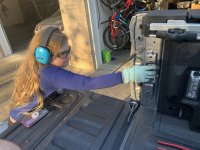
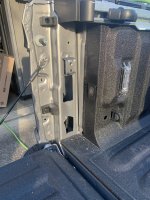
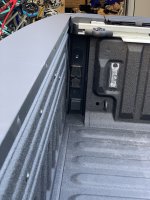
So wanted to see if it would work, so its not all pretty and in finished shape but cut out the shapes for the 12/7pin and tow mode camera connectors in the plastic pillar at the rear of the bed. Located cables for the 12 pin camera system and went up though the round hole in the base of the taillight compartment. Then detached the tow mode camera wire, removed its zip tie connection back to the bundle it joins and snaked it around through the same hole. Cut out the sheet metal behind to allow the plugs to sit flush and the wires to pass through, even let the kiddo cut some with the air saw. Here's the one part I didn't account for, with the locations I placed them it removed both of the tack welds for the lower mount/hole that retains the plastic push retainer, maybe if I went lower with the tow mode camera connector it may be retained, but you can't go higher, there is not enough slack in the wire to go any higher and still reach the connector. So plan is to glue the plastic push retainer in place and put two screws towards the bottom of the plastic pillar to keep it tight to the sheet metal. And of course to clean up those cuts in the sheet metal. Still waiting on the 7 pin pigtail to route up there, supposed to be here today but looks like it will be tomorrow.
Attachments
Users who are viewing this thread
Total: 1 (members: 0, guests: 1)