Alright, the deed is done. Here's a quick walk through applicable to 2023+ trucks...
My Setup
2024 Megacab with digital rear view package
Leer 100XR (I'm 75% sure it's an XR, I've had it through 2 trucks now and haven't got the paperwork handy)
Parts and supplies
CHMSL Camera part # 68506525AA (purchased from a local dealer via mopar part website)
1' Fakra Z Female to Female 50 Omh cable (amazon)
16' Fakra Z Female to Male 50 Ohm cable (amazon)
6' Fakra Z Female to Male 50 Ohm cable (amazon)
1/2" ID rubber grommet (hardware store)
14mm ID 16mm OD carbon fiber tube (amazon)- carbon fiber just happened to be the most common thin walled tube I could find
Rubber sealant caulk
Marine Epoxy
In the 2023+ trucks there's a hub under the driver's seat which connects to the camera in the CHMSL. It was easy to get to by moving the front seat all the way forward. You'll need to remove a plastic cowl with clips on the front left and right of the hub.
I disconnected the magenta CHMSL fakra and replaced it with the 1' female to female cable
View attachment 74264
Next I removed the trim from the driver's seat, driver-side front and rear sills, and the bottom half of the B-pillar.
Then I drilled a 1/2" Hole in angled sheet metal at the rear side at the base of the b-pillar and popped in my rubber grommet. I drilled the pilot hole from the cab and then finished it off from under the truck. I used a scrap piece of sheet metal to protect the wire bundle, just in case. 1/2" was just enough to fish the male end of my 16' fakra cable through.
View attachment 74266
Connected that male end to the short female to female jumper which just been plugged into the hub, pumped some rubber sealant into center the grommet, and buttoned up all the trim I had removed. Side note, I put some duct tape with a little square of tape sticky side to sticky side in the middle, like a duct tape bandaid, on the underside of the grommet to ensure that the sealant would pack into the hole well.
Here's the underside once the sealant had dried enough to remove the duct tape. the piece of tape you see here was just to ensure I didn't yank the cable and mess up the seal before it was fully cured.
View attachment 74274
Next step was the fish the cable down the frame of the truck and up the post hole at the end of the bed. The 16' cable made it the whole way with maybe a foot to spare.
For those who didn't see my first post, I cut the carbon tube to match the length of the camera lens so that it was flush with the lens when the camera was inserted into it. I had to spend a few minutes sanding the inside of the tube to allow the lens to slip through it. I used a normal pipe cutter to cut the tube and ensure that the cut was square. **sorry, I forgot to take pictures of that**
Once the tube was cut, the plan was to use it as a through-hull in the back of the topper for the camera lens. I used the tube to mark a center hole on the cap and then used drill bits of increasing size to enlarge the hole until the tube would ALMOST fit. I used a round file to finish it off, because it offered more control.
Here's a dry fit of the tube and camera
View attachment 74275
For the final fitting, I used some white epoxy (white, cause it's what I had on hand) to adhere the tube in the hole and 3M tape for the camera itself. I cut the topper lining away from the area so the 3M had solid surface to grab onto. I'm not confident that the 3M will hold up over time, because there's very little contact surface on the camera for it to adhere to, but it's the cleanest approach. If it fails, I figure I'll use straps to hold the camera. Tip: Use painters tape to protect the paint on the topper and put a small piece of painters tape on the camera lens to protect that during installation.
I had to relocate the mounts for my topper's LED strip to make room for the camera. This pic looks like there's light bleeding through the hole, but it's just that white epoxy.
View attachment 74271
I used some more duct tape to seal off the topper's liner a little and velcro strips to hold the camera wiring
View attachment 74273
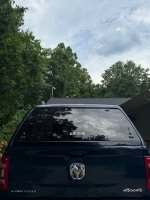
Here's the NEARLY finished product
View attachment 74276
View attachment 74278
All-in-all, it was a super easy and quick install. The challenging parts were all mental... just finding the courage to drill the holes. I'm really happy with the location as it's just under the fold of the topper above the glass, so it's pretty well hidden. Not including the camera itself, I spent ~$50 total on the carbon tube and cables. Once the epoxy has fully cured, I'll return with a paint pen to touch up around the carbon tube just so it blends in as much as possible. Otherwise, I took it for a quick drive and it worked flawlessly.