
Ram Heavy Duty Forum
You are using an out of date browser. It may not display this or other websites correctly.
You should upgrade or use an alternative browser.
You should upgrade or use an alternative browser.
Column shifter boot wear
- Thread starter Nd79
- Start date
OldJeepsNewTrucks
Well-Known Member
- Messages
- 493
- Reaction score
- 956
- Points
- 93
Curious if anybody had these installed yet. I have mine "the updated version" waiting for install but honestly I'm waiting for the OEM one to wear out first.
I haven't found a good time to re tackle this just yet. I've actually not paid much attention to my shifter boot now that there's not a huge gaping hole in it anymore so I think I might leave it for awhile. Possibly a winter project when work dies down.
DougB
Well-Known Member
I don’t see the gaping hole so keep forgetting to install the boot.
DougB
Well-Known Member
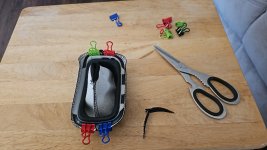
Finally got around to gluing on the Stitch Boots boot to the factory trim ring. I cut the crappy factory boot off the plastic snap-in trim ring.
Using a tip someone used here, I used mini binder clips to hold the boot to the ring. Left a little of the boot overhang the ring where possible. Applied the recommended adhesive around the ring and let it dry thoroughly. Had to do a few touch up areas to ensure adhesion all around and let those dry, too.
After all this work I was thinking this wasn’t worth the hassle. But I finally installed it today and I was actually pleased how it came out. One thing I wish Stitch Boots had done better was making both seams flat inside. The bottom one wasn’t as smooth as the top so there’s a little bulge because of that.
Installed it today and it looks really good. Better than I was expecting seeing it on the bench. Works well in park and in drive. The boot opening is snug around the gear shifter shaft. Overall pleased. RAM should do something like this for these $70k+ HD trucks.
Click thumbnails for larger photos.
Last edited:
waveslayer
Well-Known Member
- Messages
- 446
- Reaction score
- 401
- Points
- 63
Amy updates on the stitch boots, my rubber one is dying quickly. Only 9k miles
Sent from my SM-S916U using Tapatalk
Sent from my SM-S916U using Tapatalk
DougB
Well-Known Member
Did you see my post above?Amy updates on the stitch boots, my rubber one is dying quickly. Only 9k miles
Sent from my SM-S916U using Tapatalk
Ostracize
Well-Known Member


Ironsides77
Active Member
- Messages
- 206
- Reaction score
- 159
- Points
- 43
I’m not a fan of the exposed stitching or the tag.Did you see my post above?
Ironsides77
Active Member
- Messages
- 206
- Reaction score
- 159
- Points
- 43
I’d buy that!Finally got around to doing mine. I think it came out pretty good.View attachment 54468
UglyViking
Well-Known Member
- Messages
- 1,414
- Reaction score
- 1,789
- Points
- 113
Just ordered mine. @Ostracize did you custom order without a label, or is it just not visible in the photo?
Ostracize
Well-Known Member
Cut it offJust ordered mine. @Ostracize did you custom order without a label, or is it just not visible in the photo?
UglyViking
Well-Known Member
- Messages
- 1,414
- Reaction score
- 1,789
- Points
- 113
That was my plan, hahaCut it off
Rockcrawlindude
a rock crawlin’ dude
Do itI think I'm just gonna do a crown royal bag on my shifter... screw it

you sir have changed my mind lol
UglyViking
Well-Known Member
- Messages
- 1,414
- Reaction score
- 1,789
- Points
- 113
Ok, I've stared at this for a while and I can't understand what black magic you've used to do this.Finally got around to doing mine. I think it came out pretty good.View attachment 54468
The OEM shifter boot is "1 piece", rubber over-molded onto a plastic clip. I see the picture of the rubber cut out, and the binders, and yet the next picture shows the ring over the boot, what am I missing?
Ostracize
Well-Known Member
My bad I should have taken better pics during the process. In the pic you reference with the clips I was just setting the orientation/depth to match the angle of rest that the shifter rod passes through the oem rubber hole.Ok, I've stared at this for a while and I can't understand what black magic you've used to do this.
The OEM shifter boot is "1 piece", rubber over-molded onto a plastic clip. I see the picture of the rubber cut out, and the binders, and yet the next picture shows the ring over the boot, what am I missing?
Then I removed one clip trinmed off the excess then recliped to avoid movement.
That leaves the trimmed edge that matches the basic contour of the old rubber.
Then remove all clips. Cut out the old rubber center area leaving just the outermost oem accordion as that bend down inside is where I glued new to old.
Note though, you'll have to "pleat" the top and bottom of the new material a bit to account for extra material.


UglyViking
Well-Known Member
- Messages
- 1,414
- Reaction score
- 1,789
- Points
- 113
Ah, ok I think I'm following. Basically, instead of cutting right at the base to reuse the clip and then gluing over it, you measured up 2-3" cut the top off from there, and then stuffed the boot in between the OEM rubber boot, and the outside "clip portion" of the boot, sort of using the rubber to sandwich the two, hence requiring the pleats top and bottom. Assume you added glue to both sides as part of this.My bad I should have taken better pics during the process. In the pic you reference with the clips I was just setting the orientation/depth to match the angle of rest that the shifter rod passes through the oem rubber hole.
Then I removed one clip trinmed off the excess then recliped to avoid movement.
That leaves the trimmed edge that matches the basic contour of the old rubber.
Then remove all clips. Cut out the old rubber center area leaving just the outermost oem accordion as that bend down inside is where I glued new to old.
Note though, you'll have to "pleat" the top and bottom of the new material a bit to account for extra material. View attachment 61216View attachment 61217
Thanks for the additional photos and write up, that seems obvious now that you say it, and I assumed it was, but I kept looking at that test fit and thinking "now how on earth…"
Ostracize
Well-Known Member
Correct sir, and yes... Carefully glued.Ah, ok I think I'm following. Basically, instead of cutting right at the base to reuse the clip and then gluing over it, you measured up 2-3" cut the top off from there, and then stuffed the boot in between the OEM rubber boot, and the outside "clip portion" of the boot, sort of using the rubber to sandwich the two, hence requiring the pleats top and bottom. Assume you added glue to both sides as part of this.
Thanks for the additional photos and write up, that seems obvious now that you say it, and I assumed it was, but I kept looking at that test fit and thinking "now how on earth…"
I did the inside first then once it set up I did the outside... This allows you to open up down inside that oem bend to avoid getting any glue on your new material.
")