coastie
Member
- Joined
- Oct 3, 2020
- Messages
- 22
- Reaction score
- 42
I just finished this install on a new to me 2019 Ram 3500, and wanted to share the set up on the truck.

Background: I have used a hard wired Rear View Safety Camera on our 5th wheel for the last 9 years. I like the idea of the minimal RF and EM interference of a hard wired camera, as well as having a dedicated display for what's behind the trailer. After reading about others who have tried the OEM trailer camera, I didn't like the idea of the display timing out or having to share the U Connect with other apps. Kind of like a rear view mirror replacement.
Install: If you go with this system, make sure you start from the bed or trailer connection point first and move your way towards the cab.


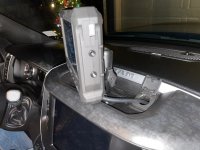
After drilling a hole for the trailer connection, I painted the bare metal and ran the trailer camera harness along the main body harness zip tying along the way. I used the hood release cable pass through in the fire wall as my entry point to the cab and routed it behind the instrument cluster to the center panel. I removed the 12volt outlet on the upper dash and used that as a pass through for the harness to the monitor.
View attachment 10599
Since that outlet is powered with the key on, it was an easy option for power. I soldered flat leads to the displays harness that would interface with the female connector of the 12volt outlet and avoided having to splice into the factory harness.
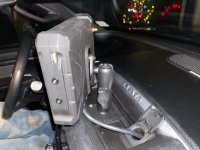
Operation: When connected to the tailer and key on, the camera and display power on. When I'm not towing the camera disconnects easily from the RAM mount and the truck side of the camera harness stays in the 12v outlet housing.
Trailer tow quick connect/disconnect kit: RVS-213-613
Monitor DVR: RVS-3710-DVR

Camera: RVS-MV3-IR-AHD

Background: I have used a hard wired Rear View Safety Camera on our 5th wheel for the last 9 years. I like the idea of the minimal RF and EM interference of a hard wired camera, as well as having a dedicated display for what's behind the trailer. After reading about others who have tried the OEM trailer camera, I didn't like the idea of the display timing out or having to share the U Connect with other apps. Kind of like a rear view mirror replacement.
Install: If you go with this system, make sure you start from the bed or trailer connection point first and move your way towards the cab.
After drilling a hole for the trailer connection, I painted the bare metal and ran the trailer camera harness along the main body harness zip tying along the way. I used the hood release cable pass through in the fire wall as my entry point to the cab and routed it behind the instrument cluster to the center panel. I removed the 12volt outlet on the upper dash and used that as a pass through for the harness to the monitor.
View attachment 10599
Since that outlet is powered with the key on, it was an easy option for power. I soldered flat leads to the displays harness that would interface with the female connector of the 12volt outlet and avoided having to splice into the factory harness.
Operation: When connected to the tailer and key on, the camera and display power on. When I'm not towing the camera disconnects easily from the RAM mount and the truck side of the camera harness stays in the 12v outlet housing.
Trailer tow quick connect/disconnect kit: RVS-213-613
Monitor DVR: RVS-3710-DVR
Camera: RVS-MV3-IR-AHD