Ram Heavy Duty Forum

Register a free account today to become a member! Once signed in, you'll be able to participate on this site by adding your own topics and posts, as well as connect with other members through your own private inbox!

Jump Seat to Console Swap Process

Rogue 2500

Active Member
Joined
Aug 9, 2020
Messages
79
Reaction score
105
Location
Oregon
[MOD: All offers to buy/sell/trade need to be made/linked to a proper post in the buy/sell/trade forum and ADHERE TO THE FORUM RULES including no buying/selling/trading outside that forum.]
[Failure to do so after one polite warning may result in the posts being deleted. Repeat offenses ignoring the rules may come with a warning and/or ban.]
[Apologies to OP and everyone else reading the thread but it was necessary. If you see a post not adhering to site rules, please help and report it.]


Hi All,

I am going to try and document the process to swap from a jump seat to a console. I have a 2020 Ram 2500 Hemi 4x4 CCSB. If you have other than this, your mileage may vary. :cool: I found another member on this site who wanted to trade and we both had the Laramie trim level. I recommend that you try to do this locally if you can, but it can be done over a distance. The shipping is on the spendy side. It worked out for us doing this halfway across the country.I did my part first by sending the jump seat and parts out first.

Jump seat removal:
Remove jump seat front tray mat to uncover 2 screws.
Take out the 2 screws.
Remove front tray.

Tray before removal:
small_jump seat tray.JPG


After tray removal:
small_DSC00184.JPG

Unbolt driver seat
Remove front and rear driver side jump seat bracket bolt. One bolt is visible in the picture above. The rear bolt is under the jump seat accessible when the driver seat is removed or slid forward.
Unbolt female seat belt strap/connector. You will need a torx driver. The female seat belt is bolted to the driver side seat rail bracket.

Unclip wiring harness under driver seat.
1 gray USB
1 Black power port.
Remove harness from under driver seat rail.

small_DSC00185.JPG

small_DSC00186.JPG

(note: I left this wiring harness attached to the jump seat. because I was not sure what was needed to mount the jump seat into the other truck.) There is a USB port inside the top storage bin in the jump seat. It could not be removed without damaging the jump seat so the other member cut the wire. Then sent this wiring harness back. I was the only way we saw to make this happen.

Unbolt passenger seat.
Remove 4 nuts from the passenger side brackets (front and rear) to the passenger seat rails.

Not my picture, I did not take a picture at this point, this shows the passenger side brackets:
jump seat bracket example.jpg

Brackets have 4 bolts to the passenger seat rail:
small_DSC00187.JPG

small_DSC00188.JPGsmall_DSC00200.JPG

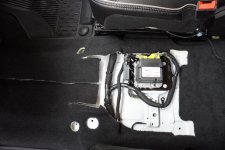
Remove heating/cooling duct extension. May require cutting carpet or carpet removal. This might be done with out cutting the carpet, but that is up to you try.
This is what it will look like after the jump seat remove. (yes, I cut the carpet, because I will not be swapping back.)
 

Attachments

  • small_DSC00200.JPG
    small_DSC00200.JPG
    534.1 KB · Views: 105
Last edited by a moderator:

Rogue 2500

Active Member
Joined
Aug 9, 2020
Messages
79
Reaction score
105
Location
Oregon
Dash components removal. I did not photograph because during the removal, because I was more worried about not damaging anything.

Dash parts removal (pictures after removed from dash)
a. Remove lower dash panel. Clipped in.
small_DSC00190.JPG

small_DSC00191.JPG

b. Remove USB/Power/Storage bezel (surround). Clipped in.

small_DSC00193.JPG

small_DSC00194.JPG

Remove 4 screws around USB/Power/Storage control panel. Hard to see because they are deep in the dash.

small_DSC00195.JPG

small_DSC00196.JPG

small_DSC00197.JPG
Remove USB/Power/Storage control panel. Clipped in after screws are removed.
Remove 4 wiring harnesses
i. 3 on the driver side (USB and aux in plugs)
ii. 1 on the passenger side (power port)
small_DSC00198.JPG
 

Rogue 2500

Active Member
Joined
Aug 9, 2020
Messages
79
Reaction score
105
Location
Oregon
In my jump seat version of the 2500, it had two sets of wires. The set under the drivers seat goes to the rear of the jump seat and under the lid in the storage bin. The front has the USB, aux in, and power port wiring. The console version has one harness that starts at the front (dash) and runs back to the rear of the console and the usb under the console storage bin.

The other member kept the console wiring harness because it made the most sense. He has the one harness and can use most of it.

I have installed the console, but do not have any of the ports working yet.

The connectors are not long enough to reach the ports in the console.

small_DSC00198.JPG
I am focusing on the front ports first as they are most important to me.

I have ordered two USB cable extensions and I am waiting for them to com in.
https://www.amazon.com/gp/product/B00S6HKR1Q/ref=ppx_yo_dt_b_asin_title_o02__o00_s00?ie=UTF8&psc=1

I would like to have some extensions made, but I am not sure if that can be done, Sure sure how to get the connectors. I am talking with a mechanic to extend the wires them selves. I.E. cut the wires, add in longer wires, and solder back together. I have tried to pull the wires as far as they will go, but they are not long enough.

I am open to suggestions! :cool:

I will post more to this as I get it worked out.
 
Last edited:

McHenry2500

Well-Known Member
Joined
Aug 20, 2020
Messages
455
Reaction score
464
Where did you get the center console you're installing? I'd be interested in doing this same swap but not sure where I could find the necessary pieces.
 

Rogue 2500

Active Member
Joined
Aug 9, 2020
Messages
79
Reaction score
105
Location
Oregon
Where did you get the center console you're installing? I'd be interested in doing this same swap but not sure where I could find the necessary pieces.

It was a swap with another forum member. We agreed to provide all necessary parts as feasible.

You could post in the classified to find someone willing to swap or try Ebay.
 

2manyprojects

Active Member
Joined
Oct 6, 2020
Messages
71
Reaction score
105
Location
WA state
Rogue, thank you for documenting this switch over. Is there a chance you could snap a few pics of the floor space between the seats, but with the driver's seat in view? Are your seats still fully mounted, or are they dependent on the center seat frame to mount to the floor?

I am thinking about a little different direction; possibly installing an aftermarket Tuffy Console or something custom w/storage. Your tear down pics are answering a lot of questions and saving me much effort dissecting my center seat in my Tradesman. Thanks again !
 

Rogue 2500

Active Member
Joined
Aug 9, 2020
Messages
79
Reaction score
105
Location
Oregon
Rogue, thank you for documenting this switch over. Is there a chance you could snap a few pics of the floor space between the seats, but with the driver's seat in view? Are your seats still fully mounted, or are they dependent on the center seat frame to mount to the floor?

I am thinking about a little different direction; possibly installing an aftermarket Tuffy Console or something custom w/storage. Your tear down pics are answering a lot of questions and saving me much effort dissecting my center seat in my Tradesman. Thanks again !

I still do not have the ports working yet, so I will be taking out the console again to work on them. I will be happy to take some more pictures. The seats are independent of the jump seat or console. The drivers side seat rail has the female (receiver) end of the seat belt. It un-bolts with a torx bit. The passenger side has the jump seat bracket that bolts to the passenger seat rail. Once those are un-bolted then the seats are independent.

On the console install there are two brackets for the console. one on the cab floor and the other on the dash frame.

It may be possible to use the four floor bolts to mount a custom console.

small_DSC00200_2.JPG
 

Rogue 2500

Active Member
Joined
Aug 9, 2020
Messages
79
Reaction score
105
Location
Oregon
Rogue, thank you for documenting this switch over. Is there a chance you could snap a few pics of the floor space between the seats, but with the driver's seat in view? Are your seats still fully mounted, or are they dependent on the center seat frame to mount to the floor?

I am thinking about a little different direction; possibly installing an aftermarket Tuffy Console or something custom w/storage. Your tear down pics are answering a lot of questions and saving me much effort dissecting my center seat in my Tradesman. Thanks again !

Here you go. Shot towards the driver seat:
DSC00212.JPG
 

Rogue 2500

Active Member
Joined
Aug 9, 2020
Messages
79
Reaction score
105
Location
Oregon
Ok, now for the console install. As mentioned earlier, the other forum member kept the console harness. I ordered a new one to use for this install. I am not sure this is completely necessary, but it beats the alternative. The other option is to extend the original wiring to meet the console ports. They just are not long enough to reach. I researched the project and the other forum does not give you the specific information needed.

As stated in one thread I purchased two of these extention cables:
https://www.amazon.com/gp/product/B00S6HKR1Q/ref=ppx_yo_dt_b_asin_title_o02__o00_s00?ie=UTF8&psc=1

When I removed the jump seat, I pulled the rear wiring harness out from under the driver seat into the console area.

DSC00219.JPG

There are two brackets that need to be mounted. The rear bracket mounts to the floor behind the electronics.

index.php


Next is the front bracket that mount to the dash frame. There are two clips behind this bracket the the bolts screw into. I got these with the swap, but I suspect they are cheap to buy fronm the dealer.

DSC00217.JPG
 

Attachments

  • small_DSC00212.JPG
    small_DSC00212.JPG
    516.4 KB · Views: 1,476
Last edited:

Rogue 2500

Active Member
Joined
Aug 9, 2020
Messages
79
Reaction score
105
Location
Oregon
I wired the new console harness and left the front most part un-clipped and loose to make it flexible enough to reach.

DSC00215.JPG

I plugged in the power port and aux in port from the new console harness. The power port and aux in port wiring from the dash (jump seat) are not used as they are not long enough. Do not plug in the two USB ports from the console wiring harness. Use the original USB connectors from the dash (jump seat) original wiring. This is were the USB extension cables come into play. Connect the extension cable to the original USB cable and run them to the console USB ports.Make sure you pay attention to USB 1 and USB 2 as this matters when selecting the port to use as labeled on the face of the console. I Gorilla taped both ends of the extension cables to ensure they stay connected during off road outing.

DSC00224.JPG

DSC00225.JPG

I also pulled and reset the fuses for the USB.

F65 – 10 Amp Red MOD Inverter (Wake Up) / Power Port / USB IP / WCPM – If Equipped
F66 – 10 Amp Red Sunroof / USB Rear– If Equipped
F67 – 10 Amp Red CDM / UCI Port / USB Front
 
Last edited:

Rogue 2500

Active Member
Joined
Aug 9, 2020
Messages
79
Reaction score
105
Location
Oregon
Put the console part way into place, connect the harness from under the driver seat (that is now moved towards the dash) to the console wiring harness. This is the H looking connections. Then connect the USB connection that is with the wiring harnesses.

DSC00220.JPG

DSC00222.JPG
 

Rogue 2500

Active Member
Joined
Aug 9, 2020
Messages
79
Reaction score
105
Location
Oregon
Carefully slide the console into place. Try to watch the air duct to mate up with the dash outlet and the ground wire on the wiring harness that was under the driver seat. The ground wire on mine was long enough, but *may not* on your truck.

ground_DSC00212.JPG


Once the console is wired and slid into place, put in the final bolts and covers.

DSC00208.JPG

DSC00209.JPG

And two final plastic trim pieces between the console and the dash.
 

Rogue 2500

Active Member
Joined
Aug 9, 2020
Messages
79
Reaction score
105
Location
Oregon
Standard caveat: This worked for my truck and may not work for yours. I was able to get all ports working except for the two rear USB ports. I really don't need them, but will work on them sometime later.

Do this at your own risk! I am not a professional, just a backyard hack. Anyway, I hope this helps.
 

farmallboy

Stump Killer
Joined
May 23, 2020
Messages
203
Reaction score
131
Great thread. I love a full console but have a manual transfer case.

Like seeing an install like this though. Good work!
 

Users who are viewing this thread

Top