Ram Heavy Duty Forum

Register a free account today to become a member! Once signed in, you'll be able to participate on this site by adding your own topics and posts, as well as connect with other members through your own private inbox!

3d Printed Bed Grommet

CortexM0

Active Member
Joined
Jul 15, 2022
Messages
164
Reaction score
217
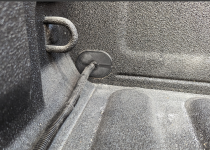
I needed to temporarily run some wires into the bed of my truck. I wanted a fairly clean install, but didn't want to permanently modify anything since I was going to have to remove it in a few months. I ended up 3d printing a grommet to replace one of the existing plugs in the front of the bed.
Screenshot 2023-12-31 at 9.54.17 PM.png

Just pop the existing plug out, and snap this one in its place. The hole is sized for 3/8" loom from H.F. Tools. The slit allows you to twist the plug open (prior to installation) and slide existing wires into place.

Files can be found here: https://www.printables.com/model/701061-2023-ram-2500-bed-grommet
 

Brutal_HO

The Mad Irishman
Staff member
Joined
Feb 1, 2020
Messages
12,202
Reaction score
21,839
Location
Douglas County, CO
I needed to temporarily run some wires into the bed of my truck. I wanted a fairly clean install, but didn't want to permanently modify anything since I was going to have to remove it in a few months. I ended up 3d printing a grommet to replace one of the existing plugs in the front of the bed.

View attachment 67347

Just pop the existing plug out, and snap this one in its place. The hole is sized for 3/8" loom from H.F. Tools. The slit allows you to twist the plug open (prior to installation) and slide existing wires into place.

Files can be found here: https://www.printables.com/model/701061-2023-ram-2500-bed-grommet

Would you mind sharing the cad file? Using the free fusion360 and converting stl/mesh sucks with it.
 

Grey

Well-Known Member
Joined
Sep 26, 2023
Messages
190
Reaction score
301
I needed to temporarily run some wires into the bed of my truck. I wanted a fairly clean install, but didn't want to permanently modify anything since I was going to have to remove it in a few months. I ended up 3d printing a grommet to replace one of the existing plugs in the front of the bed.

View attachment 67347

Just pop the existing plug out, and snap this one in its place. The hole is sized for 3/8" loom from H.F. Tools. The slit allows you to twist the plug open (prior to installation) and slide existing wires into place.

Files can be found here: https://www.printables.com/model/701061-2023-ram-2500-bed-grommet
Nice work guy
 

UglyViking

Well-Known Member
Joined
Jul 11, 2020
Messages
1,310
Reaction score
1,600
Firstly, thank you both for providing files for this stuff for free.

Secondly, @Brutal_HO , I'd love to hear about how you made that angled plate for the rubigrid. Feel free to respond here or DM if you prefer. I am curious how one goes about finding the correct angles and curves for something like that. I've got a project I'm wanting to start for a mount for a voswitch panel, but I've got no clue how to do the radius corners outside trial and error.
 

Brutal_HO

The Mad Irishman
Staff member
Joined
Feb 1, 2020
Messages
12,202
Reaction score
21,839
Location
Douglas County, CO
Firstly, thank you both for providing files for this stuff for free.

Secondly, @Brutal_HO , I'd love to hear about how you made that angled plate for the rubigrid. Feel free to respond here or DM if you prefer. I am curious how one goes about finding the correct angles and curves for something like that. I've got a project I'm wanting to start for a mount for a voswitch panel, but I've got no clue how to do the radius corners outside trial and error.

I made a "CAD" pattern best I could and went from there. Several sessions still learning Fusion360 and several prototypes later...

Most probably know, but in this context, CAD = Cardboard Aided Design. LOL

RE: Fusion360. Starting with a sketch with constraints and dimensions, one can make nearly untold number of alterations to the model just by changing the sketch. Changes to the body/component also flow back to the sketch.
 

Users who are viewing this thread

Top