
Ram Heavy Duty Forum
You are using an out of date browser. It may not display this or other websites correctly.
You should upgrade or use an alternative browser.
You should upgrade or use an alternative browser.
What did you do TO your RAM today?
- Thread starter LamboTexas
- Start date


Rockcrawlindude
a rock crawlin’ dude
Oh man. I thought you swapped for their aftermarket tow mirrors.The mirrors (glass) can only be ordered in pairs.
To be clear, I did not install/change the entire mirror, just swapped the non-heated factory convex glass for heated glass available from Boost Auto.
TrailWhale
Well-Known Member
Got some Thuren parts installed over the weekend and wheels/tires on. It looks much better leveled IMO 

Sent from my iPhone using Tapatalk

Sent from my iPhone using Tapatalk
Rockcrawlindude
a rock crawlin’ dude
DroooolGot some Thuren parts installed over the weekend and wheels/tires on. It looks much better leveled IMO
Sent from my iPhone using Tapatalk
DeepH20Driller
Well-Known Member
- Messages
- 793
- Reaction score
- 1,165
- Points
- 93
Replaced the chrome lug nuts with black ones and tinted the mirror marker lights, stuck out like a sore thumb in my opinion...
View attachment 15422View attachment 15423
Did you buy a kit for the tint or just bought some and applied?
Sent from my iPhone using Tapatalk
Link to the lug nuts? They look good.Replaced the chrome lug nuts with black ones and tinted the mirror marker lights, stuck out like a sore thumb in my opinion...
View attachment 15422View attachment 15423
Sent from my moto z3 using Tapatalk
I bought the Rustolium lens tint spray, took the lenses out and took my time on the prep.Did you buy a kit for the tint or just bought some and applied?
Sent from my iPhone using Tapatalk
Link to the lug nuts? They look good.
Sent from my moto z3 using Tapatalk
I bought the same ones as SplzhaulI agree the lug nuts chrome suck it takes away from the look. I got thEm from Amazon they are a set of 20 14x1.5mm black 7/8 22mm Hex Duplex Acorn OEM Style 1.5 Inch 38.5 mm Lug Nuts for Factory Wheels VPE-14155330BK
Captain Morgan
Member
- Messages
- 49
- Reaction score
- 75
- Points
- 18
I ordered a set of these as well .. do you guys like them ?? I thought they would look good on Granite Crystal and wanted something to prevent boot scuffs !!It was happy curled/tucked in from shipping. I have since peeled it out after shutting the gate and hope it trains itself that way. Good eye.
Sill protectors went on today. Thanks to whomever posted these last week.
Sent from my moto z3 using Tapatalk

Looks great!Got some Thuren parts installed over the weekend and wheels/tires on. It looks much better leveled IMO
Sent from my iPhone using Tapatalk
Had my RH Midnight series bumper installed. Not the best alignment with the fender well. Anyone else have the same issue with their RH bumper? I like it overall. I ordered a winch at the same time I ordered the bumper. Was told it was winch ready, but turns out it's not. Just has capability of adding a winch. Meaning there is space, but need to source the bracket/plate to mount the winch and RH doesn't have adapter plates for winches.


Rockcrawlindude
a rock crawlin’ dude
Loosen the mounting bolts, use a block of wood and a floor jack, jack up the bumper by the front and tighten it all back down. They forgot to align it it looks like.Had my RH Midnight series bumper installed. Not the best alignment with the fender well. Anyone else have the same issue with their RH bumper? I like it overall. I ordered a winch at the same time I ordered the bumper. Was told it was winch ready, but turns out it's not. Just has capability of adding a winch. Meaning there is space, but need to source the bracket/plate to mount the winch and RH doesn't have adapter plates for winches.
View attachment 15459View attachment 15460View attachment 15461View attachment 15462
Bullpin22
Member
- Messages
- 48
- Reaction score
- 86
- Points
- 18
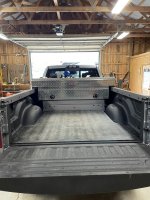
Finally got the bed finished up tonight.
Cut to fit and painted to match angles for the top of the bed rails with tie down holes.
Installed the fuel tank and pump Saturday.
Installed the toolbox this evening.
Cut to fit and painted to match angles for the top of the bed rails with tie down holes.
Installed the fuel tank and pump Saturday.
Installed the toolbox this evening.
Attachments

Last edited:
DeepH20Driller
Well-Known Member
- Messages
- 793
- Reaction score
- 1,165
- Points
- 93
Washed and clay bar yesterday. Polish and ceramic application today. First time with ceramic and it went well. Used AvalonKing ceramic.

Sent from my iPhone using Tapatalk
Sent from my iPhone using Tapatalk
lowfidelity
Member
- Messages
- 63
- Reaction score
- 60
- Points
- 18
Talk to me about this angle iron on your bed caps. Just some 3/16 steel painted? How is it held down?Finally got the bed finished up tonight.
Cut to fit and painted to match angles for the top of the bed rails with tie down holes.
Installed the fuel tank and pump Saturday.
Installed the toolbox this evening. View attachment 15464
Alright...Cool, Thx! Figured they would get it G2G the first time. They are an off-road specialty shop.Loosen the mounting bolts, use a block of wood and a floor jack, jack up the bumper by the front and tighten it all back down. They forgot to align it it looks like.
Bullpin22
Member
- Messages
- 48
- Reaction score
- 86
- Points
- 18
The angle is 3”x3”x1/4”. I laid out three locations where the tabs for the factory plastic were not. One towards the front, one towards the rear and one closer towards mid point yet rearward because the box is bolted too providing another attachment point.Talk to me about this angle iron on your bed caps. Just some 3/16 steel painted? How is it held down?
So once laid out, I drilled holes in the angle. Placed the angle on the rails and marked the bed rails. Removed the angles and used 1/2 sleeve anchor minus the sleeve. Basically a threaded rod now with a shank. Install the threaded rod portion flush with top of angle and welded it up and grind it down.
With a little body work you can’t see any signs from the top.
I do this often with our work trucks because we add ladder racks and this is a solid mount. I’ve also done this adding a tie in angle between the two bed angles at the front. I then had a place to weld a headache rack to that was solid. That was a bit of a chore as it was a fit, tack up, remove, weld up, grind, install to verify then take the unit to the painter. Awkward to handle but looks good and stout as hell.
Last edited:
Rockcrawlindude
a rock crawlin’ dude
Post pics if you get that gap straightened upAlright...Cool, Thx! Figured they would get it G2G the first time. They are an off-road specialty shop.