What's new
Ram Heavy Duty Forum

Register a free account today to become a member! Once signed in, you'll be able to participate on this site by adding your own topics and posts, as well as connect with other members through your own private inbox!

Timber Grove Air Bags

Scooter29

Well-Known Member
Messages
320
Reaction score
514
Points
93
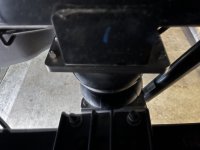
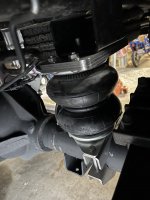
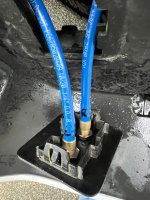
Anybody have any experience using Timber Grove air bags on a 3500? Or even a 4th gen 3500? Look like good quality and they are all stainless steel. They said they are designed to cycle with the full suspension travel of the truck. Trying to accomplish load support for a 3,000lb truck camper without making the truck any stiffer.

 
I had them on my ecodiesel. Well made and worked very well. I would definitely put them on a 3500 without question.
 
I do not have a 3500, but they work great on my 2500. Timber Grove makes a quality product.
 
I had them on my Ram 1500 EcoDiesel, installed on a friends 2500 and will add a set on my Ram 2500, they're also easy to install.
 
Had them in my 2015 Ecodiesel, this was the heaviest load I ever hauled with them. Don't know how much this weighed, but on top of whatever it normally weighed, it was saturated from a few days of heavy rain. Had to fill the bags up to their max PSI to get the truck level.

MfoaswIzXM48LtM5wy5p1dVa82Q7JKeJV9ViTZIgSrDRJhuAMQmB-rhM25Li1baMeW-0SuyY35spTNH5uPhN2kmgAzBD0x9vAN6WKIcb0qVsG6hwKGn2QidqS1X5_e9jhachOm-eqMLNVsmlda2DhGKy6016xTuhSd0RpWbggRo6A8hfzGHQjaFAH5QdyT8UyxpD83TUnWQN49YjlSpxJWPy5wLQUb8ESr7H24w_4uxF6lTQYAFO-pC7Pmq8uYX2Hd19hdsLZRzXhO9b3YVhY6J19sb2-dMf8ywBZYGz9fp6KYHYpDrIbXquhLgB2DvKibrm7iy03-nAiFjOu3200wavKdib4q-FGjl4jSbvvcIS2LqfFU1Bp_8JRGQ2ptCy9zLSBrzuAdK0OJWjCeU2j5ppkkNR5YuSUnn-WEMqnfKBInj69iQ6JyCUNTHVKyFFblOsCElQPg85UyCpaSMqIxzfqp6Zt23dPwA6KBdC4ITcePf3dhnjOlnjYHZ_deHVyue731L2ycGw5A0YliPikSAwqTA5TvnSf01vVeQsASsZjHEoN439-qOHk98MrrjVkbiZ9Pmdm-yN4mnkNMPfh4dgiQoMBmMCcp0MLuOCCwGETl6YQng__o-_UqwP8U-JrSDHTEt9HQv71TS1IsQf4W61bEdrSzoPbargLe3nv2nbWK2mXy1FFT3Dx22UcdH69e9PXhyBkpS9ee33PbRWo8hy=w1210-h907-no
 
I've had them on my 2500 and 3500 SRW and love them. I feel they are the nicest bags out there. I have factory air on my 3500 DRW, if not I'd be running them again.
 
They look like firestone bags but stainless mounts so i would say they are good
 
Thanks everyone, it’s the one thing I kinda wish I ordered with the truck. At the time I was planning on a toy hauler and then went the other way and got a truck camper ha. But I can buy these and add their auto level air system later for about the same price luckily and have auto air leveling with nice stainless material.
 
I used a pair on my 1500 before I traded for my 2500. Easy to install and worked well.
 
Ordered the bags last night. Will update with pictures when I get them and install. I really was looking at every option other than bags so I don’t jeopardize the ride in the rear. But with the camper and wanting to tow a 16ft flatbed with a SxS it makes sense. I might look at adding Carli’s add a pack later. I think it would make a good combo.
 
Air bags came in, they are really nice quality. Will try to install maybe this week if I can clear room to back the truck into the garage some. Supposed to be raining all week here in WA.
 

Attachments

  • 3869E69E-145A-466A-AFFB-BBC0FA796C3C.jpeg
    3869E69E-145A-466A-AFFB-BBC0FA796C3C.jpeg
    763.6 KB · Views: 97
  • 2621C2C4-FB9A-4BE0-A1F8-49795D71F0B1.jpeg
    2621C2C4-FB9A-4BE0-A1F8-49795D71F0B1.jpeg
    605.5 KB · Views: 91
Watch their install video a couple of times if you haven't already, its an easy install.
 
Bags are in, just need to run the airlines as I wasn’t given enough lock nuts for the shrader valves. Install was nice and easy.
 

Attachments

  • CEC746F4-842A-480B-BFAE-8CAEE46EDCF0.jpeg
    CEC746F4-842A-480B-BFAE-8CAEE46EDCF0.jpeg
    378.8 KB · Views: 98
  • 266FB9E4-43A8-48E5-8340-BA0FF1744A98.jpeg
    266FB9E4-43A8-48E5-8340-BA0FF1744A98.jpeg
    327.8 KB · Views: 103
  • F5DCEE4A-2770-4729-A4E1-9C18FDC25662.jpeg
    F5DCEE4A-2770-4729-A4E1-9C18FDC25662.jpeg
    278.3 KB · Views: 103
I installed TG bags yesterday. I had both bags mounted up in less than two hours, but another two hours was spent running the right and left air lines through the frame and up against the truck bed over the exhaust. I sleeved the lines with heavy rubber hose segments for chafe protection where it seemed appropriate. I also did the 100psi soap test.

The real test will be in two weeks when we load 2000 lbs of camper and another 1000 lbs of people and gear.
Then I'll be able to level side to side and front to back.2021-11-12 13.09.19.jpg2021-11-12 13.10.24.jpg2021-11-12 13.10.17.jpg2021-11-12 13.10.05.jpg
 
Looks good, I ran mine through the frame as well and put some rubber where it hit the edges on the frame. I’ll be road testing this week with my 3000lb camper to get the right pressures needed for when we take it out for thanksgiving.
 
Yup!
We'll be on the road for Thanksgiving also! And that's a pavement trip to the Eastern Sierra. It's really a shakedown for two weeks in Death Valley in December, where we will be 40 to 60 miles from pavement.

Today I installed our front receiver hitch (Torklift) so we can bring our bikes while riding level on the new air bags!

One thing on my air bag install was the bottom clamp wanted to sit a bit off kilter, leaning towards the front.
I got out my tape measure and it was almost an inch wider in front than the back between the clamp plates. I aired down to nothing, then used a carpenters clamp to pull the top and bottom plates to parallel then I retightened the nuts on the axle clamp.

My instructions said the bags were labeled right and left, but I couldn't see any identifying marks. They seem identical, so I don't know if I swapped right for left, which might cause the bags to be be offset slightly? I'm tempted to call Steve at TG and ask him.
 
20211114_142035.jpg

Install took me most of a Sunday, with a little help from my wife lifting the crossbar into place with a floor jack.
I was done by 230pm and started around 10am after fussing with the airbag mounts on the rear axle.

Instructions were fairly clear until it talked about removal and cutting of the intercooler shroud. Photo made zero sense. The front air dam came right off with 14 nuts @ 10mm and two clips you need to push in with a screwdriver, plus four bolts on struts, also 10mm. I only notched out the lower air dam, using my multi-tool.

I was able to remove and re-install front tow hooks. Breaking them free requires a 24mm socket and breaker bar. Fishing the bolts with (provided) wires was a first, and it worked, even when I incorrectly thought the side plates bolted to the inside of the frame. I connected everything loose, then it was time to lift the 60lb? crossbar.

My wife helped me and we put the crossbar on a floorjack on top of a 4x4 chunk. Worked like a charm. Then I snugged up the five bolts through the frame, 18/19mm and 24mm using my Makita 1/2" impact driver and socket/wrenches.

It's solid and doesn't hang down too far.

20211114_131227.jpg2021-11-14 14.35.48.jpg2021-11-14 14.35.36.jpg
 
Back
Top