
Ram Heavy Duty Forum
You are using an out of date browser. It may not display this or other websites correctly.
You should upgrade or use an alternative browser.
You should upgrade or use an alternative browser.
Installing Upper Glove Box in Tradesman
- Thread starter Jcannon
- Start date
b307a1
Well-Known Member
I'm waiting for someone knowledgeable to respond too!
What I have found out is that all of the upper trim levels that have upper glovebox has the trim level emblazoned on them. No plain door to put in a Tradesman is available..........yet.
What I have found out is that all of the upper trim levels that have upper glovebox has the trim level emblazoned on them. No plain door to put in a Tradesman is available..........yet.
Last edited:
AMLumber
Member
TTT
I have the same question does anyone know if it is possible?
Sent from my iPhone using Tapatalk
I have the same question does anyone know if it is possible?
Sent from my iPhone using Tapatalk
steve49
Well-Known Member
I would guess it would require changing out parts of the main dash framework? Here's the components that go into the dash framework.

Last edited:
Mike67
Member
- Messages
- 95
- Reaction score
- 77
- Points
- 18
Looks like a big job compared to the 2018's. Looked at my 2020 and there is no insert, besides the top shelf is my wife's junk shelf. She would not be happy if it had a door, although I would be.has anyone installed or know if you can install an upper glove box in a Tradesman?
elephantrider
Hydraulic Lifter Crew
- Messages
- 2,435
- Reaction score
- 3,307
- Points
- 113
if I get unlazy ill try and find the post where it was done on a 19 from what I remember it was just as easy.
I have been looking into this. I did the write-up on CF back in 2012 for the 4th gen upper glove box add. Looking at the parts diagram, the upper box & cover are now one piece. What i haven't figured out is it looks like there are two different parts for the far right air vent. Looking at the attached diagram, will need #8, #9, and maybe #12 or #13, if #8 requires a different vent assembly.
Need to find someone that already has the upper box with cover and see if they can get the part number of the vent assembly.
Need to find someone that already has the upper box with cover and see if they can get the part number of the vent assembly.
Attachments
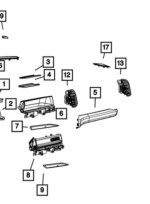
Interesting, you can find the upper glove box assembly easy enough (it will have bighorn, Laramie, etc. on it) but I have not factored that you potentially need to change out the air vent.I have been looking into this. I did the write-up on CF back in 2012 for the 4th gen upper glove box add. Looking at the parts diagram, the upper box & cover are now one piece. What i haven't figured out is it looks like there are two different parts for the far right air vent. Looking at the attached diagram, will need #8, #9, and maybe #12 or #13, if #8 requires a different vent assembly.
Need to find someone that already has the upper box with cover and see if they can get the part number of the vent assembly.
My 2021 Tradesman will not be here for another month to start monkeying with this
I ordered it. The box says bighorn on it and I hope it's the right color discription says black. The price wasn't crazy $158...sorta wish they would put vinyl seats and floor in a bighorn as a Package... Come on Ram just cause Im a dirty boy doesnt me I don't like nice things.
b307a1
Well-Known Member
Yeah with photos!
H3LZSN1P3R
You're doing it wrong
Subed to see how it works, i need to do something to avoid my wife using it as a garbage can lol
b307a1
Well-Known Member
I can't wait!
I installed it.
Part no. 6YK08TX7AA (black with bighorn on it)
My tradesman has a black dashboard and this matches perfect. Only 1 issue the bezel underneath is smaller on tradesman than bighorn so I have a gap. I'm searching for that part number now.
First remove the radio there are 2) t20 torch on top under the rubber mat than it pulls out from the clips. Watch a video on that to see how hard you gotta pull- Its in there.
Next remove the bezel ( long trim piece above lower glove box and below cubby. It's held in with clips. Cargill because one clip by the radio trim is backwards. Go easy and watch inside as you go. ( I didn't and that clip shot into the dash idk where)

See the one tab missing his clip. That's the one that's backwards. Just want you to watch that guy. if you go to yank the whole thing off that whole tab might break.
Next remove glovebox.
Under the glovebox is a fabric cover with 3 plastic push pins. Remove those pins ( buy some btw).
Under the cover you will see 2) screw with 7mm heads. Remove those.
Go to the top where you just removed bezel there are 6 screws staggered and 2 other on the left by radio area. Remove all 8.
Now is when you can remove glove box. With the two lower screws removed it is only held in with clips pry it looks with a plastic tool or give a tug.
With the glove box removed look up under the dash there are 2 screws holding in the cubby. Gonna need a 12" extension to reach up in there.
Once screws are removed the cubby is ready to be removed. It doesn't have clips.
Install the upper glove box. The black tabs on it's backside sit below the tabs that held the two screws.
This is the tab. Notice my cubby tab is attached and. There is no cubby. So that how I found those.
When you go to put the screws back in slide a piece of paper in the socket so the screw doesn't fall out of the socket.
Once those are back in it's time to put it all back together.
Took me about 45 minutes to figure it out and install it. Not a bad job at all.
I will update the trim bezel part no when I confirm it's correct.


Part no. 6YK08TX7AA (black with bighorn on it)
My tradesman has a black dashboard and this matches perfect. Only 1 issue the bezel underneath is smaller on tradesman than bighorn so I have a gap. I'm searching for that part number now.
First remove the radio there are 2) t20 torch on top under the rubber mat than it pulls out from the clips. Watch a video on that to see how hard you gotta pull- Its in there.
Next remove the bezel ( long trim piece above lower glove box and below cubby. It's held in with clips. Cargill because one clip by the radio trim is backwards. Go easy and watch inside as you go. ( I didn't and that clip shot into the dash idk where)
See the one tab missing his clip. That's the one that's backwards. Just want you to watch that guy. if you go to yank the whole thing off that whole tab might break.
Next remove glovebox.
Under the glovebox is a fabric cover with 3 plastic push pins. Remove those pins ( buy some btw).
Under the cover you will see 2) screw with 7mm heads. Remove those.
Go to the top where you just removed bezel there are 6 screws staggered and 2 other on the left by radio area. Remove all 8.
Now is when you can remove glove box. With the two lower screws removed it is only held in with clips pry it looks with a plastic tool or give a tug.
With the glove box removed look up under the dash there are 2 screws holding in the cubby. Gonna need a 12" extension to reach up in there.
Once screws are removed the cubby is ready to be removed. It doesn't have clips.
Install the upper glove box. The black tabs on it's backside sit below the tabs that held the two screws.
This is the tab. Notice my cubby tab is attached and. There is no cubby. So that how I found those.
When you go to put the screws back in slide a piece of paper in the socket so the screw doesn't fall out of the socket.
Once those are back in it's time to put it all back together.
Took me about 45 minutes to figure it out and install it. Not a bad job at all.
I will update the trim bezel part no when I confirm it's correct.
