El Toro Blanco
Member
- Messages
- 52
- Reaction score
- 50
- Points
- 18
Below are the parts list & steps taken to install an OEM fuel tank skid plate on my 2021 RAM 2500, Crew Cab, 4x4, w/ 6’4” bed. To accomplish this you will need to fabricate mounting points/ brackets for the rear. If you have tool skills, or know someone who does…you can do this!
Why are rear mounts not available?…A little back story: Instead of built-in mount points, or providing (purchasable) mounts ‘Ma Mopar’ has created TWO different frames (as in separate P/Ns!)...One with mounts for the few pickups that come from the factory with a fuel tank skid plate, and one without mounts (the majority of pickups manufactured) that come without said skid plate. I’m not making this up!! It’s straight from a RAM Tech Rep to the parts guy I dealt with.
After some time lying on my back under my pickup, studying the design, I wondered why would ‘Ma MOPAR make two(!) separate frames when they could have more cost effectively produced one frame(!) and installable, bolt-on mounts? Then they could SELL said mounts to those of us who believe in the quality of OEM parts…be it for dealer upgrades/ installs or our own installation. I digress. Let’s start.
Brackets: If you can make these, or get them made, the rest is simply ordering parts & bolting things together. Crawl under your rig and look around the rear of the fuel tank. There is a slim chance it was built using a frame that has attaching points from the factory. If it does (they will be just outside the rear tank mounting strap), consider buying a lottery ticket.

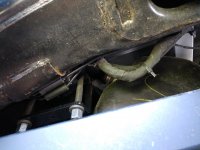
The brackets will attach to the cross member tube above, and towards the rear of the fuel cell.
Cross member ‘tube’ of frame above fuel cell, inboard side of tank. Top of photo is front, bottom is rear of pickup

This photo is of the outboard side of the tank...same tube. Top of photo is outboard. Bottom is inboard
The frame’s cross member tube where the mounts ‘would have been welded to’…is 3 ½” in dia.. The drop distance from the ‘tube’ to the rear mounting points of the OEM skid plate is:
The ‘dog ears’ on the top of the mounts are to keep the mounts from ‘rocking’ as they are tightened into place. The ‘top’ holes on the Inboard mount are ‘open’ due to the depth of the cut out…it has to reach further (up) around the 3 ½” cross member. If you cut out less as I mentioned above, you may not see this result.
There is limited space on the outboard side of the tank. I had to trim (narrow) the forward ‘dog ear’ to clearance the factory weld on the 3 ½” cross tube.
There is also limited space on the inboard side due to the differential’s anti twist strut/ shock (not sure of the technical name of it…assuming they are on all 2500s). So approximately 1” – 1 ½” wide is about all you have room for on either side of the tank.
Another bracket option would be to use a narrower, rectangular (1”x3”) piece of tubing. The down side is you would have to cut two ‘matching’ half moons into each bracket and drop an anchor nut down into the channel….or cut enough room out to get a wrench in from one side. The up side is you could possibly use something as thin as 1/16” thick. The thinner, rectangular tubing would be stringer than a single-sided 1/8”. 1/8” is also easier to cut.
Attaching these fabricated brackets:
To attach the mounts to the frame I am using 7/16” U-bolts that are 3 ½” wide 6 ¼” long. These too may be a bit robust. 3/8” may have been fine since all they are doing is keeping the mounts in place.
To attach the skid plate to the mount, I drilled a hole in the center of each mount & welded a nut to the inside. These do not have to be welded. I did it to make installation easier.
Getting Parts:
Note: Look at more than one OEM Parts/ Dealers website. Prices do vary! For me, a dealer in PA would ship it to my door cheaper than the local dealer would order it for in house pickup. I am in southern MD.
List of parts you will likely need:
Qty Nomenclature P/N
4 Rivnuts Parts guy (Chris) sent me a bag of 8. I do not have a P/N. They are M8-1.25 Thread. It was good to have extras, as I stripped one (trying to install with a shorter M8-1.25x20.00 vice M8-1.25x30.00 bolt), and installed two others in the wrong holes (vertically aligned holes vice horizontally aligned holes).
1 Skid Plate 68196501AB
1 Cross member 68223429AB
5 Bolts 6509896AA (This P/N is what is on my receipt. Looking online I see 6508724AA?) There are 3 bolts across front of skid plate to cross member & I used one each on the rear mount points. The bolt is a M8-1.25x20.00 with a ‘captured’ washer. Measured thread portion is from washer to end of thread: 20MM. Unthreaded tip beyond threading is another 5MM.
4 Bolts 06505269AA; 06509204AA; or 6507668AA I would recommend using one of these P/Ns for the cross member to frame (going into the Rivnuts) as they are longer than the ones above (M8-1.25x30.00, M8x1.25x32.00). Use one of these to ‘crimp’ (install) the rivnuts.
Nuts M8-1.25 Thread …These can be bought at a local hardware store/ auto parts store. One for each rear mount point.
2 U-Bolts R09 – 7/16” x 3 ½” Inside Width (Fine Thread) 6 ¼” length. I got these from www.Uboltsdirect.com . Don’t forget to add nuts and washers when ordering these!
2 Brackets. These I fabricated. (See at beginning of this post)
Sep 1. Install Rivnuts

Why are rear mounts not available?…A little back story: Instead of built-in mount points, or providing (purchasable) mounts ‘Ma Mopar’ has created TWO different frames (as in separate P/Ns!)...One with mounts for the few pickups that come from the factory with a fuel tank skid plate, and one without mounts (the majority of pickups manufactured) that come without said skid plate. I’m not making this up!! It’s straight from a RAM Tech Rep to the parts guy I dealt with.
After some time lying on my back under my pickup, studying the design, I wondered why would ‘Ma MOPAR make two(!) separate frames when they could have more cost effectively produced one frame(!) and installable, bolt-on mounts? Then they could SELL said mounts to those of us who believe in the quality of OEM parts…be it for dealer upgrades/ installs or our own installation. I digress. Let’s start.
Brackets: If you can make these, or get them made, the rest is simply ordering parts & bolting things together. Crawl under your rig and look around the rear of the fuel tank. There is a slim chance it was built using a frame that has attaching points from the factory. If it does (they will be just outside the rear tank mounting strap), consider buying a lottery ticket.
The brackets will attach to the cross member tube above, and towards the rear of the fuel cell.
Cross member ‘tube’ of frame above fuel cell, inboard side of tank. Top of photo is front, bottom is rear of pickup
This photo is of the outboard side of the tank...same tube. Top of photo is outboard. Bottom is inboard
The frame’s cross member tube where the mounts ‘would have been welded to’…is 3 ½” in dia.. The drop distance from the ‘tube’ to the rear mounting points of the OEM skid plate is:
- 1 ¼” drop on the Inboard. I made mine with a 1” drop (see photo below) and there is not much room between the upper rear dog ear & the differential’s anti twist strut/ shock (not sure of the technical name of it…assuming they are on all 2500s).

- 2 ¼” drop on the Outboard. I made mine with a 2” drop. If you add ¼” to the Inboard you need to do the same to the outboard to keep the plate even.

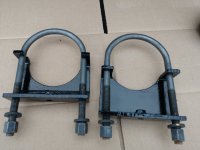
- Using some scrap, ¼” walled, 3” square tubing I fabricated two rear mounts. It’s thicker than probably needed, but I already had the tubing…and I wanted to ensure they would not be the ‘weakest links’. Thinner material (1/8” or 3/16”) could possibly be used since it is ‘pushing against the tube’ should the skid plate ever make contact from underneath. Beware, as a single sided, 1/8” bracket may bend if the skid plate took a hard hit.
Fabricating Brackets:- Drew out my cut marks/ marked the holes to drill
- Drilling the U-bolt holes while all still one piece is best…easier to handle. Stepping up drill bits (start small) helped a lot.
- Next, cut the square tube in half. This made my mounts just under 1 ½” wide…1 3/8 to 1 7/16?
- Cut out the ‘half moons’ to slip around the frame tube. Outboard Mount
- Inboard Mount
- Drill holes in the bottom center for the mounting bolts
- Either weld the anchor nut on the inside at this time, or use a wrench when installing the skid plate
- Test fit/ trim as needed
- Prime/ paint
The ‘dog ears’ on the top of the mounts are to keep the mounts from ‘rocking’ as they are tightened into place. The ‘top’ holes on the Inboard mount are ‘open’ due to the depth of the cut out…it has to reach further (up) around the 3 ½” cross member. If you cut out less as I mentioned above, you may not see this result.
There is limited space on the outboard side of the tank. I had to trim (narrow) the forward ‘dog ear’ to clearance the factory weld on the 3 ½” cross tube.
There is also limited space on the inboard side due to the differential’s anti twist strut/ shock (not sure of the technical name of it…assuming they are on all 2500s). So approximately 1” – 1 ½” wide is about all you have room for on either side of the tank.
Another bracket option would be to use a narrower, rectangular (1”x3”) piece of tubing. The down side is you would have to cut two ‘matching’ half moons into each bracket and drop an anchor nut down into the channel….or cut enough room out to get a wrench in from one side. The up side is you could possibly use something as thin as 1/16” thick. The thinner, rectangular tubing would be stringer than a single-sided 1/8”. 1/8” is also easier to cut.
Attaching these fabricated brackets:
To attach the mounts to the frame I am using 7/16” U-bolts that are 3 ½” wide 6 ¼” long. These too may be a bit robust. 3/8” may have been fine since all they are doing is keeping the mounts in place.
To attach the skid plate to the mount, I drilled a hole in the center of each mount & welded a nut to the inside. These do not have to be welded. I did it to make installation easier.
Getting Parts:
Note: Look at more than one OEM Parts/ Dealers website. Prices do vary! For me, a dealer in PA would ship it to my door cheaper than the local dealer would order it for in house pickup. I am in southern MD.
List of parts you will likely need:
Qty Nomenclature P/N
4 Rivnuts Parts guy (Chris) sent me a bag of 8. I do not have a P/N. They are M8-1.25 Thread. It was good to have extras, as I stripped one (trying to install with a shorter M8-1.25x20.00 vice M8-1.25x30.00 bolt), and installed two others in the wrong holes (vertically aligned holes vice horizontally aligned holes).
1 Skid Plate 68196501AB
1 Cross member 68223429AB
5 Bolts 6509896AA (This P/N is what is on my receipt. Looking online I see 6508724AA?) There are 3 bolts across front of skid plate to cross member & I used one each on the rear mount points. The bolt is a M8-1.25x20.00 with a ‘captured’ washer. Measured thread portion is from washer to end of thread: 20MM. Unthreaded tip beyond threading is another 5MM.
4 Bolts 06505269AA; 06509204AA; or 6507668AA I would recommend using one of these P/Ns for the cross member to frame (going into the Rivnuts) as they are longer than the ones above (M8-1.25x30.00, M8x1.25x32.00). Use one of these to ‘crimp’ (install) the rivnuts.
Nuts M8-1.25 Thread …These can be bought at a local hardware store/ auto parts store. One for each rear mount point.
2 U-Bolts R09 – 7/16” x 3 ½” Inside Width (Fine Thread) 6 ¼” length. I got these from www.Uboltsdirect.com . Don’t forget to add nuts and washers when ordering these!
2 Brackets. These I fabricated. (See at beginning of this post)
Sep 1. Install Rivnuts
- Insert rivnuts into the appropriate hexagonal holes. Run one of the longer bolts (bolts listed above) down to ‘crimp’, or ‘crush’ the rivnut, locking them in place. Don’t over tighten or you may pull the threads out of the nut. Removing a stripped one is possible, but could be a pain (think chisel & hammer, then driving it into the frame void).
- Driver’s side frame rail has two, vertically aligned holes…easy.
- Passenger side has four holes. For my 2500 Crew Cab with 6’ 4” bed, I had to use the two horizontally aligned holes, not top & bottom holes. Maybe the top & bottom holes align to a different configuration (i.e. single cab, or CC with 8’ bed)? You can verify which fit yours by test fitting/ aligning the cross member. The cross member should be inline with the forward most ‘indent’ in the fuel tank.