Ram Heavy Duty Forum

Register a free account today to become a member! Once signed in, you'll be able to participate on this site by adding your own topics and posts, as well as connect with other members through your own private inbox!

Fishnerd’s Build Thread

Fishnerd

Well-Known Member
Joined
Jun 29, 2021
Messages
247
Reaction score
302
***Started as a OBA system thread but evolved so decided to make this a comprehensive build thread***

I know there are probably a lot of posts on OBA systems, but figured I'd share mine to offer up different ideas and help others who are contemplating doing their own.

First obstacle was debating where to mount the compressor. My initial thought was to mount in the Rambox but I wanted to utilize that space for recovery gear and other necessities. I ultimately settled on mounting in the engine compartment, it also was easier to wire up the solenoids for the air suspension.

image_67175937.JPG

There are 3 daisy chain solenoids (controlled via Switchpro in the cab). Two are for inflate (driver/passenger) and the third in the deflate (all 3 solenoids open up to exhaust the air through this one). The manifold also has two connections for front and rear air couplers.
image_50739969.JPG

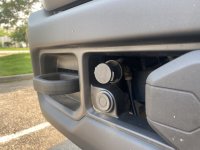
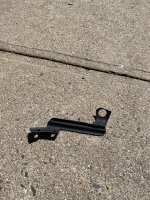
For the front coupler I had to fabricate a bracket so I could mount in the area for the clutch access without interfering with the clutch itself
image_67157761.JPG
image_67166977.JPG

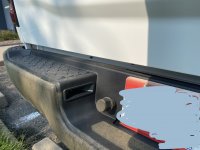
For the rear coupler i mounted in the area where the trailer tpms would have been
image_6487327.JPG

for air suspension I settled on the Airlift 5000 and Daystar cradles. Im not a fan of 90deg "sharp angles" anywhere near the tires (even though the likelyhood of it hitting is minimal), I considered it cheap insurance so I ended up modifying the mounts a bit.
image_67197697.JPG
image_16877825(1).JPG
image_16881409.JPG
passenger side with main airline routing
image_50428673.JPG

Cheers!!
 
Last edited:

el_barto

Well-Known Member
Joined
May 25, 2020
Messages
1,244
Reaction score
1,807
Nice job! Very clean install! I have the ARB couplers in the same spots of my bumpers, but your front bracket looks a bit cleaner than mine...
Also I see you have the AEV rear bumper, which I have on order. Planning on relocating my rear air coupler to that same set of holes ... do you have a template for the bracket you installed there?
 

Attachments

  • 4AEDA63C-2CE1-43FC-9130-7E4747460478.jpeg
    4AEDA63C-2CE1-43FC-9130-7E4747460478.jpeg
    392.2 KB · Views: 74
  • 67DEE604-1F0A-4B74-BC9D-B2B9B2DBB3CB.jpeg
    67DEE604-1F0A-4B74-BC9D-B2B9B2DBB3CB.jpeg
    350 KB · Views: 71
  • 0C8583B3-C85C-4F31-869F-D94D2AEBC900.jpeg
    0C8583B3-C85C-4F31-869F-D94D2AEBC900.jpeg
    1.4 MB · Views: 71

el_barto

Well-Known Member
Joined
May 25, 2020
Messages
1,244
Reaction score
1,807
Also we want to see more pictures of that AEV rear bumper :D
 

el_barto

Well-Known Member
Joined
May 25, 2020
Messages
1,244
Reaction score
1,807
great work on all aspects of the upgrades!!
I like how you clearanced the little plastic “mud flap” for the tube...I was thinking that piece would just have to be removed.

just a tip on that hitchlink...I suggest to clock it 90* so the shackle hole is vertical. it works better as a step, plus if you put a shackle in it to give someone a pull and your vehicles aren’t perfectly inline , the shackle pivots to be inline and the shackle won’t get sideloaded(bad)
 

Fishnerd

Well-Known Member
Joined
Jun 29, 2021
Messages
247
Reaction score
302
great work on all aspects of the upgrades!!
I like how you clearanced the little plastic “mud flap” for the tube...I was thinking that piece would just have to be removed.
Thank you! Yes it seemed like a waste to discard them, and they do still provide a bit of protection from rocks and gravel hitting the underside of the tubes. All in all im really happy with the bumper and the install was pretty straight forward. There are some tricky parts esp with the hoops and shackle points. If you have any questions when you get your bumper please feel free to message me.
just a tip on that hitchlink...I suggest to clock it 90* so the shackle hole is vertical. it works better as a step, plus if you put a shackle in it to give someone a pull and your vehicles aren’t perfectly inline , the shackle pivots to be inline and the shackle won’t get sideloaded(bad)
Awesome tip! I dont recall if it had hitch pin holes in that direction but will check. It also doubles as my pre bumper for those who cant parallel park :)
 

AnthonyD1978

Well-Known Member
Joined
Jul 23, 2020
Messages
588
Reaction score
1,307
Location
Arizona Mountains
It was pretty straight forward, some tricky parts. I was able to do it solo in 100+ degree weather in about 4hrs. I can make another post on the install with pictures if that will be helpful to you.

Thanks. I saw you answered that question in your previous post. Sorry about that.
 

Fishnerd

Well-Known Member
Joined
Jun 29, 2021
Messages
247
Reaction score
302
I already lost one to a rock shelf so I took the other one off too. :(
It wasnt really needed as part of the install, whats weird is the instructions didnt even mention having to remove it. When i went to install the hoops the bolts wouldn't align untill I realized it was getting hung up by them. I removed them to install the hoops then cut and re-installed (multiple times to get the cut angle correct) after the hoop was in place.
 

Fishnerd

Well-Known Member
Joined
Jun 29, 2021
Messages
247
Reaction score
302
Since this also evolved into an AEV bumper post here are a few pics of the install.

When you get the bumper it will come on a wooden pallet with 6 boxes (note be careful with a couple of the boxes they are fairly small and I almost lost them because the wrap was loose on the pallet). The pieces themselves are very manageable, as I mentioned before I was able to do the install by myself, and it wasnt very difficult (the only tricky part was aligning the hoops). The quality of the bumper is on point, I am familiar with AEV products as I previously had them on my Jeep JK and im really glad the quality has remained the same.

All together I spent about 4hrs total on the install, it would have been quicker but I chose to apply anti-seize on all the hardware and re-install the "mini mud flaps" mentioned above.

Removing the OEM bumper was the easiest part (there will be a few oem plates and bolts) you will no longer need
bumper removed.jpg

Main section installed, all other pieces will attach to this and the main frame, there is also provision for a rear winch for those who dont have a spare underneath. I wish i could have done it but Im running "35s" was able to still fit one in the spare location and didnt want to occupy space in the bed.

main bumper.jpg

Hoop installed, gets a little tricky felt like i was doing yoga poses underneath the truck to get everything aligned to frame plate, recovery points sandwiched to the main section.
bumper hoops.jpg

The last tricky parts were getting the backup sensors to sit flush with the plastic corners (sorry I didnt get pictures of this since I was already frustrated by that point)

Hope this helps, and good luck with your installs. Im sure you will be equally happy as I am with the bumper.
 

Fishnerd

Well-Known Member
Joined
Jun 29, 2021
Messages
247
Reaction score
302
I mentioned it briefly above, but to continue the discussion on air install, I use a Switch Pros to actuate the solenoids to inflate and deflate the airbags

to inflate turn on the compressor (air) and hit the up arrow (opens up solenoid 1 and 2) , to deflate hit the down arrow (turns off air, and actuates solenoids 1,2 and 3). Air is exhausted through solenoid 3.

switch pros.jpg

SDHQ switchpros mount, im pretty happy with the quality and the location is out of the way
sdhq mount.jpg

Firewall pass through via balder gland, I love using these since I can easily add more wires for future needs and keeps it water tight
pass through.jpg
To make for easy connections to future accessories I made a custom harness with deutsch connector for easy plug and play
harness.jpg
harness 2.jpg

In case someone wants to copy the front coupler bracket.....
air coupler1.jpgair coupler 2.jpgair coupler 3.jpg

Cheers!
 

Users who are viewing this thread

Top