Ram Heavy Duty Forum

Register a free account today to become a member! Once signed in, you'll be able to participate on this site by adding your own topics and posts, as well as connect with other members through your own private inbox!

Carli Backcountry — Driveway Install — '21 RAM 3500

Dave88LX

Active Member
Joined
Nov 10, 2020
Messages
151
Reaction score
178
Location
York, PA
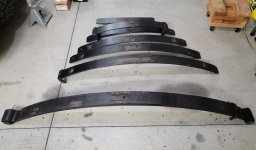
Second spring I started with the clamps already on. Removed the center pin nut, and backed off the clamps a little bit on each side at a time until the pack was loose.
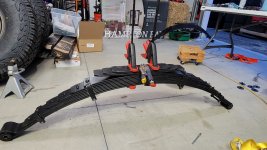
20211218_164328.jpg


Disassembled a layer at a time and laid them out in order. Popped out the old pads, put in the new ones.
Cleaned up the threads, had this second leaf pack done in about 10-15 minutes.
20211218_235537.jpg


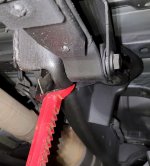
Next challenge was "Man, where the heck do I put these jack stands to get the truck high enough in the back?
As the truck transitions from cab to bed, the frame gets a lot higher. I found that right in front of the front spring hangers was the best spot.
The metal is doubled-up, and they are still far enough back that it's not a see-saw.
20211221_171410.jpg


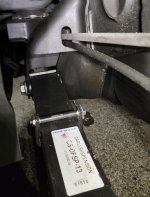
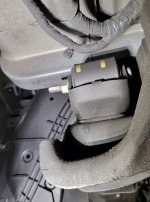
At this point I went around and took pictures of all the bolts I'd be removing, to make sure they went back in the same way.

THE MOST IMPORTANT IS THE BOLT CONNECTING THE SPRING HANGER TO THE REAR SPRING EYE!
You get this in backwards, you're pulling the spring back out of the truck to flip the bolt around.
20211221_182412.jpg


The driver's side top shock mount nut is a pretty tight reach with the spare tire in the way.
I saw no reason to keep that tire up there any longer, since I'll have 37s on there.
20211221_171709.jpg


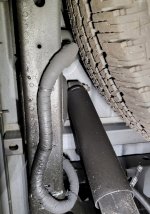
Tools to lower the spare are under the passenger's seat. Tons of room with that gone.
Vent hose can get tight, easy to pop that off the axle housing. Just don't forget to push it back on.
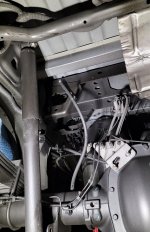
20211221_180708.jpg


Honestly the worst part about this whole ordeal was removing the parking brake cable off the driver's side.
The reason I struggled was I didn't want to mess with the parking brake adjuster. I wasted an hour but finally got it off.
Putting it back on, I wasted another hour, busted knuckles, curse words, and selling myself to the Devil, but still couldn't get it.

Just do yourself a favor, grab the 1/2" wrench, and loosen this this thing way out to get that cable disconnected.
I first marked the backside with white paint so I knew where to tighten it back to.
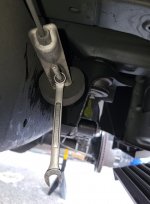
20211222_093210.jpg


I've had this tool for many years, it's helpful in pushing on a spring to open things up a bit.
Loosen the adjuster far enough, might be able to muscle it. Nice to have though.
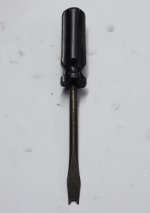
20211222_002731.jpg


First you've got to push all the prongs in and work the clip out of the bracket.
Then you have to push the spring towards the rear (left in photo) in order to expose the bare parking brake cable so that it fits out the slot.
The spring is a tough one, you can see how it tapers down and actually fits into the end of the clip.
Lots of pressure if you don't relieve it through the adjuster.
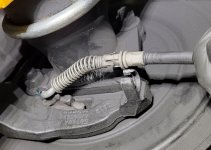
20211221_232826.jpg


Before I started pulling the springs out, I used a couple moving blankets to lay over the bedsides "just in case" a spring wanted to flop in one direction or the other.
Thankfully it didn't, but they are heavy and awkward. But after having one topple in the garage, I was nervous.
I would say it's a two-person job. I'm sure there are people who can creatively get them done alone, but, grab someone else if you can.
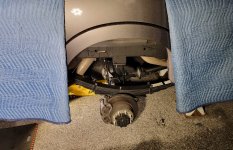
20211221_213635.jpg


Taking the leafs out is easy.
I don't really have any pictures of the removal and installation process.
It was cold, raining, and didn't want to keep the neighbor out there any more than I needed to.
Process basically went like this, NOTE, this is NOT a substitute for following along with the Carli instructions that are provided.
  1. Remove the shocks
  2. Support the axle w/ a jack, remove the U-bolts on driver's side, lower axle to clear center pin
  3. Loosen the front bolt to drop the captive nut, don't remove bolt
    1. Beware this is 30MM, not part of most sets
  4. Loosen the rear lower bolt to drop that captive nut, don't remove bolt
    1. The spring hanger comes out attached to the rear of the spring, no need to mess with that one
  5. Cargo strap around the spring toward the front side of the axle, attached to the frame. There's places to hook onto
  6. Remove rear hanger bolt
  7. Remove front hanger bolt
  8. Work with your partner to loosen cargo strap, then slide the spring out from under the truck toward the front
    1. Spring hanger may interfere with removal, use breaker bar to turn hanger-spring nut to straighten that hanger out a bit to get some clearance
    2. This happened to me on passenger side
  9. I put old spring next to new spring, upside-down to transfer hanger
    1. Bolt head is T-60 TORX or I guess Vice Grips if you don't have the right tool
    2. MAKE SURE BOLT IS EXACT SAME DIRECTION or you'll be pulling it back out
    3. Hand-tight, final tightness done after installation
  10. Loosened passenger side U-bolts to allow axle to drop far enough to get new taller spring in
  11. Used my fancy dolly to roll it out to the truck
  12. Worked it up on top of the axle, cargo strapped back in place
  13. Rear bolt installed snug
  14. Front bolt installed snug
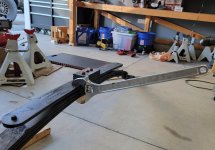
  15. Use that big 24" adjustable wrench on the spring to get it to "twist" as necessary to line up bolt holes as needed
  16. Jack axle back up slowly to spring pack, make sure centering pin is in correct location
  17. U-bolts are a bit long, even for a deep socket
    1. Had to cut U-bolts down a bit once I got them installed to get them fully tightened
  18. Do it all again on the passenger's side
    1. Hanger bracket was too tall to slide spring forward, had to turn nut to allow bracket to turn more horizontal
  19. Re-route parking brake cable. Going to use a little muscle and feel a bit awkward pulling it through the frame
  20. Attach it to spring pack using P-clamp
  21. Attach that damn parking brake cable back to the parking brake using whatever prayers necessary
    1. Tighten adjuster back to where it was
  22. When going through torque sequence (follow instructions), need impact wrench to tighten hanger-to-spring nut
    1. Regular ratchet just spins TORX-head bolt, no way to stop it from spinning
    2. Air impact is very cramped inside bedsides with the air couplings hitting everything, electric would shine here
  23. Install rear shocks
 

Rockcrawlindude

a rock crawlin’ dude
Joined
Jan 1, 2021
Messages
6,323
Reaction score
16,383
Location
Georgia USA
Getting the front springs in next — going to need a lot of axle droop for these.
This will require removing the two bolts on each side attaching the brake line brackets, plus an electrical connection's "christmas tree plug" on the passenger side.
View attachment 29239


I used larger jack stands under the truck frame, just behind the RADB (on the meaty part of the frame), setting them as high as I safely felt.
Used my smaller set under the front axle.

Before pulling a driveshaft off, I like to mark it and the flange with a grease pen to make sure it's lined back up the way it came out.
It may not matter on this truck, but I'd rather not worry about it.
Support the front driveshaft with a cargo strap.
Getting creative with a pry bar and a breaker bar, you can get these bolts loosened.
View attachment 29238


Springs are marked Driver and Passenger side.
Make sure they are on the correct side, and right-side up.
View attachment 29237


The shock reservoir brackets are also marked for Driver and Passenger, along with an indexing hole for a nipple on the spring isolator that pushes into the top of the coil bucket.
View attachment 29236


There is only one way for them to line up on the truck using the isolator.
Driver's side ends up with the logo facing out. See the alignment of the spring and isolator pad.
NOTE: shock went in after the spring, not before.
View attachment 29235


Passenger side ends up with the logo facing IN towards the truck. Confirmed this with Carli and that is OK.
Previous generations instructions have specified that the logo needs to face outwards, so I double-checked with them.
Note indexing of spring and upper isolator. (Spring will be turned slightly to line up, it's where it rested against for a pic.)
View attachment 29234


With the springs in, move to the shocks.
Don't be an idiot like me and forget to put the brake lines back where they go BEFORE putting the shock in.
That was a waste of a few minutes taking that top nut off and on again.
View attachment 29233


Looking partially together again.
View attachment 29232
Before you put the aftermarket wheels on, remove those push/star washers

Looks like you made a ton of progress this week. Truck is going to be awesome.
 

Dave88LX

Active Member
Joined
Nov 10, 2020
Messages
151
Reaction score
178
Location
York, PA
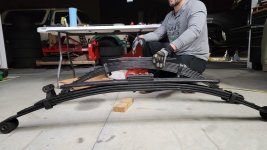
With the old and new springs side-by-side, you can see why the factory springs are so harsh and jarring. Once you get through your first 3 leaves, you're slamming into that thick leaf (overload leaf, thank you Rockcrawlerdude) and it's not giving.

Looking at the new springs, the name "Progressive" makes sense. Predictable, stiffness increases in increments vs slamming a thick bar.
20211221_191646.jpg


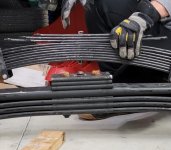
Closer view of the spring pack stacks.
20211221_191646 (1).jpg


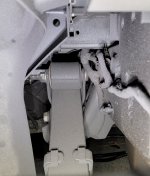
Here's the passenger side hanger I mentioned. Not enough clearance to pull the spring down with it vertical, need to angle it back a bit via turning that nut.
Also, one more time — If you put that bolt in backwards, you're gonna have a bad time.
20211221_171430.jpg


Parking brake cables. Driver's side will need to be worked through there.
20211221_224653.jpg


New parking brake cable routing:
20211222_094222.jpg


As mentioned, long U-bolts, too long for my deep sockets.
20211221_223047.jpg


I used a small clamp to hold this brake arm forward and still while hooking it back up.
20211222_000825.jpg


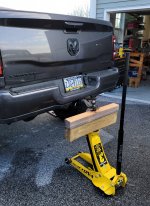
I'm not proud of myself for this, but I was running out of ideas and time to lift the the truck up high enough off the frame in order to get the shocks installed.
I went a half pump at a time on the way up and down, making sure the jack was rolling and staying underneath.
Be prepared to get that extra lift.
Would love to hear your ideas and suggestions to do this better!
20211222_111739.jpg


"Use the 24" adjustable wrench to "twist" the leaf pack to get the bolts in."
This made it really easy to get the holes lined up.
20211222_124204.jpg
 
Last edited:

Rockcrawlindude

a rock crawlin’ dude
Joined
Jan 1, 2021
Messages
6,323
Reaction score
16,383
Location
Georgia USA
With the old and new springs side-by-side, you can see why the factory springs are so harsh and jarring. Once you get through your first 3 leaves, you're slamming into that thick leaf and it's not giving.

Looking at the new springs, the name "Progressive" makes sense. Predictable, stiffness increases in increments vs slamming a thick bar.
View attachment 29285


Closer view of the spring pack stacks.
View attachment 29284


Here's the passenger side hanger I mentioned. Not enough clearance to pull the spring down with it vertical, need to angle it back a bit via turning that nut.
Also, one more time — If you put that bolt in backwards, you're gonna have a bad time.
View attachment 29283


Parking brake cables. Driver's side will need to be worked through there.
View attachment 29282


New parking brake cable routing:
View attachment 29281


As mentioned, long U-bolts, too long for my deep sockets.
View attachment 29280


I used a small clamp to hold this brake arm forward and still while hooking it back up.
View attachment 29279


I'm not proud of myself for this, but I was running out of ideas and time to lift the the truck up high enough off the frame in order to get the shocks installed.
I went a half pump at a time on the way up and down, making sure the jack was rolling and staying underneath.
Be prepared to get that extra lift.
Would love to hear your ideas and suggestions to do this better!
View attachment 29278


"Use the 24" adjustable wrench to "twist" the leaf pack to get the bolts in."
This made it really easy to get the holes lined up.
View attachment 29277
When I run into that lifting height problem, i remove the tires, lower the truck and start from the lower position. Visualize working with the brake rotors closer to the ground. Or you could let the air out of the tires, but you don’t gain as much that way

If you haven’t already, you can cut the excess off the u bolts so you can get a deep socket on them to torque them.

“Overload leaf” is what the thick leaf is called.
 

Dave88LX

Active Member
Joined
Nov 10, 2020
Messages
151
Reaction score
178
Location
York, PA
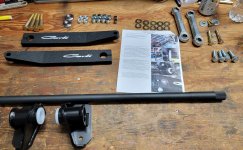
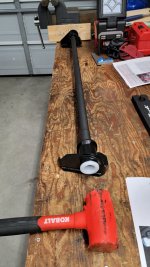
Torsion Sway Bar.
20211219_203843.jpg


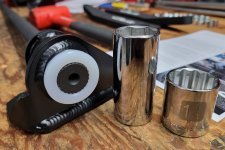
Another oddball you'll need is a socket that's large enough to go over the splined shaft, but not too big so that you're outside the bushing there.
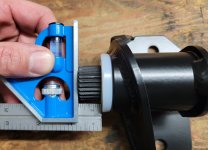
Have to use a mallet/dead-blow hammer to work that down so that 11/16 " of the splines are exposed.
Instructions used a 1-1/4” Matco deep impact socket which I did not have. Made the best with what I had.
20211219_205227.jpg


11/16" ... check.
20211219_210212.jpg


I set one end on a piece of 2x4 on the floor and held the whole thing vertically while working the bracket down, and checking to make sure I was on the wood. Can use your feet to keep it in place too.

To get the other end on, I set it flat on my bench so that the brackets/bushings would be clocked correctly, and then worked the other end on. Set that wood block up against the vice to give me something to push against.

Same thing after, stood it up, worked the other side down to 11/16". Double-check both ends before putting the end caps and the arms on.
20211219_210429.jpg


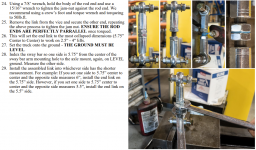
Now one thing that didn't make sense to me in the instructions was the washers to use.
It comes with two, but you don't use the ones you think you'd use, but rather the flat ones. I don't know the difference in application.
download (1).png


Another important thing was a "following directions" exercise that we did in like 4th grade:
"Read all the instructions thoroughly before you begin."
I set the length for one of the sway bar links, it was late, I was tired, so then quickly set up the other one too.
Had to come out the next day and reset that second one again after doing the measurement in the instructions.
You're only setting the first one to 5.75", the second one is dependent upon the measurement of the truck since is probably not exact.
If you set them both to the same length, and you have a larger distance on one side than the other, your torsion will be in a constant state of torsion in one direction.
Read this part carefully.

Make sure the ends stay parallel when you're tightening everything.
1641091454350.png


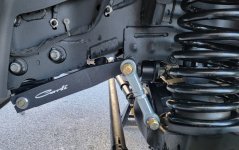
Driver's side was the "shorter" side, so that got the 5.75" end link.
From here, I measured what the passenger side needed, I think it was 6.25".
20211220_112850.jpg


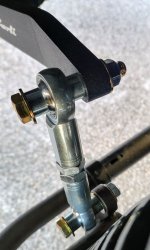
Don't be that guy that crosses them over inside-to-outside!
20211220_112917.jpg
 
Last edited:

Dave88LX

Active Member
Joined
Nov 10, 2020
Messages
151
Reaction score
178
Location
York, PA
When I run into that lifting height problem, i remove the tires, lower the truck and start from the lower position. Visualize working with the brake rotors closer to the ground. Or you could let the air out of the tires, but you don’t gain as much that way

If you haven’t already, you can cut the excess off the u bolts so you can get a deep socket on them to torque them.

“Overload leaf” is what the thick leaf is called.
Overload, thanks!
I was slightly annoyed at myself for not putting the shocks in while I had it up in the air before putting the tires on. That's what I get for following the directions!

When it says to install the wheels tires, set it on the ground, then torque everything, is there any difference between being on jack stands under the axle, and on the tires? I can't see how it's any different.

And yep, I did cut the U-bolts down!
 

Dave88LX

Active Member
Joined
Nov 10, 2020
Messages
151
Reaction score
178
Location
York, PA
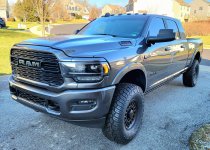
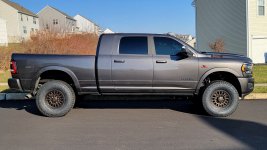
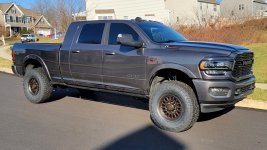
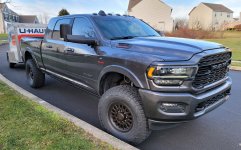
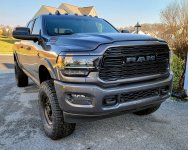
So what's it look like already?
Dirty. It looks dirty!
Had to hit the road the same day I finished up for a Christmas trip. Don't have the center trim rings on the wheels yet either.

Rides beautifully. No more bracing my kidneys on dips and bumps, and my head no longer wants to slam off the side window pulling into a gas station at an angle.


20211222_124653.jpg


20211222_124733.jpg


20211222_132808.jpg


20211222_132823.jpg


20211222_132844.jpg


20211222_132921.jpg


20211223_101624.jpg


Had to flip them mirrors to tow safely!
Nah only for a goofy pic, I put them back down.
20211223_152801.jpg
 

Dave88LX

Active Member
Joined
Nov 10, 2020
Messages
151
Reaction score
178
Location
York, PA
Thanks!!

I am reading about 5 MPH slow at highway speeds.
Have to look up how to correct that.
No TPMS lights though and I'm running 40 F / 37 R.
 

loveracing1988

Well-Known Member
Joined
Feb 16, 2021
Messages
387
Reaction score
285
Ok a few comments, complaints, criticisms.
First you should have swapped to the power wagon isolators, the provide more support for the springs. Not a big deal and a little late now but in case anyone else reads this.
Second for the shocks I install the top bolt and nut and use your floor jack with a small section of 2x4 to position the bottom. Works better for the front.
Third do you have measurements for the rear before and after? I want a little more rake for towing my fifth wheel and the 1" spacer I have needs to be 2".

Truck looks awesome!
 

Dave88LX

Active Member
Joined
Nov 10, 2020
Messages
151
Reaction score
178
Location
York, PA
What is different about the Power Wagon isolators? I hadn't read anything about that before I started, bummer.
Thanks for the tip on the shock, probably easier than working the whole axle up and down.
I didn't measure before/after and I'm annoyed I didn't. I can at least get an after measurement later on.
And thank you!
 

loveracing1988

Well-Known Member
Joined
Feb 16, 2021
Messages
387
Reaction score
285
What is different about the Power Wagon isolators? I hadn't read anything about that before I started, bummer.
Thanks for the tip on the shock, probably easier than working the whole axle up and down.
I didn't measure before/after and I'm annoyed I didn't. I can at least get an after measurement later on.
And thank you!
"Tech: 2014+ Ram Coil Isolator Options – Carli Suspension, Inc." https://carlisuspension.com/tech-2014-ram-coil-isolator-options/

Measure from the middle of the hub to the wheel well, that way its consistent between tire sizes and everything.
My ultimate goal is to figure out how to fit a 37" spare in the stock location, if I can figure that out I'm going 37's next time gearing be dammed. My only idea so far is to deflate the tire and use a ratchet strap to compress it, but idk how the tire would last doing that.
 

Dave88LX

Active Member
Joined
Nov 10, 2020
Messages
151
Reaction score
178
Location
York, PA
"Tech: 2014+ Ram Coil Isolator Options – Carli Suspension, Inc." https://carlisuspension.com/tech-2014-ram-coil-isolator-options/

Measure from the middle of the hub to the wheel well, that way its consistent between tire sizes and everything.
My ultimate goal is to figure out how to fit a 37" spare in the stock location, if I can figure that out I'm going 37's next time gearing be dammed. My only idea so far is to deflate the tire and use a ratchet strap to compress it, but idk how the tire would last doing that.
Great read, thank you. I was not aware of that or I'd have grabbed the PW isolators.
Thankfully working in my favor is that I'm not going off-road boogie, and I do have the drop brackets so hopefully a non-issue for my use.
Too bad there wasn't a blurb about it in the description or instructions somewhere; it specifies the factory isolators with no mention of the PW. :(

"So what’s the solution? Well, there are two and it depends on what you’re doing with the truck. if you’re running one of our leveling systems, the Power-Wagon isolator is a no-frills, easy install that will ensure the coils stays seated. For our 3.25″ Systems, it’s actually less necessary to address the isolator thanks to the provided Radius Arm Drop Brackets. Dropping the Radius Arm Pivot Point from the frame end flattens out the coil bucket minimizing the axle “roll” through the travel stroke that induces most of the unsettling forces to the coil spring."
 

loveracing1988

Well-Known Member
Joined
Feb 16, 2021
Messages
387
Reaction score
285
Great read, thank you. I was not aware of that or I'd have grabbed the PW isolators.
Thankfully working in my favor is that I'm not going off-road boogie, and I do have the drop brackets so hopefully a non-issue for my use.
Too bad there wasn't a blurb about it in the description or instructions somewhere; it specifies the factory isolators with no mention of the PW. :(

"So what’s the solution? Well, there are two and it depends on what you’re doing with the truck. if you’re running one of our leveling systems, the Power-Wagon isolator is a no-frills, easy install that will ensure the coils stays seated. For our 3.25″ Systems, it’s actually less necessary to address the isolator thanks to the provided Radius Arm Drop Brackets. Dropping the Radius Arm Pivot Point from the frame end flattens out the coil bucket minimizing the axle “roll” through the travel stroke that induces most of the unsettling forces to the coil spring."
I tend to overthink the heck out of everything so if I see a path that leads to less possible issues I generally take it. Although I will be taking mine apart this summer to install those weld in supports because I know my luck. I will have an issue 3 hours away from the nearest town that can help me.
I didn't realize the drop brackets essentially eliminated the need for those though. Probably saw the drop bracket section and skipped it because I don't have them.
If you do ever decide to go off road I'd recommend the carli front diff cover guard, mine took a solid hit on a rock last summer and barely dented.
 

gimmie11s

Well-Known Member
Joined
Mar 30, 2021
Messages
2,376
Reaction score
3,501
Great thread, awesome write up, comments, and pictures. A+!

Truck looks unbelievably bad ass... im sure you are proud of and happy with the results.
 

tchur1

Well-Known Member
Joined
Jun 23, 2021
Messages
664
Reaction score
704
Killer write up, thank you for doing this. I have been trying to decide what suspension system to put on my truck when it gets delivered and I think you have me convinced the backcountry with the works is the best way to go for on road ride quality.

Truck looks amazing, well done!
 

jpidgie

Member
Joined
Sep 25, 2019
Messages
87
Reaction score
85
Location
Jefferson County, Colorado
What a great write up. Thanks for sharing! The truck looks amazing.

Not sure if the tire pressure monitoring has changed in the newer years, but my 2019 3500 has TPIS, not TPMS (information vs. monitoring) you can see what the pressure is, but it will not alert you if pressure is lost. Sadly, I often drive longer trips with that screen turned on in the dashboard display.

I think you need a hitch with a bigger drop now, that uhaul looks like it is going to take off. It is painful buying a 9-10" adjustable drop hitch.
 

Icky

Active Member
Joined
Sep 6, 2021
Messages
175
Reaction score
169
What a great write up. Thanks for sharing! The truck looks amazing.

Not sure if the tire pressure monitoring has changed in the newer years, but my 2019 3500 has TPIS, not TPMS (information vs. monitoring) you can see what the pressure is, but it will not alert you if pressure is lost. Sadly, I often drive longer trips with that screen turned on in the dashboard display.

I think you need a hitch with a bigger drop now, that uhaul looks like it is going to take off. It is painful buying a 9-10" adjustable drop hitch.
There's a thread on here that describes how to switch from tpis to tpms
 

kpecks

Active Member
Joined
Nov 27, 2021
Messages
153
Reaction score
184
"Tech: 2014+ Ram Coil Isolator Options – Carli Suspension, Inc." https://carlisuspension.com/tech-2014-ram-coil-isolator-options/

Measure from the middle of the hub to the wheel well, that way its consistent between tire sizes and everything.
My ultimate goal is to figure out how to fit a 37" spare in the stock location, if I can figure that out I'm going 37's next time gearing be dammed. My only idea so far is to deflate the tire and use a ratchet strap to compress it, but idk how the tire would last doing that.
Good to know this!! I have a Carli 2.5” lift and trac bar coming so I will prob go ahead and order the PW isolators. Part number 68268825AA.
 

Users who are viewing this thread

Top