
did you rattle can them or have them professionally painted? they look good..Mine were the same color. I painted them.
Ram Heavy Duty Forum
You are using an out of date browser. It may not display this or other websites correctly.
You should upgrade or use an alternative browser.
You should upgrade or use an alternative browser.
What did you do TO your RAM today?
- Thread starter LamboTexas
- Start date
did you rattle can them or have them professionally painted? they look good..
I used Duplicolor hwp102 paint. Been using this paint for years with great results. Had the tires mounted, taped them up and painted them. Used the same color on my 2013 JK and the the rash rings on my 2020 JL Rubi.
driveshift
New Member
- Messages
- 5
- Reaction score
- 0
- Points
- 1
Installed some cap for door handle. I noticed few scratches under the handle so I would like to prevent it from having too many scratches.
Ramit530
Active Member
@Brutal_HO & @20Limited3500 I installed a reverse light (LPR LED Back Up Light) as well as adding puddle lights to the running boards. Reverse light works off of a jumper installed for the trailer hitch as well as an Aux Switch so I can use the light while hooking up trailer or such, puddle lights also connected the circuit for the bed lights as well as an Aux Switch. To prevent back feed I used these, (Diodes) that work real well . They can be found at Amazon, etrailer and more.. Just thought I would shareYea, simple circuit is a single relay with a diode on the reverse lead (from trailer plug). This would give you reverse activation and manual control. I'm also looking at a lockout option.
View attachment 7564
@Brutal_HO & @20Limited3500 I installed a reverse light (LPR LED Back Up Light) as well as adding puddle lights to the running boards. Reverse light works off of a jumper installed for the trailer hitch as well as an Aux Switch so I can use the light while hooking up trailer or such, puddle lights also connected the circuit for the bed lights as well as an Aux Switch. To prevent back feed I used these, (Diodes) that work real well . They can be found at Amazon, etrailer and more.. Just thought I would share
I'd be interested to know where you connected an Aux to the bed lights. I hate that they timeout so soon and are not adjustable, even using AlfaOBD.
Ramit530
Active Member
@Brutal_HO I hooked the running board LED lights (lights) into the bed light circuit as well as powering the puddle lights from an AUX Switch, not powering the bed lights from the AUX switch. Sorry if I stated that differently. I grabbed the power from the bed lights to the hot side of the bed light at the right left rear of the tailgate. Currently still trying to determine what plug assembly it is of the wiring harness so I can make up a why connector vs using a posi seal connector on the hot lead.I'd be interested to know where you connected an Aux to the bed lights. I hate that they timeout so soon and are not adjustable, even using AlfaOBD.
@Brutal_HO I hooked the running board LED lights (lights) into the bed light circuit as well as powering the LED lights from an AUX Switch, not powering the bed lights from the AUX switch. Sorry if I stated that differently. I grabbed the power from the bed lights to the hot side of the bed light at the left rear of the tailgate. Currently still trying to determine what plug assembly it is of the wiring harness so I can make up a Y connector vs using a posi seal connector on the hot lead.I'd be interested to know where you connected an Aux to the bed lights. I hate that they timeout so soon and are not adjustable, even using AlfaOBD.

elephantrider
Hydraulic Lifter Crew
- Messages
- 2,438
- Reaction score
- 3,327
- Points
- 113


Distillusion
Well-Known Member
- Messages
- 342
- Reaction score
- 362
- Points
- 63
I like the N-Fabs. I have a set that's 5 years old that still look like new. Really sturdy, too. None of that multi-part brackets and dozens of bolts to hold it together, single piece welded steel is the way to go.
RamGuy84
Active Member
- Messages
- 366
- Reaction score
- 166
- Points
- 43
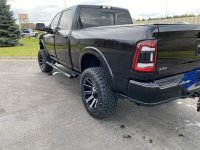
Thuren leveling kit with Thuren track bar, King steering stabilizer, Fox 2.0 shocks, Readylift 1” rear block, Nitto Ridge Grapplers 35/12.5/20 and Fuel Contra rims 20x10 -18 offset.
Attachments


20Limited3500
Well-Known Member
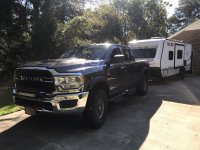
@DMC1, the bar on your front bumper. Where did you find it at? Is the light bar attached to it?Not so much what I did to it but what I did with it! Loaded up Tipsy and Biscuit and pulled the RV around to the house to load ’um up and move ‘um out!

@DMC1, the bar on your front bumper. Where did you find it at? Is the light bar attached to it?
Start at post #649 around page 33 of this thread for some additional info. The bar is a WARN winch guard that I took off of the Jeep Gladiator I just sold. Was playing around with it in the shop one day while I was bored and it ended up on the RAM. The light bar is attached to an aluminum 2 inch flat bar bolted to the WARN hoop.
Last edited:
2manyprojects
Active Member
Made the 1st mods to my new Tradesman yesterday. Weathertech grey mats match the grey seats well and lighten up the interior nicely while providing a "catch basin" over my fancy black vinyl flooring. Splurged for GTR Ultra Series 2.0 H11 and H9005 LED replacement headlight bulbs; excellent improvement in illumination, with a clean, even, white light and a very pronounced upper cut-off line. The high beams seem much brighter and project further, but I haven't had much chance to test yet. Overall much more usable output with modern white light compared to the OEM halogens.
Not so fortunate with GTR replacements for the turn signals and front side marker lights. In spite of all the positive propaganda on Youtube touting how these bulbs work in '19+ Rams with the Canbus system without need for extra resistors, etc. Tried every permutation I could think of switching locations, reversing the polarity in the socket, and couldn't get them to function correctly. On-line retailer I purchased everything from doesn't seem to have a clue, and is only offering to send me more bulbs to try. I've contacted the mfr. to get their recommendation, but I'm not optimistic. These are the GTR 7440/7443 Non-CK Carbide Canbus 2.0 LEDs, with switchback. Great concept, but not plug and play for my Ram.
Not so fortunate with GTR replacements for the turn signals and front side marker lights. In spite of all the positive propaganda on Youtube touting how these bulbs work in '19+ Rams with the Canbus system without need for extra resistors, etc. Tried every permutation I could think of switching locations, reversing the polarity in the socket, and couldn't get them to function correctly. On-line retailer I purchased everything from doesn't seem to have a clue, and is only offering to send me more bulbs to try. I've contacted the mfr. to get their recommendation, but I'm not optimistic. These are the GTR 7440/7443 Non-CK Carbide Canbus 2.0 LEDs, with switchback. Great concept, but not plug and play for my Ram.
Took the truck in for it's first oil change and tire rotation. They had a bed step in stock so I just bit the bullet as I'm not hopeful RAM will come through on this "voucher." I figure it'll be worthwhile to have over the next few months of yard work here. I haven't seen the original design but this version is bulky AF. It's super stout and install was a piece of cake (though I only have metric sockets so the fit was obnoxious at times). I love how much it hides away while stowed.
OA

OA
Rogue 2500
Active Member
Wiring harness for my console swap came in and I have most of the ports working now. The USBs up front work (connect to Uconnect) and the USB in the storage bin works (charge only, I do not believe it was intended to connect to the Uconnect). Power ports front and rear work now. Rear most USB ports still do not work. Not sure why yet.
I will update my thread in the interior section went I have a chance.
I will update my thread in the interior section went I have a chance.
Took the truck in for it's first oil change and tire rotation. They had a bed step in stock so I just bit the bullet as I'm not hopeful RAM will come through on this "voucher." I figure it'll be worthwhile to have over the next few months of yard work here. I haven't seen the original design but this version is bulky AF. It's super stout and install was a piece of cake (though I only have metric sockets so the fit was obnoxious at times). I love how much it hides away while stowed.
OA
The only things different is the beefed up brace and bolts for the brace. Same step.
jrhickman13
New Member
- Messages
- 6
- Reaction score
- 2
- Points
- 3

Anybody have this style installed on their mega cab? I’m thinking of putting these on my 2500 Mega Cab Night Edition.
Sent from my iPhone using Tapatalk
That’s what I figured. The brace is pretty big compared to photos I’ve seen before. The bolt for the brace to the frame is reused. They did supply new bolts for the step to the bumper/frame.The only things different is the beefed up brace and bolts for the brace. Same step.
OA
MikeXM
Well-Known Member
- Messages
- 825
- Reaction score
- 765
- Points
- 93
Anybody have this style installed on their mega cab? I’m thinking of putting these on my 2500 Mega Cab Night Edition.
Sent from my iPhone using Tapatalk
I have the chrome ones on my Mega Cab Longhorn.

Last edited: