What's new
Ram Heavy Duty Forum

Register a free account today to become a member! Once signed in, you'll be able to participate on this site by adding your own topics and posts, as well as connect with other members through your own private inbox!

My 2024 Dually build thread

Flyin6

Active Member
Messages
117
Reaction score
221
Points
43
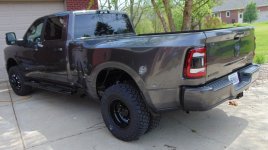
I have been building and modifying my 24' 3500 dual-wheel truck since purchasing it. I want to say it went about a week before things started to change, and there is a good reason for the haste, at least there was back then.
I was happily motoring around in my 2002, 3500 single-wheel Cummins truck when I ran into a problem. I was getting ready to purchase a slide-in truck camper and was struggling with the 6.5' bed, but when I ran the cargo numbers, I was way on the wrong side of the equation.
I never really paid much attention to the truck's load-carrying capacity because I would usually tow things, sometimes heavy ones (like farm equipment). I was shocked to discover how limited the cargo weight was, and it was clear that it would not fit into the upcoming trip across the US I was getting ready to launch on.
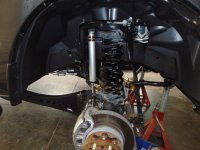
I must have been living right, because I had purchased my '22 Laramie for a song, as it had been sitting on the lot for nearly six months. I paid $72K for it back then, then paid it off quickly. Realizing I would have to scrap either the trip, the camper, or the truck, I opted to let the 22 go and find a dually instead. I went to my local dealer who had a new 24 HO truck sitting there, and I really loved my 22 Laramie. The 22 was lifted with a Carly suspension, 37" tires, wheels, an Expedition one bumper, and a winch, along with other goodies. A guy who worked at the dealership offered me $ 73,000 for the truck, which I accepted. Meanwhile, the dealership discounted the $ 93,000 stickered dually to the same price, $ 73,000. It was a wash, with me only losing the money I spent on mods for the 22, and I left the dealership owing nothing on my brand new Dually.
That all seemed almost magical, and just like that, I had a new, unproven Cummins HO truck that needed some adjustments to make it behave well with a 4,000+ pound camper.
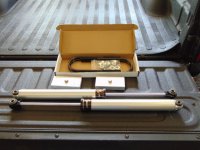
I will detail all the changes made to the truck in the upcoming posts, and there is a lot to discuss.
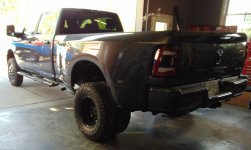
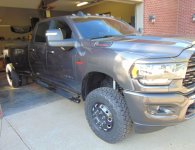
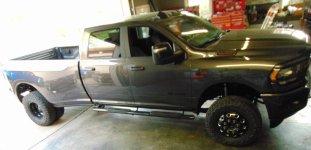
2024 Ram 3500 Dually
Big Horn
Cummins HO/AISIN
4.10 ratio, 12" rear axle
50 gal fuel tank
Alpine with the big display
Midnight edition with Alchoa wheels
 
So far I have:
Modified the rear springs
Added a Carli suspension
Hellwig sway bar
7500 Airbags
Banks rear diff cover
Expedition one front bumper with grill guard (for mule deer)
Ox 13,500 winch w/synthetic rope
Adjustable electric air spring pump
Amp Research steps

Sitting in boxes in the garage:
Banks power ram
Banks hot and cold side intercooler pipes
Banks 5" exhaust
Banks Ram air
Expedition one rear bumper
 
OK, let me start catching up here. I purchased the truck in late March 2024.

The first thing I did was stiffen the rear spring pack with increased height bump pads to engage both the main helper spring and the additional spring pack.
If you are familiar with the effectiveness of torque-lift products, this is a simpler and more cost-effective method to achieve essentially the same result.

I tapped Energy Suspension for the thicker bump pads and the spacers for the secondary spring engagement pad. Usually, the truck has to settle a couple of inches before it can use all of the spring pack. With this setup, the total spring pack(s) are engaged almost immediately.

What does this do? You can carry the same weight without as much squat, and with all those strings engaged, the ride with a top-heavy camper is much better
 

Attachments

  • DSC02333 (Medium).JPG
    DSC02333 (Medium).JPG
    149.9 KB · Views: 45
  • DSC02340 (Medium).JPG
    DSC02340 (Medium).JPG
    128.7 KB · Views: 43
  • DSC02333 (Medium).JPG
    DSC02333 (Medium).JPG
    149.9 KB · Views: 41
  • DSC02337 (Medium).JPG
    DSC02337 (Medium).JPG
    141.1 KB · Views: 43
  • DSC02338 (Medium).JPG
    DSC02338 (Medium).JPG
    152.2 KB · Views: 43
And that by itself accounted for some lift.

At this point, I am carrying the weight of the truck on both (4) spring packs, which stiffened up the ride some, but this was only the first step in the process.
 

Attachments

  • DSC02334 (Medium).JPG
    DSC02334 (Medium).JPG
    121.6 KB · Views: 21
  • DSC02332 (Medium).JPG
    DSC02332 (Medium).JPG
    155.7 KB · Views: 21
Next, I installed a set of 7,500-lb air bags and a Helwig rear anti-sway bar.

After adding just a little air, the body raised off the upper spring pack and still gave me a stiff but stable ride without a load. At this point, I have not placed the camper into the bed yet; that will be coming right up the following month.
 

Attachments

  • DSC02325 (Medium).JPG
    DSC02325 (Medium).JPG
    171.8 KB · Views: 34
  • DSC02326 (Medium).JPG
    DSC02326 (Medium).JPG
    152.2 KB · Views: 32
  • DSC02330 (Medium).JPG
    DSC02330 (Medium).JPG
    138.3 KB · Views: 35
  • DSC02331 (Medium).JPG
    DSC02331 (Medium).JPG
    139 KB · Views: 34
Next, I pulled off those Nexen tires, which are known to grenade for no particular reason. Having experience crashing cars, trucks, Jeeps, and things that fly, I'm no longer interested in any unplanned high adventure.

Stock size is a 235/80R-17

I opted for the Toyo Open Country RT in size 255/80R-17

Why an RT? As an avid Jeep enthusiast, I prefer aggressive tires. I also use the truck on my "Gentleman's farm," which features a variety of terrain, including dry mud, wet mud, sticky mud, slippery mud, and rocky mud. I figured the RT's would keep me from having to get the tractor to pull me out of a hole somewhere ;-)
 

Attachments

  • DSC02419 (Medium).JPG
    DSC02419 (Medium).JPG
    143.5 KB · Views: 55
  • DSC02422.JPG
    DSC02422.JPG
    458.9 KB · Views: 51
  • DSC02429 (Medium).JPG
    DSC02429 (Medium).JPG
    134.4 KB · Views: 53
  • DSC02432 (Medium).JPG
    DSC02432 (Medium).JPG
    118.7 KB · Views: 57
  • DSC02434 (Medium).JPG
    DSC02434 (Medium).JPG
    209.7 KB · Views: 58
NIce truck!
 
Next up, and within a week, was the Carli suspension. In the past, I have opted for the entire setup for many thousands of wasted dollars. Not wasted in the sense that Carli is not great stuff, but wasted in the sense that, for what I do, and in a dually, most of the stock stuff is fine
 

Attachments

  • DSC02455 (Medium).JPG
    DSC02455 (Medium).JPG
    156.2 KB · Views: 15
  • DSC02456 (Medium).JPG
    DSC02456 (Medium).JPG
    109.5 KB · Views: 15
  • DSC02457 (Medium).JPG
    DSC02457 (Medium).JPG
    131.6 KB · Views: 14
  • DSC02458 (Medium).JPG
    DSC02458 (Medium).JPG
    98.4 KB · Views: 15
I did find, however, that the supplied U-bolts were not as long as I prefer. I had a new set bent up at the local HD truck shop.
 

Attachments

  • DSC02465 (Medium).JPG
    DSC02465 (Medium).JPG
    219.4 KB · Views: 20
  • DSC02466 (Medium).JPG
    DSC02466 (Medium).JPG
    147.8 KB · Views: 20
  • DSC02468 (Medium).JPG
    DSC02468 (Medium).JPG
    155.4 KB · Views: 20
The difference in height before and after suspension. I do not need the truck sitting on a 6" lift, but for my liking, the thing sat too low, and I was concerned about catching a "wait-a-minute" stump on the farm.

From when I had originally installed the airbags, those cheapo supplied fittings were leaking. I replaced them while things were disassembled with much better brass fittings.
 

Attachments

  • DSC02454 (Medium).JPG
    DSC02454 (Medium).JPG
    145.7 KB · Views: 28
  • DSC02475 (Medium).JPG
    DSC02475 (Medium).JPG
    143.8 KB · Views: 28
  • DSC02472 (Medium).JPG
    DSC02472 (Medium).JPG
    144.5 KB · Views: 30
  • DSC02473 (Medium).JPG
    DSC02473 (Medium).JPG
    158.9 KB · Views: 28
  • DSC02474 (Medium).JPG
    DSC02474 (Medium).JPG
    109.3 KB · Views: 29
The truck may have acquired a noticeable "nose low" attitude, but I can adjust that with air bag pressure, and of course, with that camper sitting in there with 120 psi pressure, it all looks quite comfortable. My ride is firm, but that's what I like in an HD truck. If I want a nice ride, I'll hop into the wife's Caddy.
 

Attachments

  • DSC02484 (Medium).JPG
    DSC02484 (Medium).JPG
    205.3 KB · Views: 28
  • DSC02485 (Medium).JPG
    DSC02485 (Medium).JPG
    164.3 KB · Views: 28
  • DSC02480 (Medium).JPG
    DSC02480 (Medium).JPG
    136.1 KB · Views: 28
Next up, a new Carli steering stabilizer got installed. Carli upgrades the axle mount for the gas-charged unit.
 

Attachments

  • DSC02500 (Medium).JPG
    DSC02500 (Medium).JPG
    170.5 KB · Views: 16
  • DSC02502 (Medium).JPG
    DSC02502 (Medium).JPG
    214.4 KB · Views: 16
  • DSC02496 (Medium).JPG
    DSC02496 (Medium).JPG
    142.1 KB · Views: 17
  • DSC02505 (Medium).JPG
    DSC02505 (Medium).JPG
    166 KB · Views: 17
With all that done, I moved on to the task which I DO NOT LIKE...The front suspension.

Teardown was first. Working around all that heavy stuff: The wheels, jacks, springs, and dogs, I pulled the springs.
 

Attachments

  • DSC02440 (Medium).JPG
    DSC02440 (Medium).JPG
    167.5 KB · Views: 28
  • DSC02442 (Medium).JPG
    DSC02442 (Medium).JPG
    169.5 KB · Views: 24
  • DSC02441 (Medium).JPG
    DSC02441 (Medium).JPG
    133 KB · Views: 21
  • DSC02439 (Medium).JPG
    DSC02439 (Medium).JPG
    131.7 KB · Views: 28
  • DSC02438 (Medium).JPG
    DSC02438 (Medium).JPG
    161.1 KB · Views: 28
Taping in the upper rubber isolator made for a slightly easier install
 

Attachments

  • DSC02445 (Medium).JPG
    DSC02445 (Medium).JPG
    151.4 KB · Views: 19
  • DSC02446 (Medium).JPG
    DSC02446 (Medium).JPG
    143.5 KB · Views: 19
Before and after measurements:
 

Attachments

  • DSC02452 (Medium).JPG
    DSC02452 (Medium).JPG
    151.4 KB · Views: 14
  • DSC02450 (Medium).JPG
    DSC02450 (Medium).JPG
    121.3 KB · Views: 14
  • DSC02436 (Medium).JPG
    DSC02436 (Medium).JPG
    94.1 KB · Views: 14
I may not have mentioned it, but I did install the Carli radius arm after torquing the bushing/nut to something like a million ft/lbs!

The alignment came in at factory specs, although I was at the limit of the cam bolts. To go higher will involve lowering the radius arms with more Carli stuff.
 
Talk about ugly, but very functional, I had installed a bumper for a trip out to Wyoming/Montana, where the year before I had almost run over two really big and dumb mule deer. Had I not seen them, I would have very likely totaled my Jeep. As a precaution, I purchased the pictured bumper to provide some protection.
About as soon as I tightened the last bolt, I started to dislike that ugly thing, so it was just a matter of time before I replaced it.
This is the start of that replacement. While the bumper was off there was a perfect opportunity to install the LED Morimoto headlights
 

Attachments

  • DSC02623 (Medium).JPG
    DSC02623 (Medium).JPG
    156 KB · Views: 35
  • DSC02624 (Medium).JPG
    DSC02624 (Medium).JPG
    164.5 KB · Views: 35
  • DSC02626 (Medium).JPG
    DSC02626 (Medium).JPG
    183 KB · Views: 35
Last edited:
The Morimoto units were not blazingly bright, which I hate because of what it does to other drivers. I have to deal with that enough myself; therefore, I won't add to the problem.
The Morimotos have projector lamps that cut off the light scatter to prevent blinding, yet still do a decent job of illuminating the road ahead.
If you've never taken the grill off one of these trucks, you'll be surprised, as I was, by all the fasteners Mopar uses to hold it in there.
 

Attachments

  • DSC02647 (Medium).JPG
    DSC02647 (Medium).JPG
    113.9 KB · Views: 22
  • DSC02651 (Medium).JPG
    DSC02651 (Medium).JPG
    118 KB · Views: 22
  • DSC02652 (Medium).JPG
    DSC02652 (Medium).JPG
    167 KB · Views: 22
The install was straightforward with everything out of the way.
Having driven with these headlights now, for a year plus, I am wanting a bit more illumination. IMHO, the factory LED headlights in my 22 Laramie were both brighter and better. But, hey, these are thousands less than a conversion to factory LEDs
 

Attachments

  • DSC02655 (Medium).JPG
    DSC02655 (Medium).JPG
    109 KB · Views: 16
  • DSC02656 (Medium).JPG
    DSC02656 (Medium).JPG
    139.5 KB · Views: 16
The new bumper from Expedition One arrived bare metal.

I cleaned it with solvent, then sprayed two coats of wet self-etching primer. After drying for a day, I scuffed it and top-coated it with the Bed coating material from Harbor Freight. Yeah, I know, cheap Chinaman junk, you say? My experience is quite the opposite. I have used this stuff on bumpers for many years with great results. I have used many other types, including mixing the two-part Urethanes. This inexpensive HF stuff works just as well and is easily repaired when I use the truck to push over a tree or move a Prius out of the way ;-)
 

Attachments

  • DSC02632 (Medium).JPG
    DSC02632 (Medium).JPG
    142.7 KB · Views: 25
  • DSC02628 (Medium).JPG
    DSC02628 (Medium).JPG
    110.3 KB · Views: 25
  • DSC02629 (Medium).JPG
    DSC02629 (Medium).JPG
    195.1 KB · Views: 25
Back
Top