What's new
Ram Heavy Duty Forum

Register a free account today to become a member! Once signed in, you'll be able to participate on this site by adding your own topics and posts, as well as connect with other members through your own private inbox!

What did you do TO your RAM today?

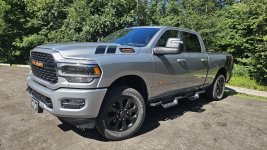
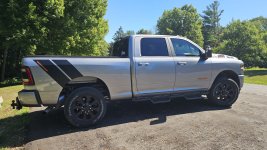
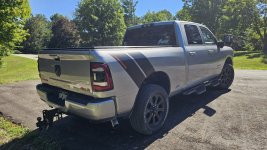
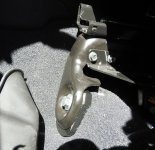
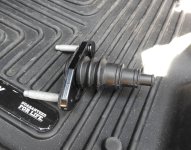
Today's Ram project was small and simple. There is one bolt in the front feeder well that is not black and really stands out. I had spray bedliner leftover from the badlands jack mount project. I removed the bolt. Screwed it back into the fender through a sheet of paper. Made a mini spray booth by cutting each end off a plastic bottle to hold up against the paper. Hit it with the bedliner. Then tore the paper away. Walla!
 

Attachments

  • 20230810_150708.jpg
    20230810_150708.jpg
    356.2 KB · Views: 49
  • 20230810_152752.jpg
    20230810_152752.jpg
    283.5 KB · Views: 49
After picking up my 3500 BigHorn from the dealer in Phoenix, drove just under 400 miles for its first fill up. Drove to Ventura to assist my niece with a vintage Bronco, then headed north towards home. Clocked just over 900 miles, and the mileage and power (HO Cummins) kept improving. Flawless operation of everything.
 

Attachments

  • 20230810_142006.jpg
    20230810_142006.jpg
    364.6 KB · Views: 108
  • 20230811_062102.jpg
    20230811_062102.jpg
    527.8 KB · Views: 108
  • 20230811_074715.jpg
    20230811_074715.jpg
    307.9 KB · Views: 109
After picking up my 3500 BigHorn from the dealer in Phoenix, drove just under 400 miles for its first fill up. Drove to Ventura to assist my niece with a vintage Bronco, then headed north towards home. Clocked just over 900 miles, and the mileage and power (HO Cummins) kept improving. Flawless operation of everything.

That really is the best color.
 
Wrapped up my install of a custom ATTA 66 gal aux/transfer L-tank. But my bonehead design blocked the camera's view of my gooseneck ball . Yay me on trying to line up the gooseneck now by using an dot on my screen on its assumed location. :confused: *cue sad trombone*
Looks real good @Wheelz :cool:
I figure when I put in the large Weather Guard toolbox that I want for when we start full time camping, I'll loose site of my goose ball as well. Planning ahead, I went ahead and picked up a pair of these alignment balls from Amazon:
<Link>
I should always be able to line up the two balls from the CHMSL camera
 
Gave 3D One and Speed products a try and fought for every inch of that shade.

I've probably spent over 8 hours with 2500/3000 Unigrit getting rid of minor clear coat runs along the bottom of the two-tone paint around the truck already.
Just happened to catch it under lights while doing a quick correction last year. The runs were almost invisible and blended well with the short-wave texture of the lower panel paint.

I'm still catching some defects in the clear every once in a while, but I washed this monster only twice in the last year.

IMG_4213.jpg
 

Attachments

  • IMG_4212.jpg
    IMG_4212.jpg
    262.6 KB · Views: 37
This morning's project for the Ram was another simple one. During the first long drive in my new Power Wagon, over 10 hours each way, I felt like I kept sliding forward in the seat. No amount of adjustment could fix it. The new seats are very firm and I was thinking man I hope they wear in over time. I then ran across some posts on here about Desert Does it Seat Jackers. I installed them on my driver seat this morning. I went with the lowest setting so it raised the front mounts by 3/4 inch leveling the seat or giving it a slight reverse rake. I can immediately feel the difference. I feel like I am sitting in a bucket seat like it should be. It is much more comfortable. It will not be for everyone I am sure. My wife is short and likes the passenger seat the way it is so I am not going to say it should have come from the factory that way. But if your having any back issues on long drives or feeling the same sensation of sliding or tilting forward, these seat jackers might fix that. The high setting on it is too much though IMHO. Maybe it would work for a tall person, but the 3/4 setting feels just right. It only took me a few minutes to install them.

The other thing I am going to do today is install the wire pass through I got from NH Overland. I know i could have removed my clutch delete plate, drilled a hole with a hole saw bit, and installed a grommet in it. But the cost was reasonable enough to just buy it pre made IMO and save some time. I have a few things to wire through the firewall, streamlight fast charger, arb compressor, nanny kill switch, and who knows what else. So today it is just to get it ready to wire. It's too hot in Texas to be outside working on the truck too much right now. 107 degrees today.
 

Attachments

  • DSCN3600.JPG
    DSCN3600.JPG
    741.6 KB · Views: 80
  • DSCN3601.JPG
    DSCN3601.JPG
    520.1 KB · Views: 80
Looks real good @Wheelz :cool:
I figure when I put in the large Weather Guard toolbox that I want for when we start full time camping, I'll loose site of my goose ball as well. Planning ahead, I went ahead and picked up a pair of these alignment balls from Amazon:
<Link>
I should always be able to line up the two balls from the CHMSL camera

@ETX Ram Thanks! Good idea on those aligning balls...I'll give it a try...hope they wont droop ;)
 
Finally ordered the Ram mounts kit for my tablet. It's overkill for sure, but initial impressions are really good.
Yes, the floor mat needs trimmed, not what I wanted to do, but fits good with a small notch taken out, and still has all the coverage.

also, yes I need to clean this thing out. Been nothing but mud and rain for a week around here.
20230814_133538.jpg

20230814_133610.jpg

20230814_134222.jpg
 
Dang, my delivery drivers are awesome today!
Just got my ditch light brackets from Baja right after my last post.

Install is super easy on these things. Admittedly, I feel like a chump because this is type of stuff I design and manufacture, but I've been too busy to actually get them drawn up and fabricated. Oh well, anyone on the fence about the brackets, just buy them.

Lights to go on this evening or tomorrow morning sometime. 20230814_153358.jpg
20230814_153349.jpg


Oh, yea had a nice waterfall when opening the hood too....

20230814_151155.jpg
 
Finally ordered the Ram mounts kit for my tablet. It's overkill for sure, but initial impressions are really good.
Yes, the floor mat needs trimmed, not what I wanted to do, but fits good with a small notch taken out, and still has all the coverage.

also, yes I need to clean this thing out. Been nothing but mud and rain for a week around here.
View attachment 61100

View attachment 61101

View attachment 61102
That mount looks solid. I’ve had computer mounts in my work cars for last 18 years and most have been lacking. I wish we would go to a tablet and wireless keyboard.
 
Look forward to seeing lights mounted
Thanks! I am as well. Once those are mounted, all I'm lacking is an ACC+ to my switch board. It came with a fuse tap, but it's the wrong size, and I'm not too keen on those things anyway. Still have a lot of wiring to layout, loom, install, and terminate yet. Trying to get this thing buttoned up enough to make a trip to CO next week. Fingers crossed It'll all be functioning.

That mount looks solid. I’ve had computer mounts in my work cars for last 18 years and most have been lacking. I wish we would go to a tablet and wireless keyboard.

Thanks, this system is actually intended for a laptop mount. and after holding it and installing it, I must say I wouldn't be hesitant to put a full blown 17" workstation laptop on that mount. I knew these things were beefy, but wow. A company I used to work at outfit all of their crew trucks, pm trucks, and sales vehicle with this style mount for the tablets. Something like 30+ vehicles. Yea, the sticker shock was real on that order! o_O

I'm curios to see how stable it is once I get onto some of the FS roads around here as a trial run of things.
 
Back
Top